Documentation index: llms.txt. This page is also available as markdown: append .md to this URL or send Accept: text/markdown.
Migrating SQL to Coalesce with Copilot
Overview
Learn how to migrate existing SQL code into Coalesce using Copilot. Whether you have stored procedures, views, ad-hoc queries, or legacy transformation logic, Copilot can analyze your SQL and generate a DAG of Nodes with transformations, columns, and relationships preserved. This guide walks you through the process from preparation through validation and refinement, with copy-paste examples you can use.
What You Can Migrate
Copilot handles the following sources:
| Source | What to Extract | Notes |
|---|---|---|
| Stored procedures | The full procedure | Paste the whole procedure. Copilot creates a Node for each CTE and the final INSERT. Add any uncaptured setup or cleanup to Pre-SQL or Post-SQL. |
| Views | The SELECT statement from CREATE VIEW x AS | Often the cleanest input; views are usually self-contained. Works best when the view has no external dependencies or when you already have matching source Nodes in your Workspace. |
| Ad-hoc queries | The full query | Paste as-is if it uses standard SQL. |
| CTE-based scripts | The full script | CTEs map well to Stage Nodes; each CTE can become a Node. |
| dbt models | The compiled SQL or model query | Remove Jinja; paste the resulting SQL. |
| Legacy ETL code | Transformation logic from WhereScape, SAP HANA, Informatica, or similar | Extract the SQL portions (SELECT, INSERT, MERGE, and similar statements; ignore control flow and scripting). Platform-specific syntax (date functions, string handling, and so on) may need adjustment for your target data platform. |
Copilot excels at converting SQL with clear structure: CTEs, joins, aggregations, and standard transformations. The more modular your SQL, the cleaner the resulting DAG.
Prerequisites
Before you start, ensure you have:
- Coalesce 7.27+ with Copilot — Enable Copilot in your Workspace.
- Workspace permissions to create and modify Nodes — Copilot creates and edits Nodes on your behalf; you need write access.
- Source Nodes already in your Workspace — Copilot cannot create source Nodes. It matches table names in your SQL to existing sources; add your source tables first.
- Storage Locations configured — Each generated Node needs a target schema. Without Storage Locations, Copilot can't assign where tables or views are deployed.
- A version control checkpoint — Create a checkpoint (commit or save point) before starting. If Copilot produces unexpected results, you can discard changes and revert.
Step 1: Prepare Your SQL
Preparation means getting your SQL into a form Copilot can process efficiently. A few minutes of cleanup before pasting reduces manual fixes later and improves the quality of the generated DAG.
Things you can do:
- Gather your SQL in one place — Copy the full procedure, view definition, or script into a single file or editor. Copilot handles hundreds of lines; very large procedures may need to be split into logical chunks.
- Simplify where possible — Remove or comment out session variables, temporary setup, or environment-specific logic that doesn't belong in the transformation.
- Use clear table references — Avoid aliases like
t.colwhen you can; usetable_name.column_nameinstead. Aliases can break column lineage and require manual re-mapping after migration. - Match table names to your Workspace — Ensure table names in your SQL match the names of your existing source Nodes in Coalesce.
- Resolve templating first — For dbt models, run
dbt compileand paste the compiled SQL instead of Jinja; Copilot needs plain SQL.
The following are examples of preparing SQL for migration.
Migrating a Stored Procedure
You can paste the entire stored procedure into Copilot. Copilot creates a Node for each CTE and for the final INSERT, so a procedure with two CTEs and an INSERT becomes three Nodes.
Example procedure:
CREATE OR REPLACE PROCEDURE refresh_daily_sales()
RETURNS VARCHAR
LANGUAGE SQL
AS
$$
DECLARE
    run_date DATE DEFAULT CURRENT_DATE();
BEGIN
    CREATE OR REPLACE TEMP TABLE temp_run_params AS
    SELECT run_date AS filter_date;

    INSERT INTO target_sales
    WITH filtered_orders AS (
        SELECT * FROM orders WHERE order_date = (SELECT filter_date FROM temp_run_params)
    ),
    aggregated AS (
        SELECT customer_id, SUM(amount) AS total FROM filtered_orders GROUP BY customer_id
    )
    SELECT * FROM aggregated;

    RETURN 'Success';
END;
$$;
Paste this whole procedure into Copilot. Copilot creates a Node for filtered_orders, a Node for aggregated, and a Node for the final INSERT (three Nodes total).
Add Setup and Cleanup (If Needed)
Copilot creates Nodes from the CTEs and INSERT, but some procedure logic may not be captured—for example, temp table creation that runs before the transformation, or logging that runs after. Add that logic using Pre-SQL and Post-SQL:
| Procedure logic Copilot may not capture | Where to add it in Coalesce |
|---|---|
| Temp table creation, session setup | Pre-SQL on the first Node in the pipeline |
| Post-insert logging, cleanup, or audit | Post-SQL on the final Node |
| Dynamic SQL or cursor loops | Pre-SQL, Post-SQL, or a separate Node |
Example: The procedure above creates temp_run_params before the transformation. The first Node (filtered_orders) references it in its WHERE clause. Add Pre-SQL on that Node so the temp table exists when the Node runs:
CREATE OR REPLACE TEMP TABLE temp_run_params AS
SELECT CURRENT_DATE() AS filter_date;
For logging or audit steps (such as the RETURN 'Success'), add them to Post-SQL on the final Node.
Migrating a View
Step 1: Retrieve the View Definition
Get the view's DDL from your data platform:
- Snowflake:
SELECT GET_DDL('VIEW', 'database.schema.view_name'); - BigQuery: Query
INFORMATION_SCHEMA.VIEWSfor theview_definitioncolumn - Databricks:
DESCRIBE EXTENDED catalog.schema.view_name(returns view text), or queryINFORMATION_SCHEMA.VIEWSfor theVIEW_DEFINITIONcolumn (Unity Catalog) - Microsoft Fabric: Use the view metadata in your workspace or script the view definition from the Fabric portal
You'll get something like:
CREATE OR REPLACE VIEW my_schema.customer_summary AS
SELECT
    customer_id,
    customer_name,
    region,
    SUM(order_amount) AS total_spent
FROM customers c
LEFT JOIN orders o ON c.customer_id = o.customer_id
WHERE o.order_date >= '2024-01-01'
GROUP BY customer_id, customer_name, region;
Step 2: Paste the View Into Copilot
Paste the full view definition into Copilot with instructions such as: "Convert this view into a Coalesce View Node. Use my existing source Nodes CUSTOMERS and ORDERS." Copilot creates a View Node with the transformation logic and column mappings. If your source Node names differ from the table names in the view (for example, the view uses customers but your Node is SOURCE.CUSTOMERS), update the SQL to match your Workspace names or specify the mapping in your instructions.
Migrating a dbt Model
Step 1: Get Plain SQL
dbt models use Jinja templating. Copilot needs plain SQL, so compile first:
- Run
dbt compilein your project directory. - Open the compiled SQL in
target/compiled/<project>/models/<model_name>.sql. - Copy the contents. All
{{ ref() }},{{ config() }}, and other Jinja will be resolved.
Example: A dbt model like this:
{{ config(materialized='view') }}
SELECT
    {{ ref('stg_customers') }}.customer_id,
    {{ ref('stg_customers') }}.customer_name,
    SUM({{ ref('fct_orders') }}.amount) AS total_spent
FROM {{ ref('stg_customers') }}
LEFT JOIN {{ ref('fct_orders') }} ON ...
GROUP BY 1, 2;
Becomes plain SQL after compile:
SELECT
    "stg_customers".customer_id,
    "stg_customers".customer_name,
    SUM("fct_orders".amount) AS total_spent
FROM "database"."schema"."stg_customers" "stg_customers"
LEFT JOIN "database"."schema"."fct_orders" "fct_orders" ON ...
GROUP BY 1, 2;
Complex stored procedures sometimes include logic that Copilot doesn't capture, such as custom session variables or Pre-SQL and Post-SQL. Teams migrating large stored procedure estates often add missing logic to Pre-SQL and Post-SQL manually. Validate the generated Nodes against your original procedure behavior.
Step 2: Create a Checkpoint and Open Copilot
Before you start, create a safety net and open Copilot with the right settings.
- Create a version control checkpoint — In the Coalesce App, open the version control modal (Git icon) and create a checkpoint (commit or save point). If Copilot produces unexpected results, you can discard all changes and revert to this point.
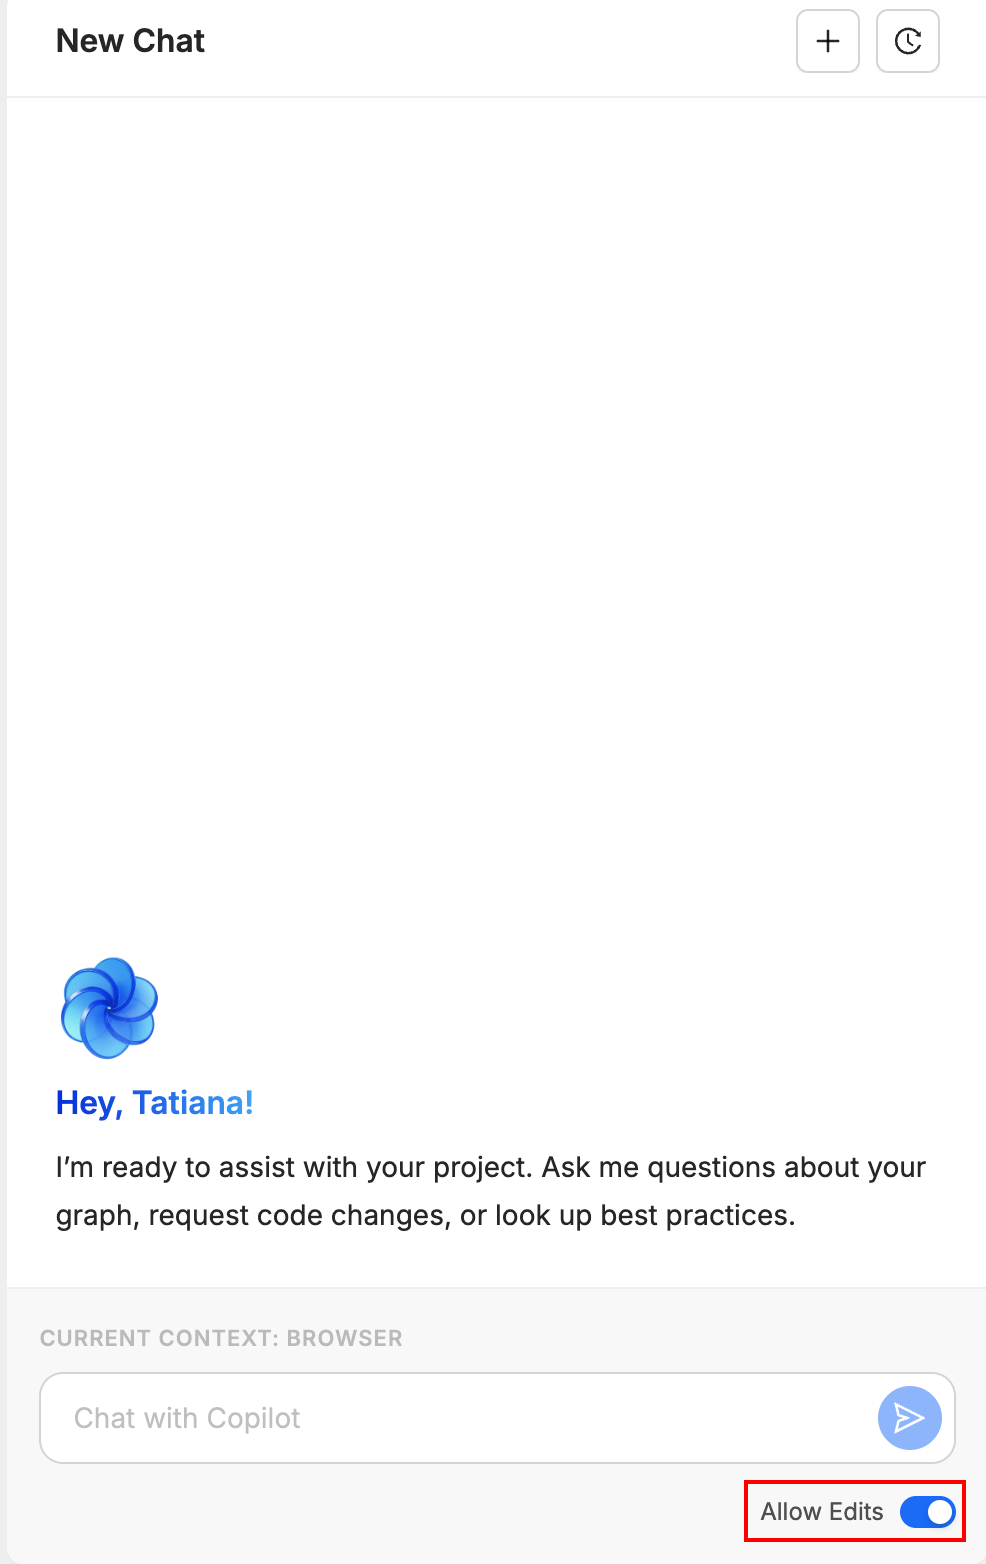
- Open Copilot — Click the AI button
 in the builder toolbar to open the Copilot chat panel.
 - Enable Allow Edits — Ensure Allow Edits (Edit Mode) is turned on in the Copilot panel. If it's off, Copilot can only suggest changes; it won't create or modify Nodes. You must enable it for the migration workflow to work.
Step 3: Paste Your Instructions and SQL
Start a new chat and provide clear instructions before pasting your SQL. The instructions set the context so Copilot knows how to interpret your code.
Example Instructions by Source Type
For a stored procedure (CTE-based):
Reverse engineer this SQL into Coalesce Nodes. Create a Stage Node for each CTE. Use my existing source Nodes INVENTORY_MOVEMENTS and PRODUCTS. Map to my WORK Storage Location.
For a view definition:
Convert this view definition into a Coalesce View Node. Use my existing source Node CUSTOMERS. Name the Node V_CUSTOMER_SUMMARY.
For an ad-hoc query:
Create Nodes from this query. Match CUSTOMERS and ORDERS to my existing sources. Create a Stage Node for the result.
For a dbt-style model:
Import this SQL as Coalesce Nodes. Each CTE should become a separate Stage Node. Use snake_case for Node names.
What to Specify Upfront
Include any of these in your first message:
- Node Type preference: "Create Stage tables" (default; good for intermediate transformations), "Create Views only" (lighter weight; no materialization), or "Make the final Node a Fact table" (for final marts or reporting tables)
- Naming convention: "Prefix all Nodes with STG_" or "Use my org's naming: dd_mm_yyyy format"
- Target Subgraph: "Put all Nodes in the Inventory Subgraph"
- Source mapping: "Use SOURCE.INVENTORY_MOVEMENTS and SOURCE.PRODUCTS as predecessors"
Paste the SQL
After your instructions, paste the SQL. Paste one script at a time; for multiple procedures or views, run separate Copilot sessions. Copilot will analyze it and create the corresponding Nodes. For a ~400-line stored procedure with multiple CTEs, Copilot typically generates a chain of Stage Nodes, each representing a logical step in your pipeline. Processing may take a minute or two for large inputs.
Copilot shows progress as it works. You'll see Nodes appear in your Workspace and the graph update in real time.
Step 4: Review the Generated Pipeline
After Copilot finishes, validate the results before deploying. Work through each check systematically.
Check the Graph and Lineage
In the builder, the graph shows your pipeline as a DAG. If it doesn't update automatically after Copilot runs, reload it. Perform these checks:
- Reload the graph or lineage view if it doesn't update automatically.
- Verify your source Nodes connect to the new Nodes. There should be no orphaned Nodes (Nodes with no incoming or outgoing connections that don't belong).
- Trace the flow: each CTE or logical step in your SQL should map to a Node. The final Node should represent your final SELECT.
Inspect Columns and Transforms
Open each generated Node and review the columns. In the Node panel, switch to the column view (Columns dropdown). Perform these checks:
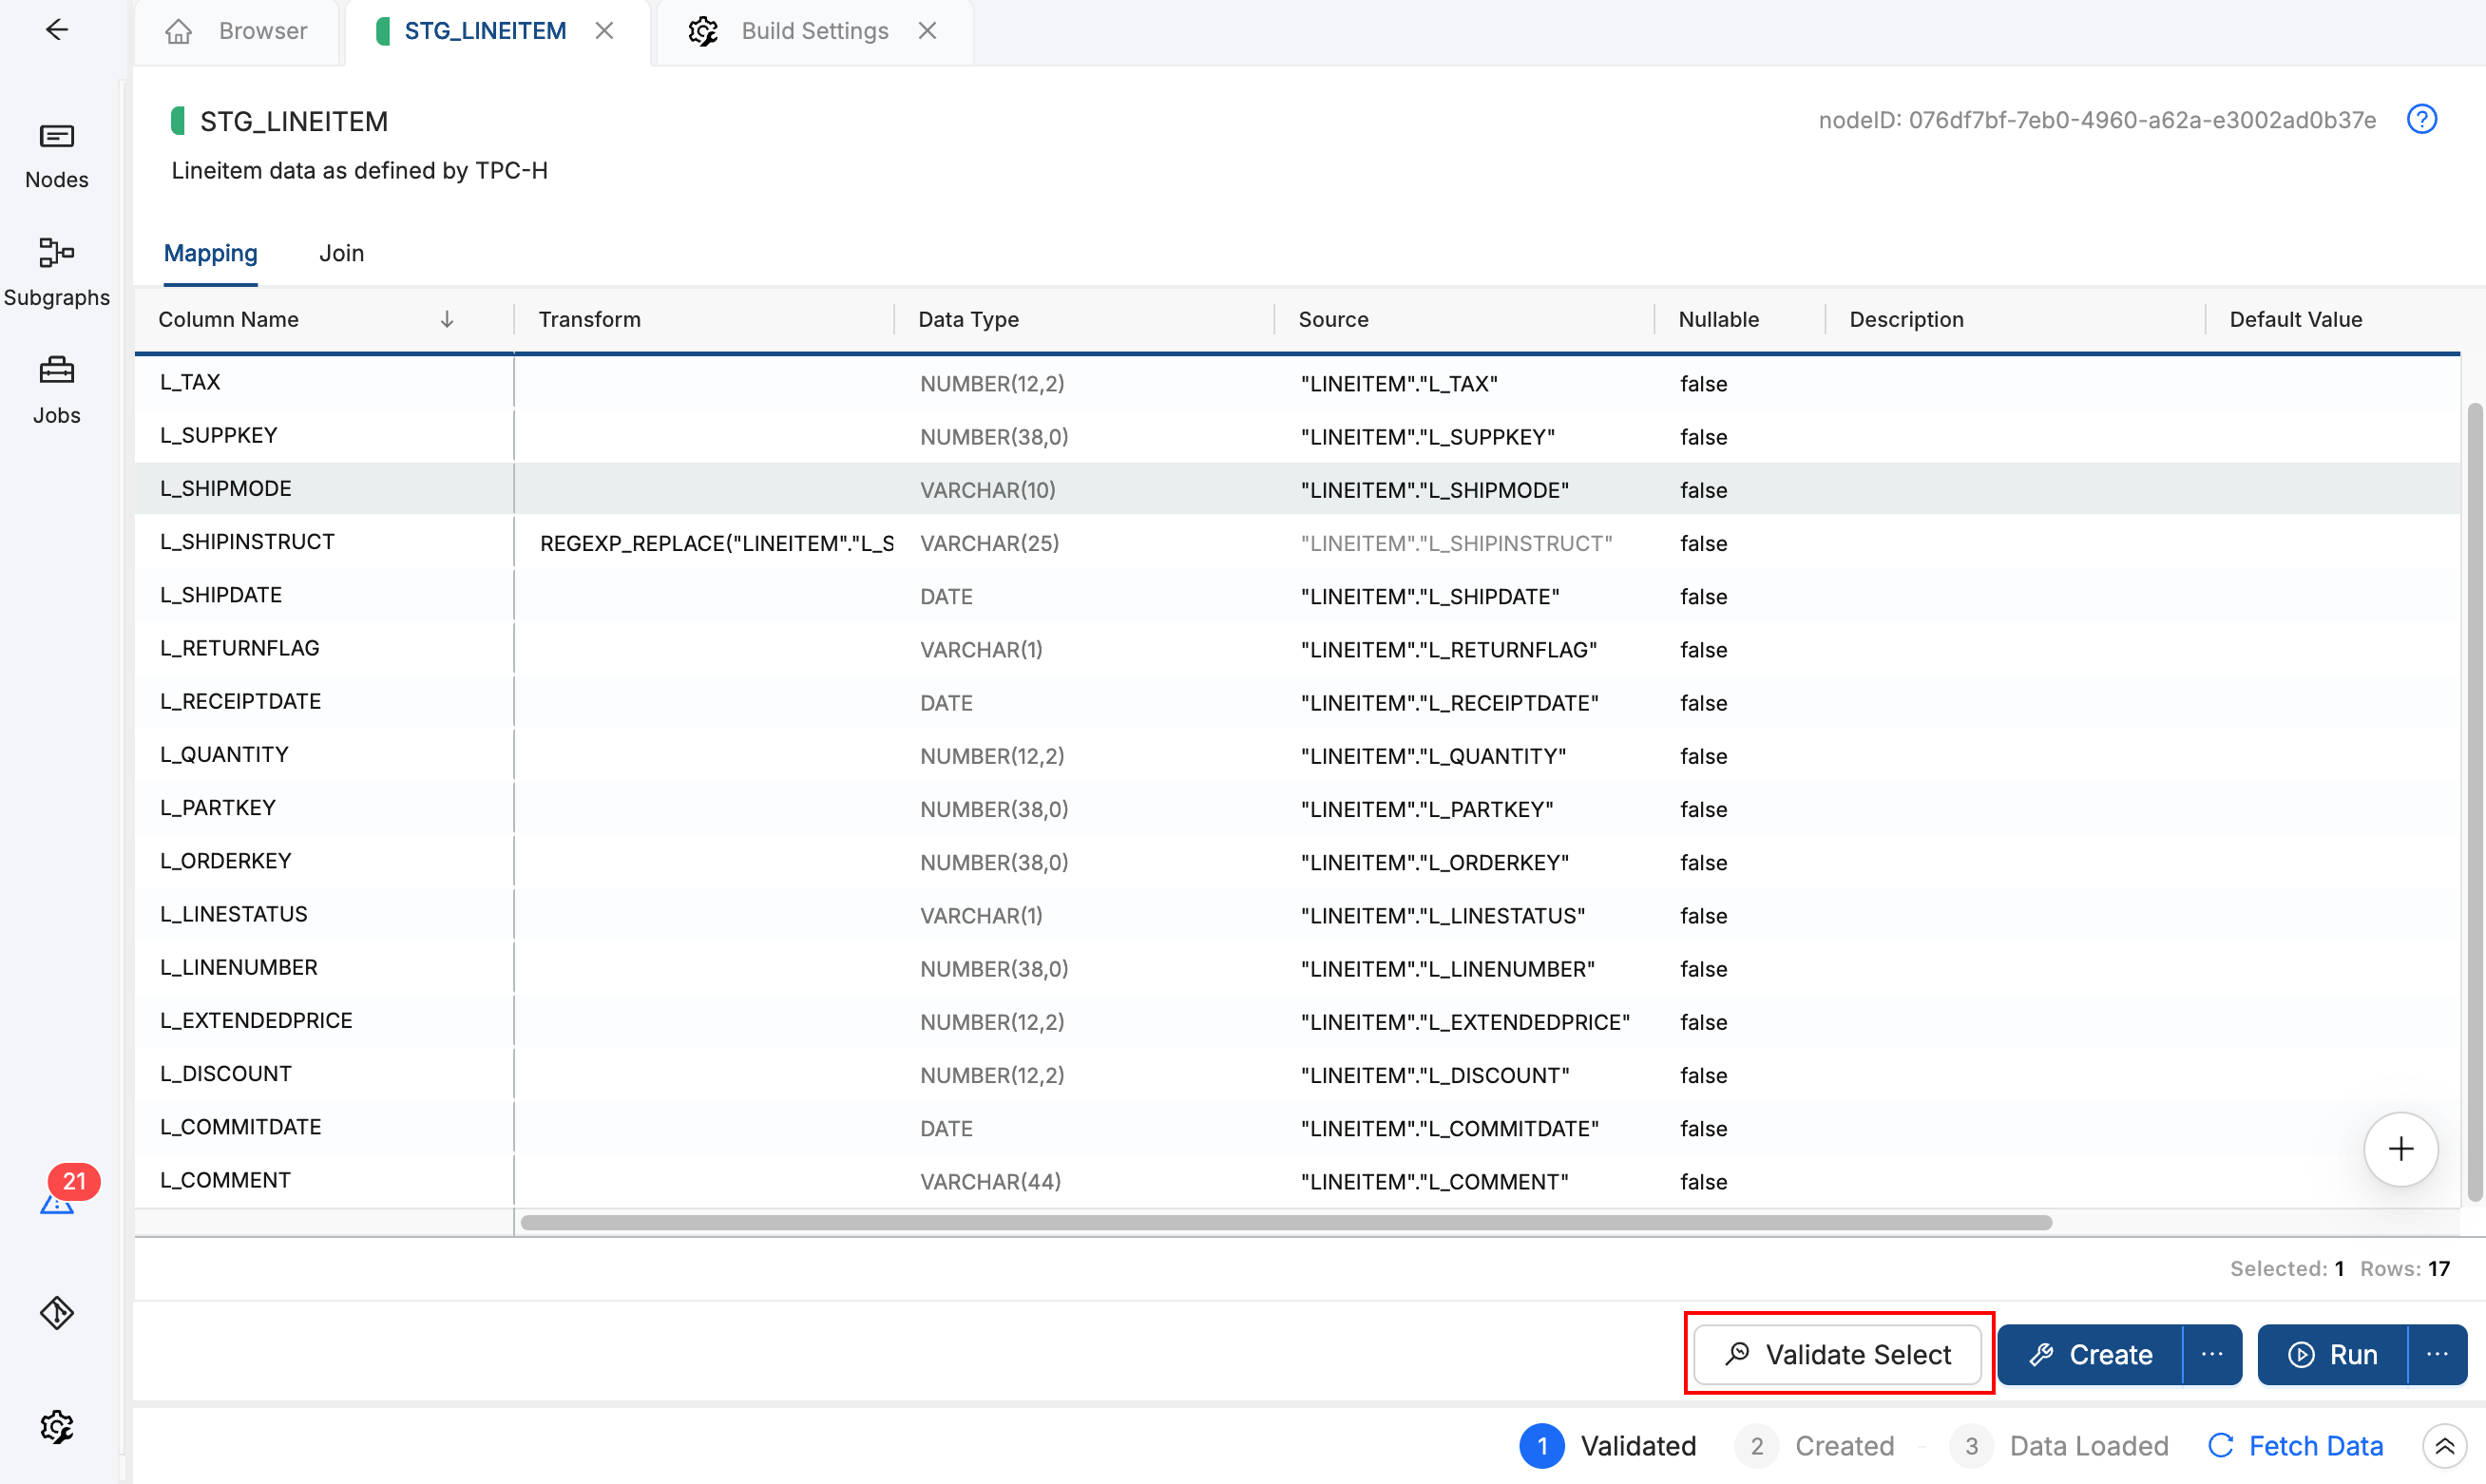
-
Look for the transforms in the Transform column. Those show where Copilot placed transformation logic from your SQL.
-
Compare column names and data types to your original SQL. Ensure business logic is preserved.
-
Check that joins and aggregations are correct. Open the Join tab and Config tab as needed.
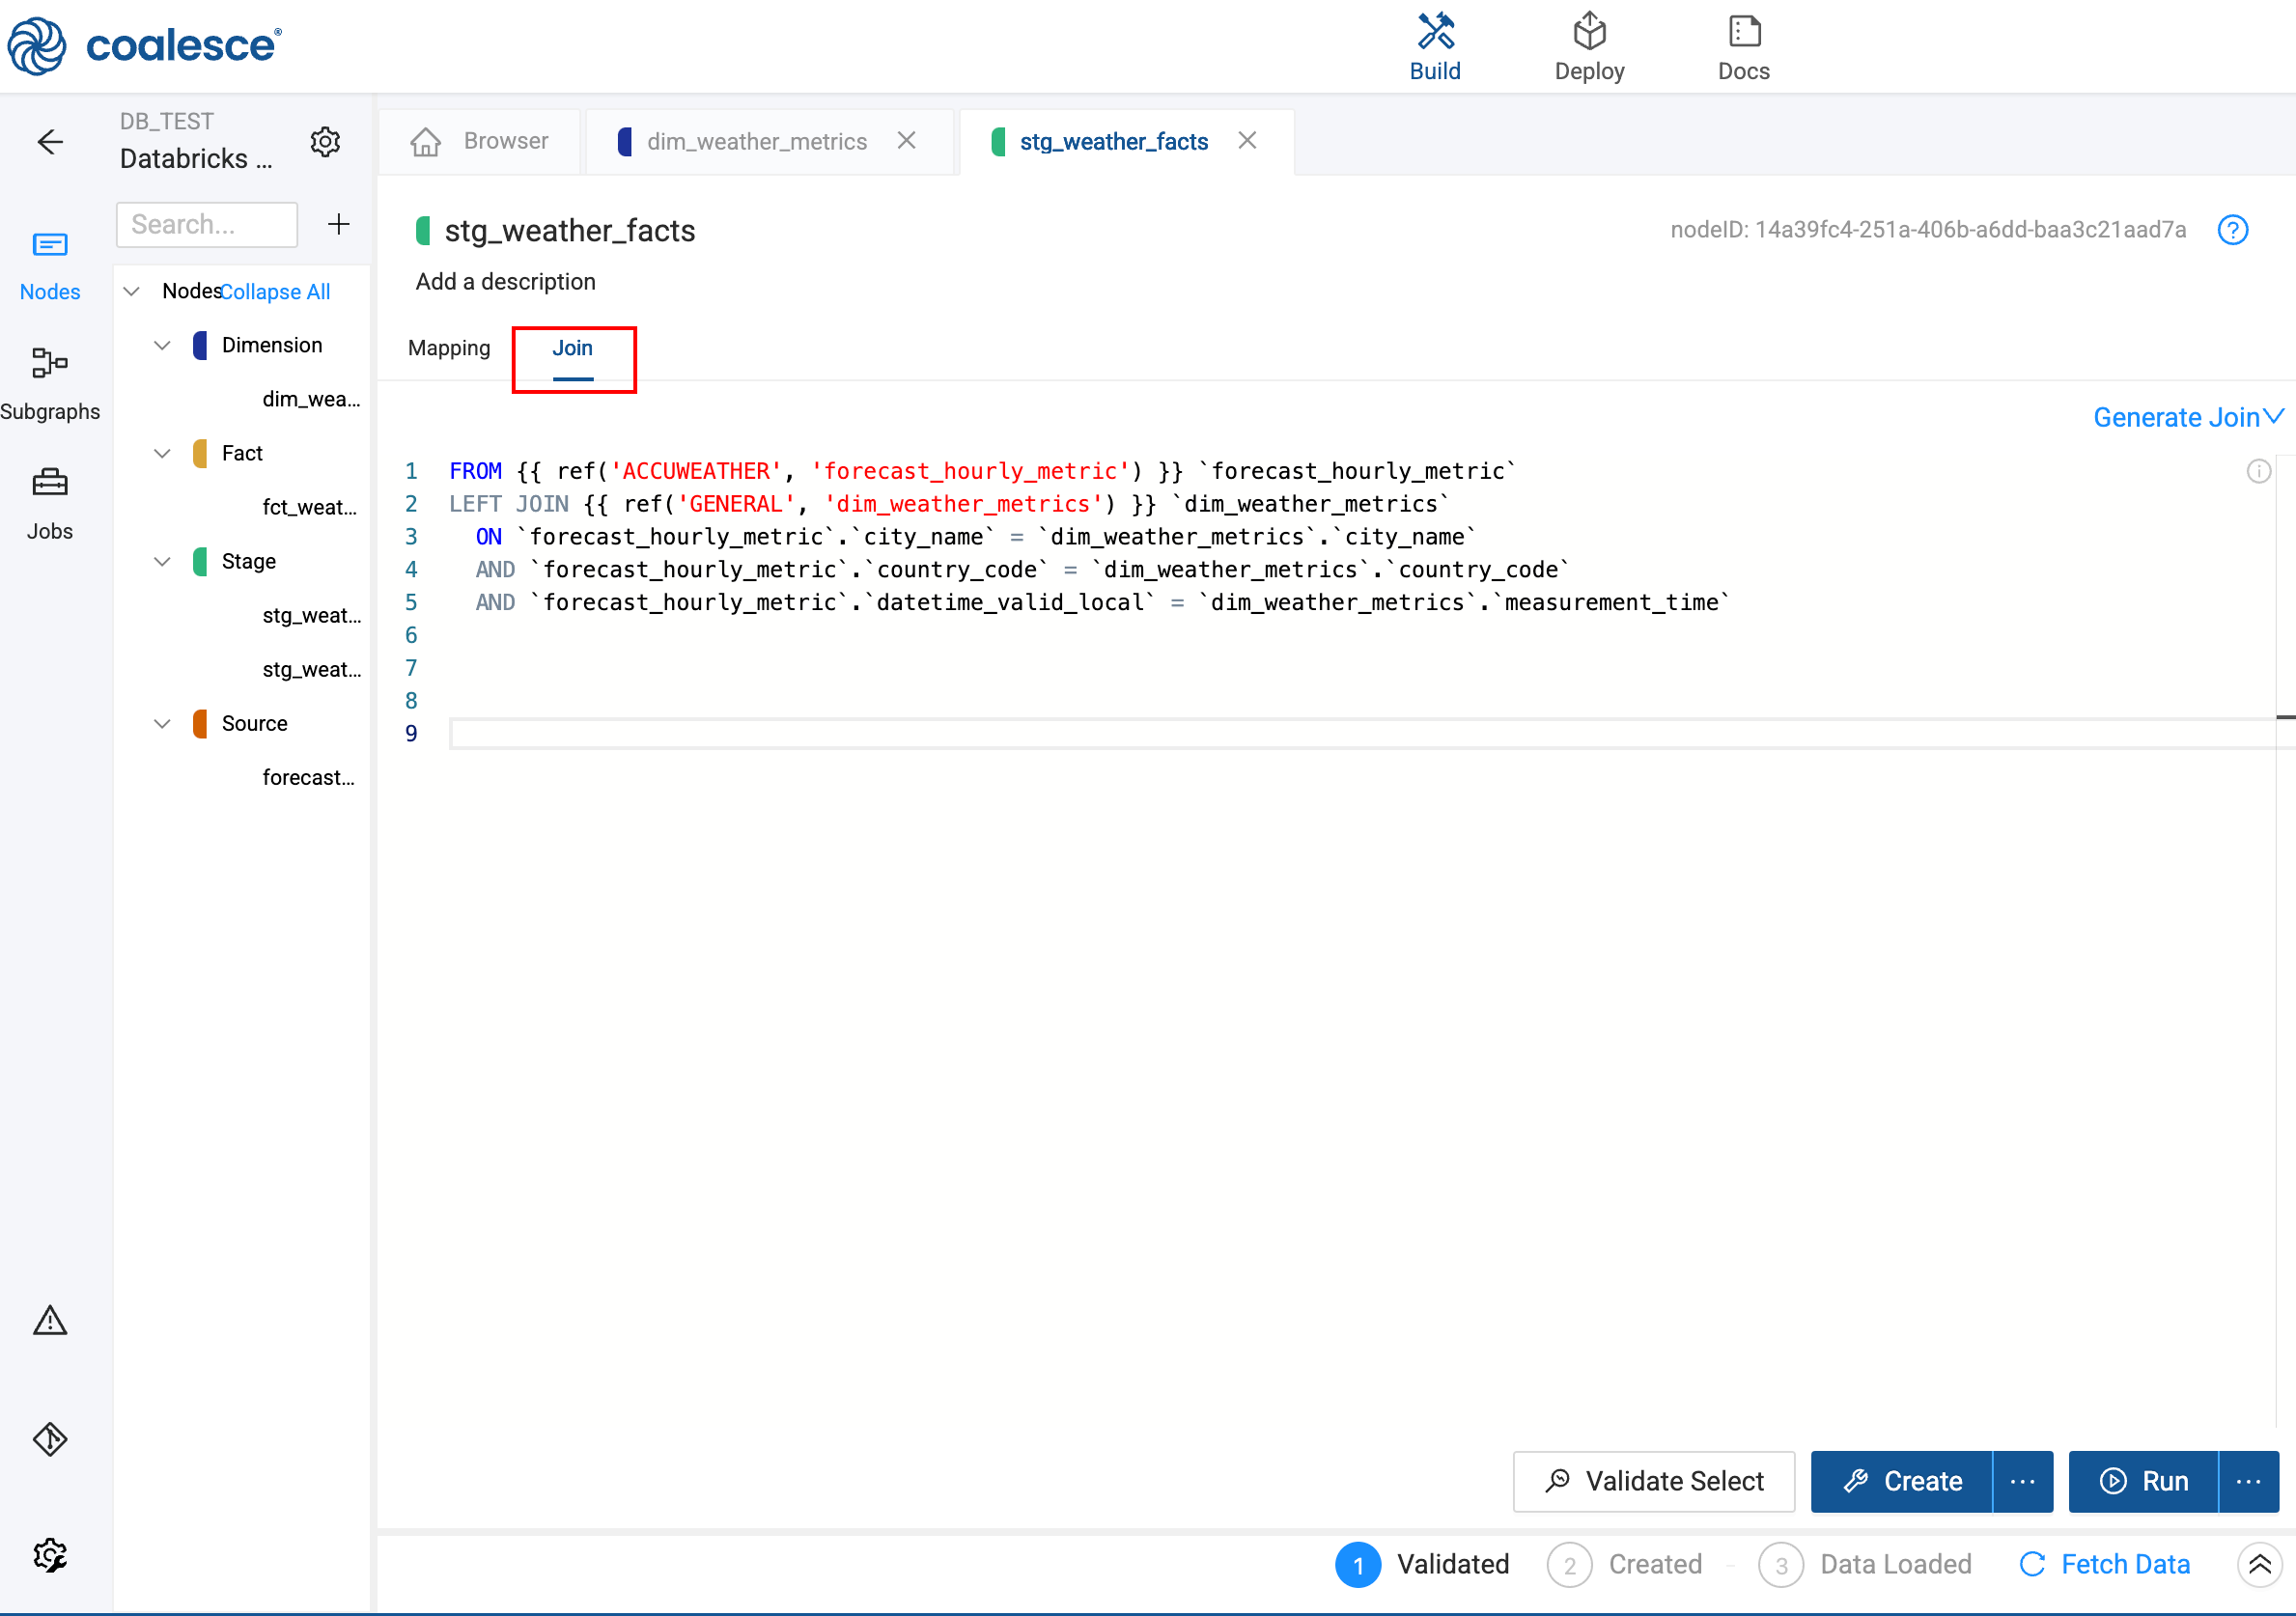
Check the Join tab 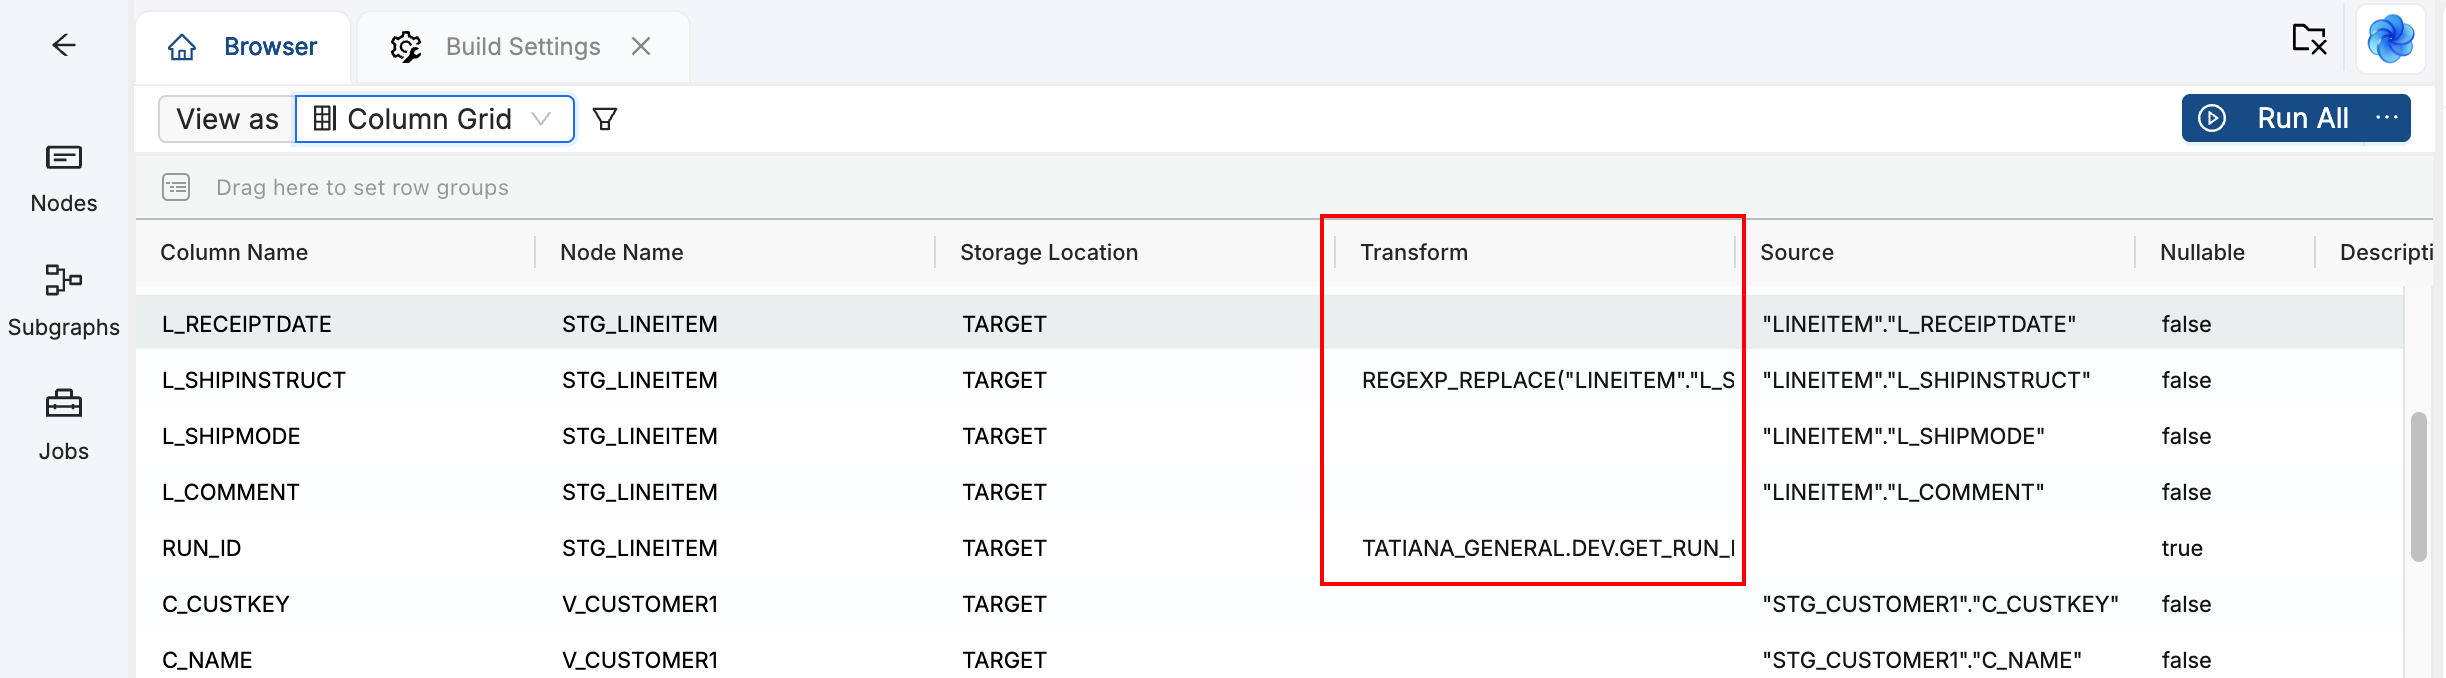
Review the transforms
Verify Column Lineage
If you used table aliases in your SQL (for example, im.product_id instead of INVENTORY_MOVEMENTS.product_id), Copilot may have placed the expression in the Transform field instead of mapping directly to the Source column. That breaks column lineage.
To fix: In the Coalesce UI, open the Node, find the affected columns, remove the transform, and map the column to the correct source column.
Confirm Node Types and Storage
- Node Types: By default, Copilot often creates Stage Nodes. Ensure they match your intent: Stage (intermediate tables), View (virtual, no materialization), Persistent Stage (materialized staging), Dimension (slowly changing dimensions), or Fact (fact tables for analytics).
- Storage Locations: Verify each Node points to the correct Storage Location in the Node Config. Staging tables typically go to a WORK or STAGE schema; final tables may go to a different schema. Change the Storage Location in the Node Config if needed.
Run a Quick Validation
Before deploying, run these validation steps:
- Click Validate Select on a Node to ensure the SQL compiles.
- Run the Node (Build or Refresh) in a development environment to confirm the output matches expectations.
- Compare row counts or sample data to your original query if possible.
Examine all generated SQL, Node configurations, and transformations before deploying to production. Test changes in a development environment first. See Copilot Best Practices and Limitations for a full validation checklist.
Step 5: Refine and Enhance
Once the base pipeline is in place, you can use Copilot for follow-up changes. Ask in the Copilot chat; Copilot applies changes across the pipeline.
Convert Node Types. Ask Copilot to change Stage tables to Views, or to convert the final Node into a Fact table.
Standardize transformations. If you have inconsistent null handling (COALESCE, NVL, and so on) across columns, ask Copilot to apply a consistent pattern. For example: "For all VARCHAR columns, apply NVL for null handling and make it consistent."
Rename columns. Improve clarity for people who consume your data downstream: "Rename any column containing 'sales AMT' to 'sales_amount'." Copilot propagates renames through downstream Nodes.
Insert Nodes in the middle. To add a Persistent Stage between two existing Nodes, create the new Node, then ask Copilot to update the reference. For example: "Modify inventory_status so it references pstage_movements_filtered instead of movements_filtered." Copilot updates references and lineage.
Adjust data types. In the Copilot chat, request conversions such as VARCHAR to STRING, or add validation to incoming columns. Verify changes in the Node panel afterward.
Discard and retry. If the result isn't what you want, open the version control modal and discard all changes. Create a new checkpoint, then start a new Copilot conversation with revised instructions.
Use Copilot for bulk changes and structural updates, then switch to the Coalesce UI for fine-tuning individual column mappings and advanced Node configuration.
Example: Stored Procedure (Inventory Pipeline)
This example walks through migrating a CTE-based inventory pipeline. You'll paste instructions and SQL into Copilot, then validate the generated Nodes. Use it as a template for your own stored procedures.
Before You Start
- Checkpoint and Copilot — Complete Step 2: Create a Checkpoint and Open Copilot first. Create a version control checkpoint, open Copilot, and ensure Allow Edits is on.
- Source Nodes — Create or add source Nodes for
INVENTORY_MOVEMENTSandPRODUCTSin your Workspace. Copilot cannot create source Nodes; it matches table names in your SQL to existing sources. - Table name alignment — If your source Node names differ (for example,
SOURCE.INVENTORY_MOVEMENTSvsINVENTORY_MOVEMENTS), update the SQL to match your Workspace or specify the mapping in your instructions. - Storage Location — Ensure your Workspace has a Storage Location configured (for example, WORK or STAGE) so Copilot can assign where tables are deployed.
Step 1: Paste Instructions and SQL
Copy the following instructions into a new Copilot chat, then paste the SQL below it:
Reverse engineer this SQL into Coalesce Nodes. Create a Stage Node for each CTE. Use my existing source Nodes INVENTORY_MOVEMENTS and PRODUCTS. Map to my WORK Storage Location.
-- Step 1: Filter to recent movements and join with product details
WITH movements_filtered AS (
    SELECT
        im.movement_id,
        im.product_id,
        im.warehouse_id,
        im.quantity,
        im.movement_date,
        im.movement_type,
        p.product_name,
        p.category
    FROM INVENTORY_MOVEMENTS im
    JOIN PRODUCTS p ON im.product_id = p.product_id
    WHERE im.movement_date >= DATEADD(day, -90, CURRENT_DATE())
),

-- Step 2: Aggregate movements by product and warehouse
movements_by_product AS (
    SELECT
        product_id,
        warehouse_id,
        product_name,
        category,
        SUM(CASE WHEN movement_type = 'IN' THEN quantity ELSE -quantity END) AS net_quantity,
        COUNT(*) AS movement_count
    FROM movements_filtered
    GROUP BY product_id, warehouse_id, product_name, category
),

-- Step 3: Calculate inventory status and flag low stock
inventory_status AS (
    SELECT
        product_id,
        warehouse_id,
        product_name,
        category,
        net_quantity,
        movement_count,
        CASE
            WHEN net_quantity <= 0 THEN 'OUT_OF_STOCK'
            WHEN net_quantity < 10 THEN 'LOW_STOCK'
            ELSE 'IN_STOCK'
        END AS stock_status
    FROM movements_by_product
)

SELECT * FROM inventory_status
ORDER BY stock_status, net_quantity ASC;
Step 2: Review the Generated Pipeline
After Copilot finishes, you should see three Stage Nodes (one per CTE) plus a final Node for the ordered result. Each Node connects to the previous one in the pipeline. Work through the checks in Step 4: Review the Generated Pipeline:
- Verify source Nodes connect to the new Nodes and the graph shows a clear flow.
- Open each Node and check the Transform column for correct column mappings; fix any alias-related transforms if needed.
- Click Validate Select on the final Node to ensure the SQL compiles.
- Run the Node in a development environment and compare output to your original procedure if possible.
From there, you can convert the final Node to a View or Fact table, or add more transformations using Copilot or the UI.
Example: Ad-Hoc Query (Customer Spending)
This example shows how to migrate a standalone query with a join and aggregation. It's simpler than a stored procedure: one query becomes one (or a few) Nodes.
What You Need
- Checkpoint and Copilot — Complete Step 2: Create a Checkpoint and Open Copilot first. Create a version control checkpoint, open Copilot, and ensure Allow Edits is on.
- Source Nodes — Create or add source Nodes for
CUSTOMERSandORDERS. Copilot cannot create source Nodes; it matches table names in your SQL to existing sources. - Table name alignment — Ensure table names in your SQL match your Workspace (for example,
CUSTOMERSandORDERS). If your sources use different names, adjust the SQL or specify the mapping in your instructions.
Paste the Query
Copy the following instructions into a new Copilot chat, then paste the SQL below it:
Create Nodes from this query. Match CUSTOMERS and ORDERS to my existing sources. Create a Stage Node for the result.
SELECT
    c.customer_id,
    c.customer_name,
    c.region,
    SUM(o.order_amount) AS total_spent,
    COUNT(o.order_id) AS order_count
FROM CUSTOMERS c
LEFT JOIN ORDERS o ON c.customer_id = o.customer_id
WHERE o.order_date >= '2024-01-01'
GROUP BY c.customer_id, c.customer_name, c.region
ORDER BY total_spent DESC;
Review the Generated Pipeline
Copilot matches CUSTOMERS and ORDERS to your existing source Nodes and builds a transformation Node with the join and aggregation. You should see a single Stage Node (or a small chain) representing the query result. Work through the checks in Step 4: Review the Generated Pipeline:
- Verify the source Nodes connect to the new Node and the graph shows the correct lineage.
- Open the Node and check the Transform column; if you used aliases (
c.customer_id,o.order_amount), Copilot may have placed expressions in the Transform field instead of mapping to source columns. Fix any broken lineage by re-mapping to the correct source column. - Click Validate Select to ensure the SQL compiles.
- Run the Node and compare row counts or sample data to your original query.
Common Pitfalls and Troubleshooting
The following table lists common issues and how to resolve them:
| Issue | Resolution |
|---|---|
| Table aliases break column lineage or lineage looks wrong | After import, open the Node and use the column grid view to see all columns. Check for alias-related transforms; for each affected column, remove the transform (clear the Transform field) and re-map the column to the correct source column. You can fix multiple columns in bulk when using the column grid. |
| Stored procedure session logic missing | Add custom session variables or setup to Pre-SQL and Post-SQL manually on the appropriate Node. |
| Copilot doesn't capture everything in complex stored procedures | Migrate in smaller chunks (split the procedure into logical sections), or plan to supplement with manual edits after migration. |
| Very large Nodes hit token limits | Break the migration into smaller SQL segments. Alternatively, migrate incrementally and propagate only new columns to downstream Nodes instead of re-reading entire Nodes. |
| Data type changes don't apply | Copilot may report a change but not apply it; verify in the Node panel and fix manually if needed. |
| Copilot stops responding | Wait 1–2 minutes, then start a new conversation. A fresh context often helps. If it persists, check your connection or try again later. |
| Results don't match expectations | Rephrase your instructions with more specificity. Include Node Type preferences ("Create Stage tables" or "Create Views only"), naming conventions ("Prefix all Nodes with STG_"), and target Subgraph ("Put all Nodes in the Inventory Subgraph"). |
| Need to start over | Open the version control modal (Git icon), discard all changes, and create a new checkpoint before trying again. |
What's Next?
- Coalesce Copilot for core capabilities and workflow
- Copilot Best Practices and Limitations for validation and safety
- AI Policy for Coalesce's AI usage guidelines