Schedule Coalesce Jobs with Apache Airflow
Coalesce's code-first GUI-driven approach has makes it easier to build, test, and deploy data pipelines than ever before. This considerably improves the data pipeline development workflow when compared to creating directed acyclic graphs (or DAGs) purely with code.
Coalesce relies on third-party services and orchestrators to schedule and execute the Coalesce-built data pipelines, which are organized into Jobs for execution.
Apache Airflow is a common orchestrator used with Coalesce.
Airflow stands out as a widely embraced open-source platform dedicated to crafting, scheduling, overseeing, and archiving workflows. Rooted in Python and backed by a thriving community, it has evolved into an essential tool in the repertoire of data engineers, proficiently handling the orchestration, scheduling, and construction of pipelines.
With respect to orchestrating Coalesce Jobs, Airflow can be used to schedule and execute these Jobs directly, or within the constructs of a larger organizational data pipeline or stack via Airflow DAGs.
This article details the steps for configuring nodes in an Airflow DAG to utilize the Coalesce API to trigger Coalesce Jobs on a schedule.
Before You Begin
The steps detailed in this article assume the following is already in place:
- You have a basic Airflow web server and scheduler already running.
- You have created the Coalesce Jobs for your data pipelines.
- You have deployed your Coalesce Jobs to your Coalesce Environments you wish to refresh.
- You have generated your Coalesce Access Token as is required to use the Coalesce Command-Line Interface (CLI) or API.
- You have the credentials readily available for a supported Authentication to Snowflake method for the Coalesce API.
Configure Airflow to Execute Coalesce Jobs on a Schedule
The steps below will detail how to configure Airflow to execute Coalesce Jobs on a Schedule.
Configure Airflow Variables to Support Authentication to Snowflake
In Airflow, you will need to create variables to store your the Snowflake credentials for your selected Snowflake authentication method.
In this article, we will be leveraging the KeyPair Authentication method to avoid exposing actual username/password credentials in the DAG, and the instructions and screen captures will reflect that authentication method. You will need to modify to support your selected authentication method if it is not KeyPair Authentication.
-
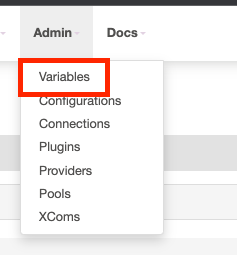
Within Airflow, go to the Admin tab, and click Variables.
-
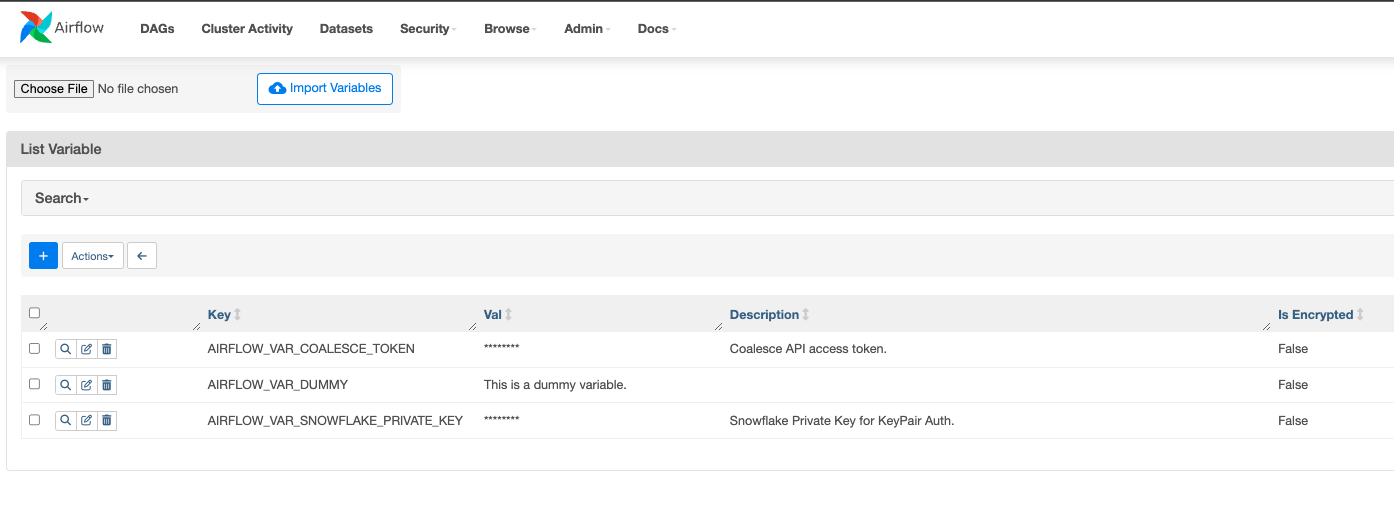
Create two variables:
AIRFLOW_VAR_COALESCE_TOKEN: To hold your Coalesce Access Token.AIRFLOW_VAR_SNOWFLAKE_PRIVATE_KEY: To hold the private key you generated for Snowflake.
Create and Configure Your Airflow DAG to Run a Coalesce Job
In the place where your DAGs are stored within Airflow:
-
Create a new DAG.
-
Paste in the following code:
from datetime import datetime, timedelta
from airflow import DAG
from airflow.operators.bash_operator import BashOperator
from airflow.models import Variable
default_args = {
'owner': 'airflow',
'start_date': datetime(2023, 01, 01),
'retries': 1,
'retry_delay': timedelta(minutes=2),
}
dag = DAG(
'example_coalesce_trigger_w_status_check_parametrized_token',
default_args=default_args,
description='An example Airflow DAG',
schedule_interval=timedelta(days=1),
)
print_hello_command = 'echo "Hello, World"'
execute_api_call_command = """
response=$(curl --location 'https://app.coalescesoftware.io/scheduler/startRun' \
--header 'accept: application/json' \
--header 'content-type: application/json' \
--header 'Authorization: Bearer {{ params.coalesce_token }}' \
--data-raw '{
"runDetails": {
"parallelism": 16,
"environmentID": "3",
"jobID": "3"
},
"userCredentials": {
"snowflakeAuthType": "KeyPair",
"snowflakeKeyPairKey": "{{ params.sf_private_key }}"
}
}')
# Extract runCounter from the JSON response using Python and remove the prefix.
runCounter=$(echo "$response" | python -c "import sys, json; print(json.load(sys.stdin)['runCounter'])" | sed 's/Run Counter: //')
echo "$runCounter"
"""
check_status_command = """
curl --request GET \
--url 'https://app.coalescesoftware.io/scheduler/runStatus?runCounter={{ task_instance.xcom_pull(task_ids="execute_api_call") }}' \
--header 'Authorization: Bearer {{ params.coalesce_token }}' \
--header 'accept: application/json'
"""
# Define tasks
task_print_hello = BashOperator(
task_id='print_hello',
bash_command=print_hello_command,
dag=dag,
)
task_execute_api_call = BashOperator(
task_id='execute_api_call',
params={'coalesce_token': Variable.get('AIRFLOW_VAR_COALESCE_TOKEN'),
'sf_private_key': str(Variable.get('AIRFLOW_VAR_SNOWFLAKE_PRIVATE_KEY'))},
bash_command=execute_api_call_command,
dag=dag,
)
task_check_status = BashOperator(
task_id='check_status',
params={'coalesce_token': Variable.get('AIRFLOW_VAR_COALESCE_TOKEN')},
bash_command=check_status_command,
dag=dag,
)
# Set task dependencies
task_print_hello >> task_execute_api_call >> task_check_statusCheck Your Environment and Job IDsEnsure that you replace the values for
environmentIdandjobIdin the code with the relevant ID’s of the Environment and Job in your organization in Coalesce. If you don’t want to specify a job, and instead, run the entire Coalesce pipeline, simply remove thejobIdas an argument in the payload of the node in the DAG.The
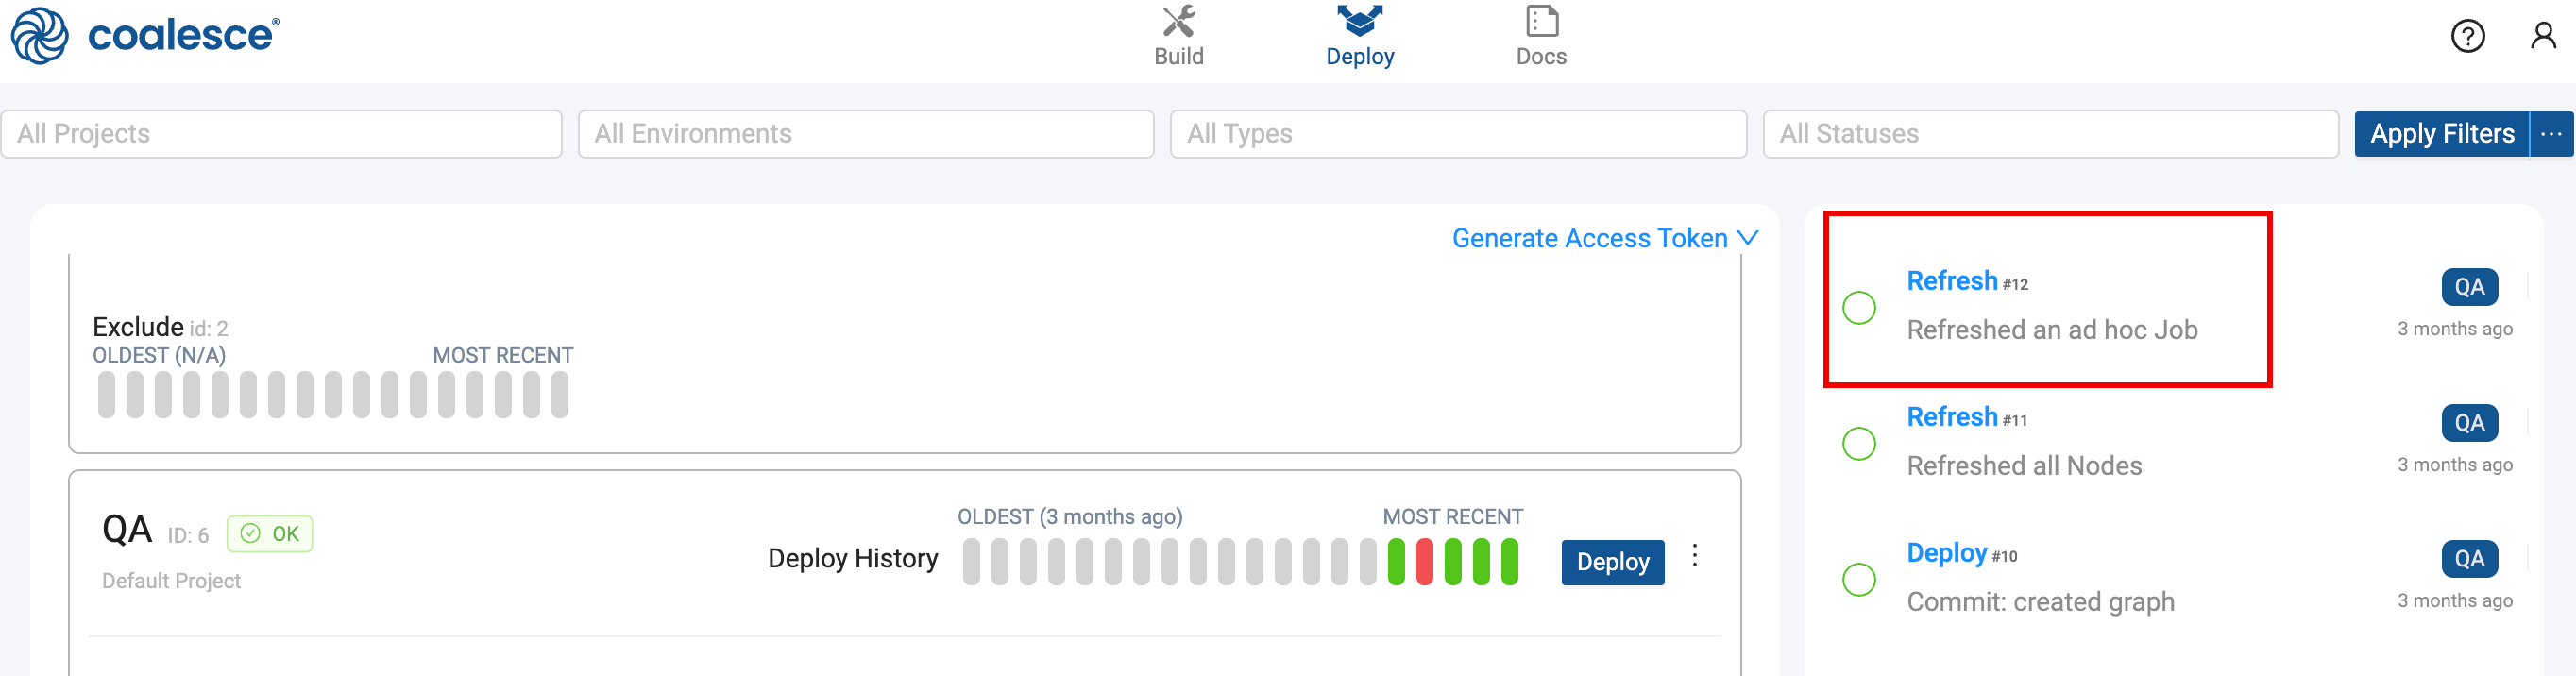
environmentIdcan be found in the Deploy Interface of the Coalesce App. The jobID can be found in a Workspace that contains your Job. Take a look at What's My ID? to see all the places your ID can be found. -
Edit the values for attributes like
start_date,retries,retry_delay,schedule_interval, etc. to reflect your requirements. -
Change the name of the DAG to reflect its purpose.
Once configured and the DAG is triggered, manually or on the schedule, you will see the corresponding Job executions and their details in the Activity Feed in the Coalesce App. You are also able to retrieve run results and details via the API.
Running Multiple Coalesce Jobs Using Airflow
You can run or schedule multiple Coalesce Jobs using the Airflow Scheduler for which there are multiple ways of doing so.
-
You can create additional nodes within the same Airflow DAG, each of which calls a different job executing sequentially. You can indicate the order by modifying the task dependencies at the bottom of the DAG code:
refresh_job_1 >> refresh_job_2 >> refresh_job_3 >> ...where each
refresh_job_Xis the name of a task that executes the API call to trigger a refresh of an environment or job. -
You can create multiple Airflow DAG's that you can schedule independently. Copy the example code into a new DAG within your /dags folder in Airflow, edit the
executeapi_call_command_ function with the desiredenvironmentIDandjobIDparameters, modify the schedule, and give the DAG a new name.dag = DAG(
'example_coalesce_trigger_w_status_check_parametrized_token',
default_args=default_args,
description='An example Airflow DAG',
schedule_interval=timedelta(days=1),
)
It is best practice to save the DAG .py file with the same name as that given to the DAG within the file.
Video How to use Airflow to Schedule Coalesce Jobs
Watch a demo on using Airflow for Coalesce Jobs.