Orchestrate Deploys with Bitbucket
Bitbucket is a version control tool offered by Atlassian that mimics the functionality of tools like GitHub and GitLab. Coalesce supports using Bitbucket repositories for project version control as well as CI/CD pipelines for automated deployment. In this article, we will go over how to set up a sample Bitbucket pipeline with Coalesce deployments.
Before You Begin
- A Bitbucket repository linked to a Coalesce Project.
- At least one Coalesce Environment linked to the Coalesce Project to deploy into.
- A user with necessary permissions in both Bitbucket, Coalesce, and Snowflake to execute pipelines, deploy into the selected environment, and run SQL commands in the mappings configured to the Coalesce Environment in Snowflake.
- Bitbucket - Need to have repository admin privileges with the ability to create access tokens.
- Snowflake - A user with the following privileges.
USAGEprivilege on the database and schema.SELECT,INSERT,UPDATE, andDELETEprivileges on the tables involved in the mappings.EXECUTEprivilege for any procedures or functions referenced by Coalesce mappings.
- Username/Password based authentication into Snowflake for the Snowflake user/service account that the Bitbucket pipeline is executed under.
- Coalesce - A user with the ability to manage pipelines. Such as Organization Administrator, Project Administrator, or Environment Administrator.
Configure Your CLI
To deploy using Bitbucket pipelines, you'll use a virtualized instance of the Coalesce CLI. To use the CLI, we need to configure a file with the credentials required to authenticate the CLI for deployments into our Coalesce environments.
-
Follow the instructions in CLI Setup. Go through:
- Installation
- Generate Your Token
-
You'll need to create your configuration file. Create a new text file and save it securely on your computer, for example,
coa_config.txt. You'll need to use it later. See the following as an example. You can create a profile for each deployment.Bitbucket COA File AuthenticationOnly username/password authentication is accepted.
[default]
token=yourtoken
domain=your deployment server. For example, https://app.eu.coalescesoftware.io
snowflakeAuthType=Basic
snowflakePassword=password
snowflakeRole=SYSADMIN (or other role)
snowflakeUsername=username
snowflakeWarehouse=COMPUTE_WH
environmentID=one of your non-dev environments

[testing]
token=yourtoken
domain=your deployment server. For example, https://app.eu.coalescesoftware.io
snowflakeAuthType=Basic
snowflakePassword=password
snowflakeRole=SYSADMIN (or other role)
snowflakeUsername=username
snowflakeWarehouse=COMPUTE_WH
environmentID=one of your non-dev environments
Configure Bitbucket
Bitbucket does not allow for direct file uploads, you'll securely pass this file into the Bitbucket pipelines is through base64 encoding the file locally.
-
Navigate to the folder that you saved your
cli_config.txtfile using the command line and then execute the following command. This will encode thecoa_configfile as a string that you can pass as a secure Bitbucket variable.- Window
- macOS
- Linux
certutil -encode coa_config.txt encoded_config.base64base64 -i coa_config.txt > encoded_config.base64base64 coa_config.txt > encoded_config.base64 -
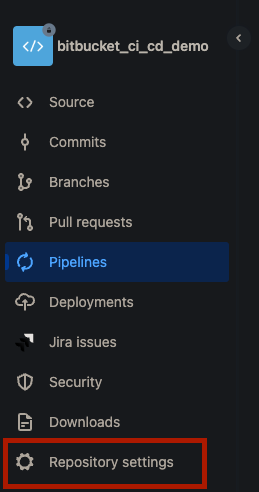
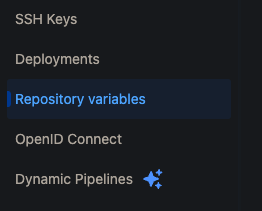
In your Bitbucket repo, navigate to Repository Settings > Repository Variables.


-
Add the following variables and make sure Secured is checked.
SECURE_FILE_BASE64 = <your base64 encoded coa_config.txt file>
Build Your Pipeline
Now that you have your variables set up, you are ready to start building the CI/CD pipeline. In this section, you'll set up a CI/CD pipeline to trigger upon successful merges, commits, or pull requests in the main branch. If you want to modify this behavior, you can add an additional section under branches in the code in the next step to dictate the pipeline's behavior upon merges into other branches in your project.
- This pipeline runs a set of steps:
- Downloads the Coalesce CLI
- Prints the Coalesce CLI version
- Generates the Coalesce deployment plan
- Executes the Coalesce deployment to the default profile specified
Within your main branch in your repository, navigate to Pipelines > Create a New Pipeline and copy/paste the following code:
image: node:20.0.0

definitions:
  caches:
    npm: node_modules

pipelines:
  branches:
    main:
      - step:
          name: 'Download Coalesce CLI'
          caches:
            - npm
          script:
            - npm install @coalescesoftware/coa@$coa_version
      - step:
          name: 'Print Version'
          caches:
            - npm
          script:
            - npm coa --version
      - step:
          name: 'Coalesce Plan'
          caches:
            - npm
          script:
            # Decode the base64 config and save it
            - echo "$SECURE_FILE_BASE64" | base64 -d > config.txt

            # 2. Print length of the base64 string (should not be 0)
            - echo "Length of Base ${#SECURE_FILE_BASE64}"

            # 2. Create coa plan file.
            - npx coa plan --config config.txt --profile default
          artifacts:
            - config.txt
            - coa-plan.json
      - step:
          name: 'Coalesce Deploy'
          caches:
            - npm
          script:
            - npx coa deploy --config config.txt --plan coa-plan.json --debug