Documentation index: llms.txt. This page is also available as markdown: append .md to this URL or send Accept: text/markdown.
Step: 1 Setup Version Control
When setting up a project in Coalesce, you'll need your repository URL and access token. This guide will walk you through:
- Creating a repo and getting your URL
- Creating your access token
- Adding your version control account to Coalesce by creating a Project.
If you have experience with version control and want a quick overview, take a look at Set Up Version Control.
Before You Begin
- Review Coalesce Git Requirements before starting.
Coalesce supports the following Git providers:
Each section includes a video walkthrough of all the steps.
GitHub
GitHub is a web-based platform that provides version control and collaborative software development services using Git. It allows developers to store, manage, and track changes to their code while facilitating collaboration through features like pull requests, issue tracking, and project management tools.
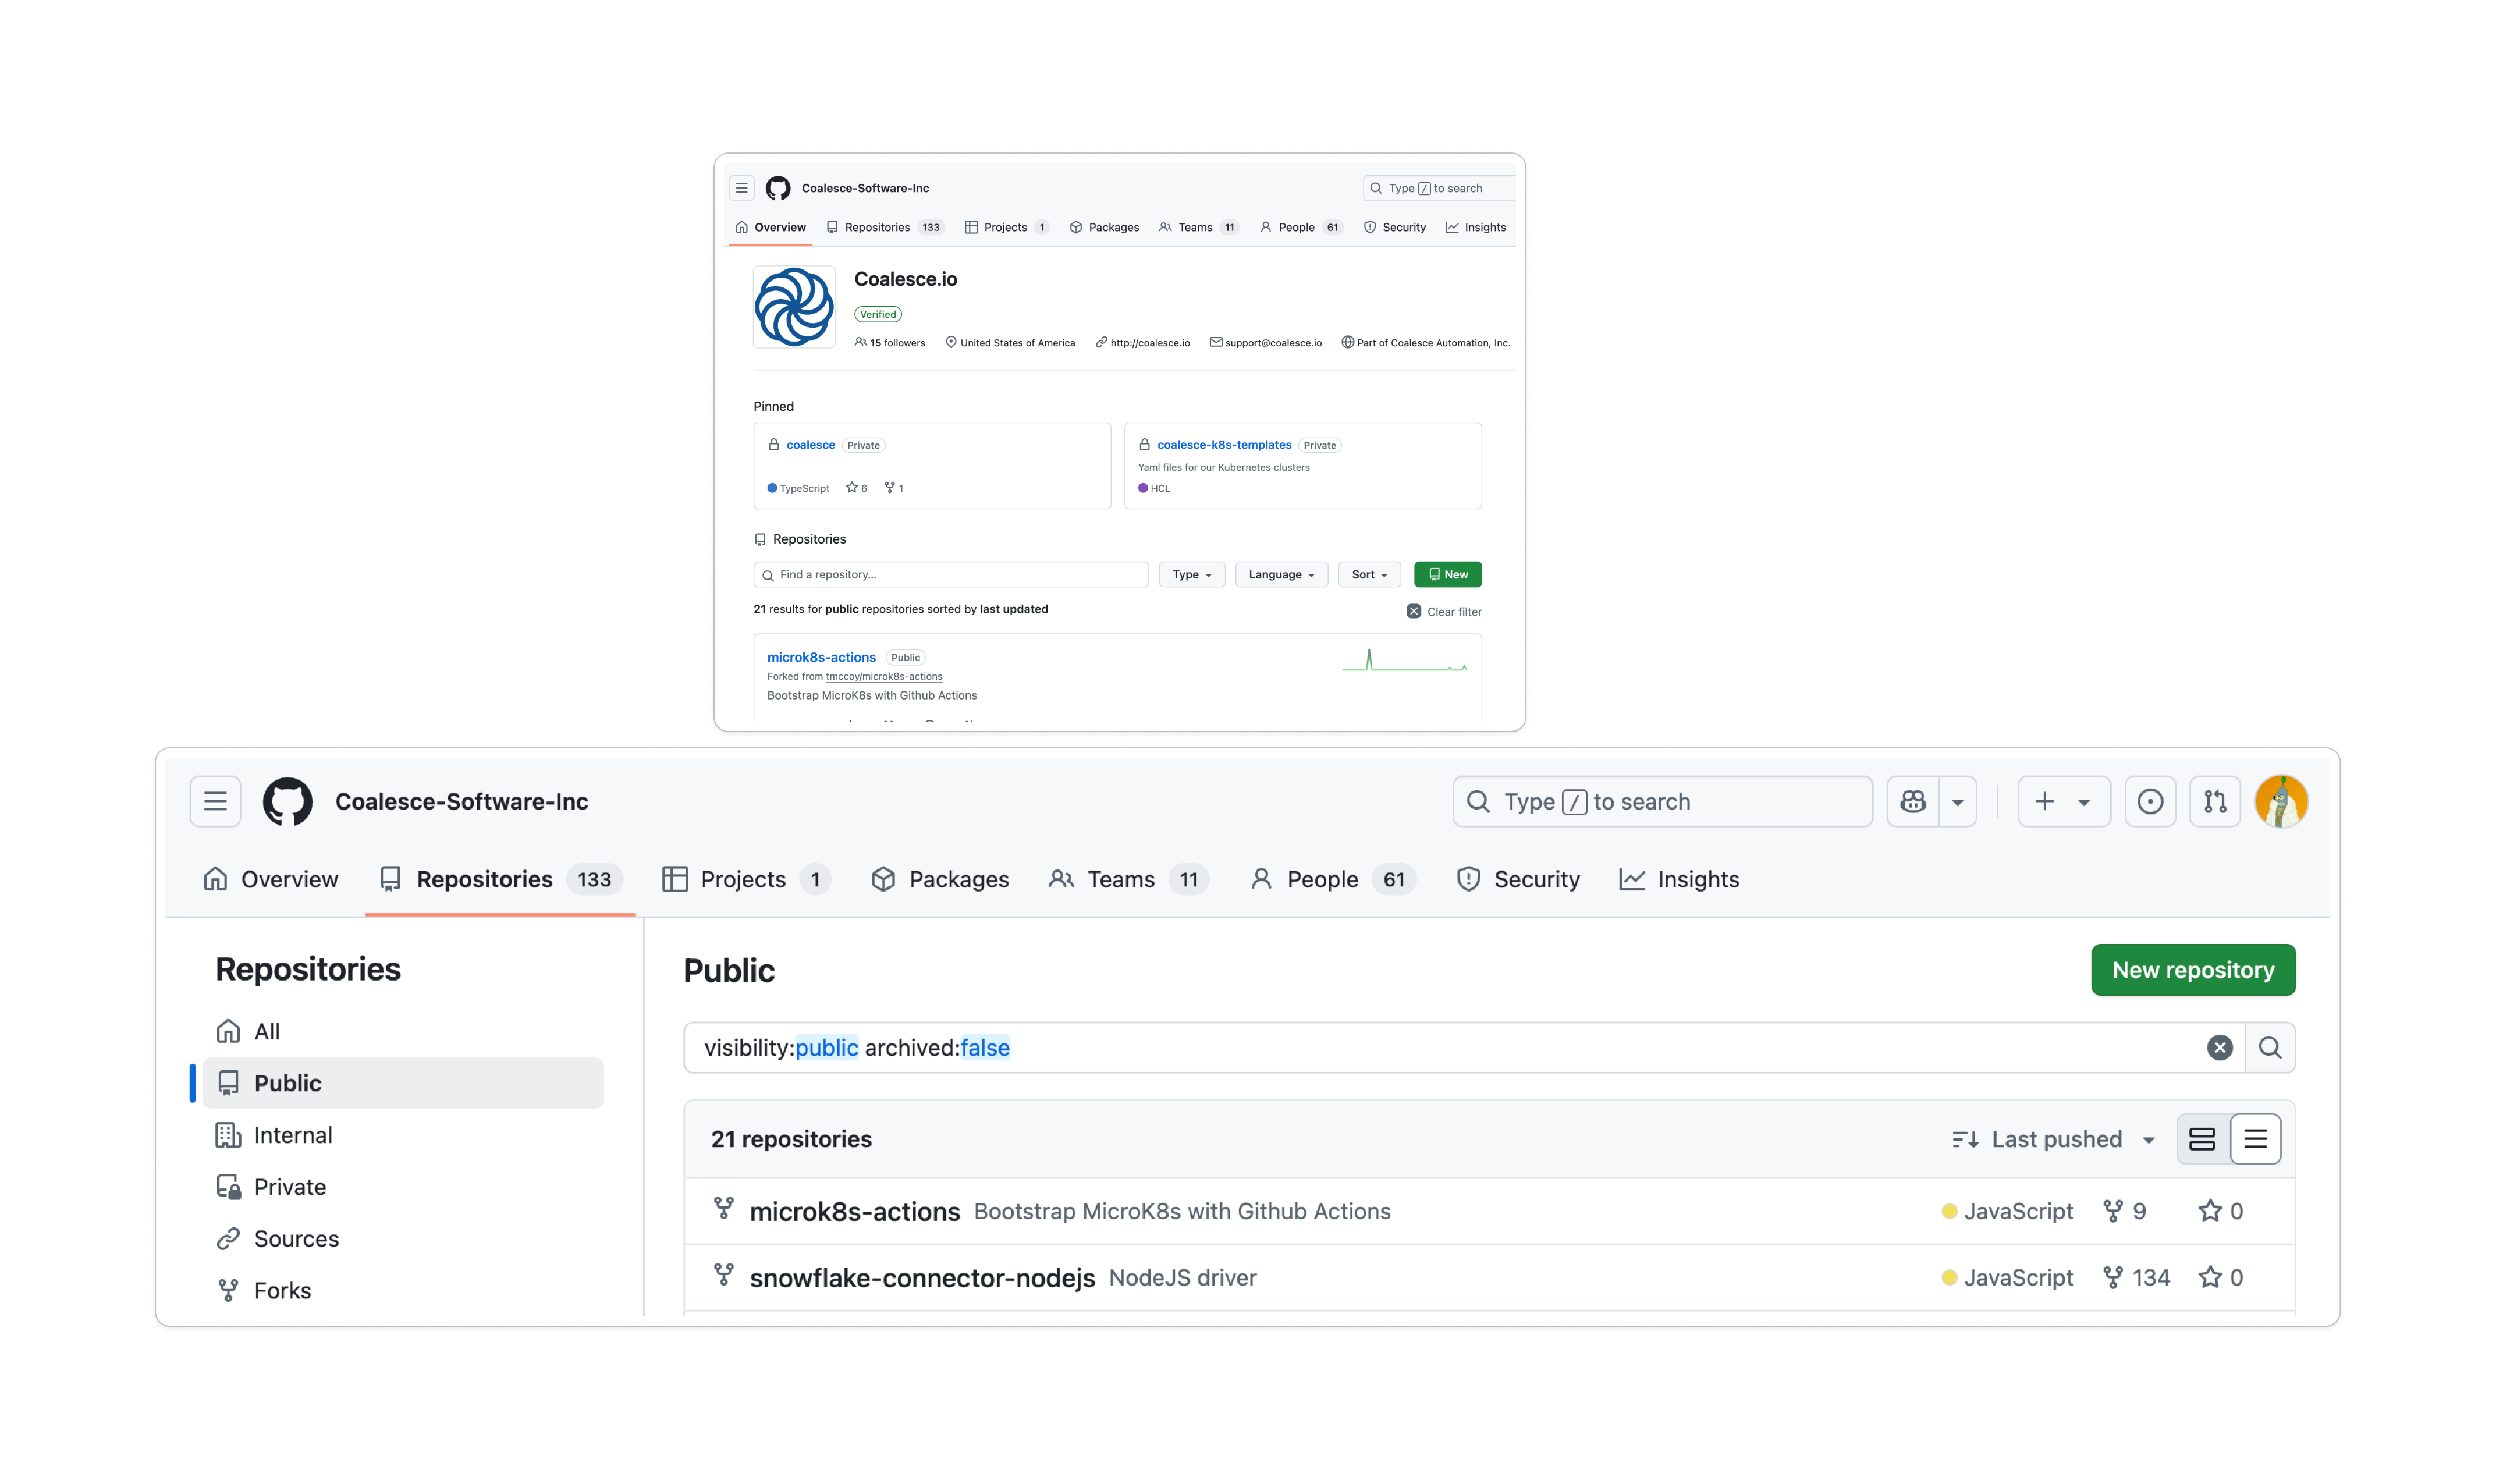
Create Your GitHub Repo
-
Go to https://github.com/.
-
Click the green New button, to create a new repository. It can be found on the homepage or on your profile page under Repositories.
-
On the Create a new repository page, choose the Owner, give the repo a name. The name will become part of your URL.
-
Optionally add a description.
-
Choose if it should be Public or Private. If you're an GitHub Enterprise customer, you'll have the option for Internal.
-
Click Create Repository. You shouldn't add a README, use a template, or add a
.gitignore. -
Once created, you'll see your Git URL. For example
https://github.com/Coalesce-Software-Inc/data-transformations.git. Select the HTTPS version to use in Coalesce.
.gitignoreDon't add a .gitignore to your repo when creating it. It should be completely empty of all files. This is so Coalesce can initiate the repo correctly. After the repo is initiated, you can create a .gitignore.
These file paths are protected paths and files and should NOT be in the .gitignore and should not be used for anything else.
- data.yml
- locations.yml
- nodes/
- subgraphs/
- packages/
- macros/
- nodeTypes/
- environments/
- jobs/
Get Your GitHub Access Token
-
Click on your GitHub profile and go to Settings > Developer Settings.
-
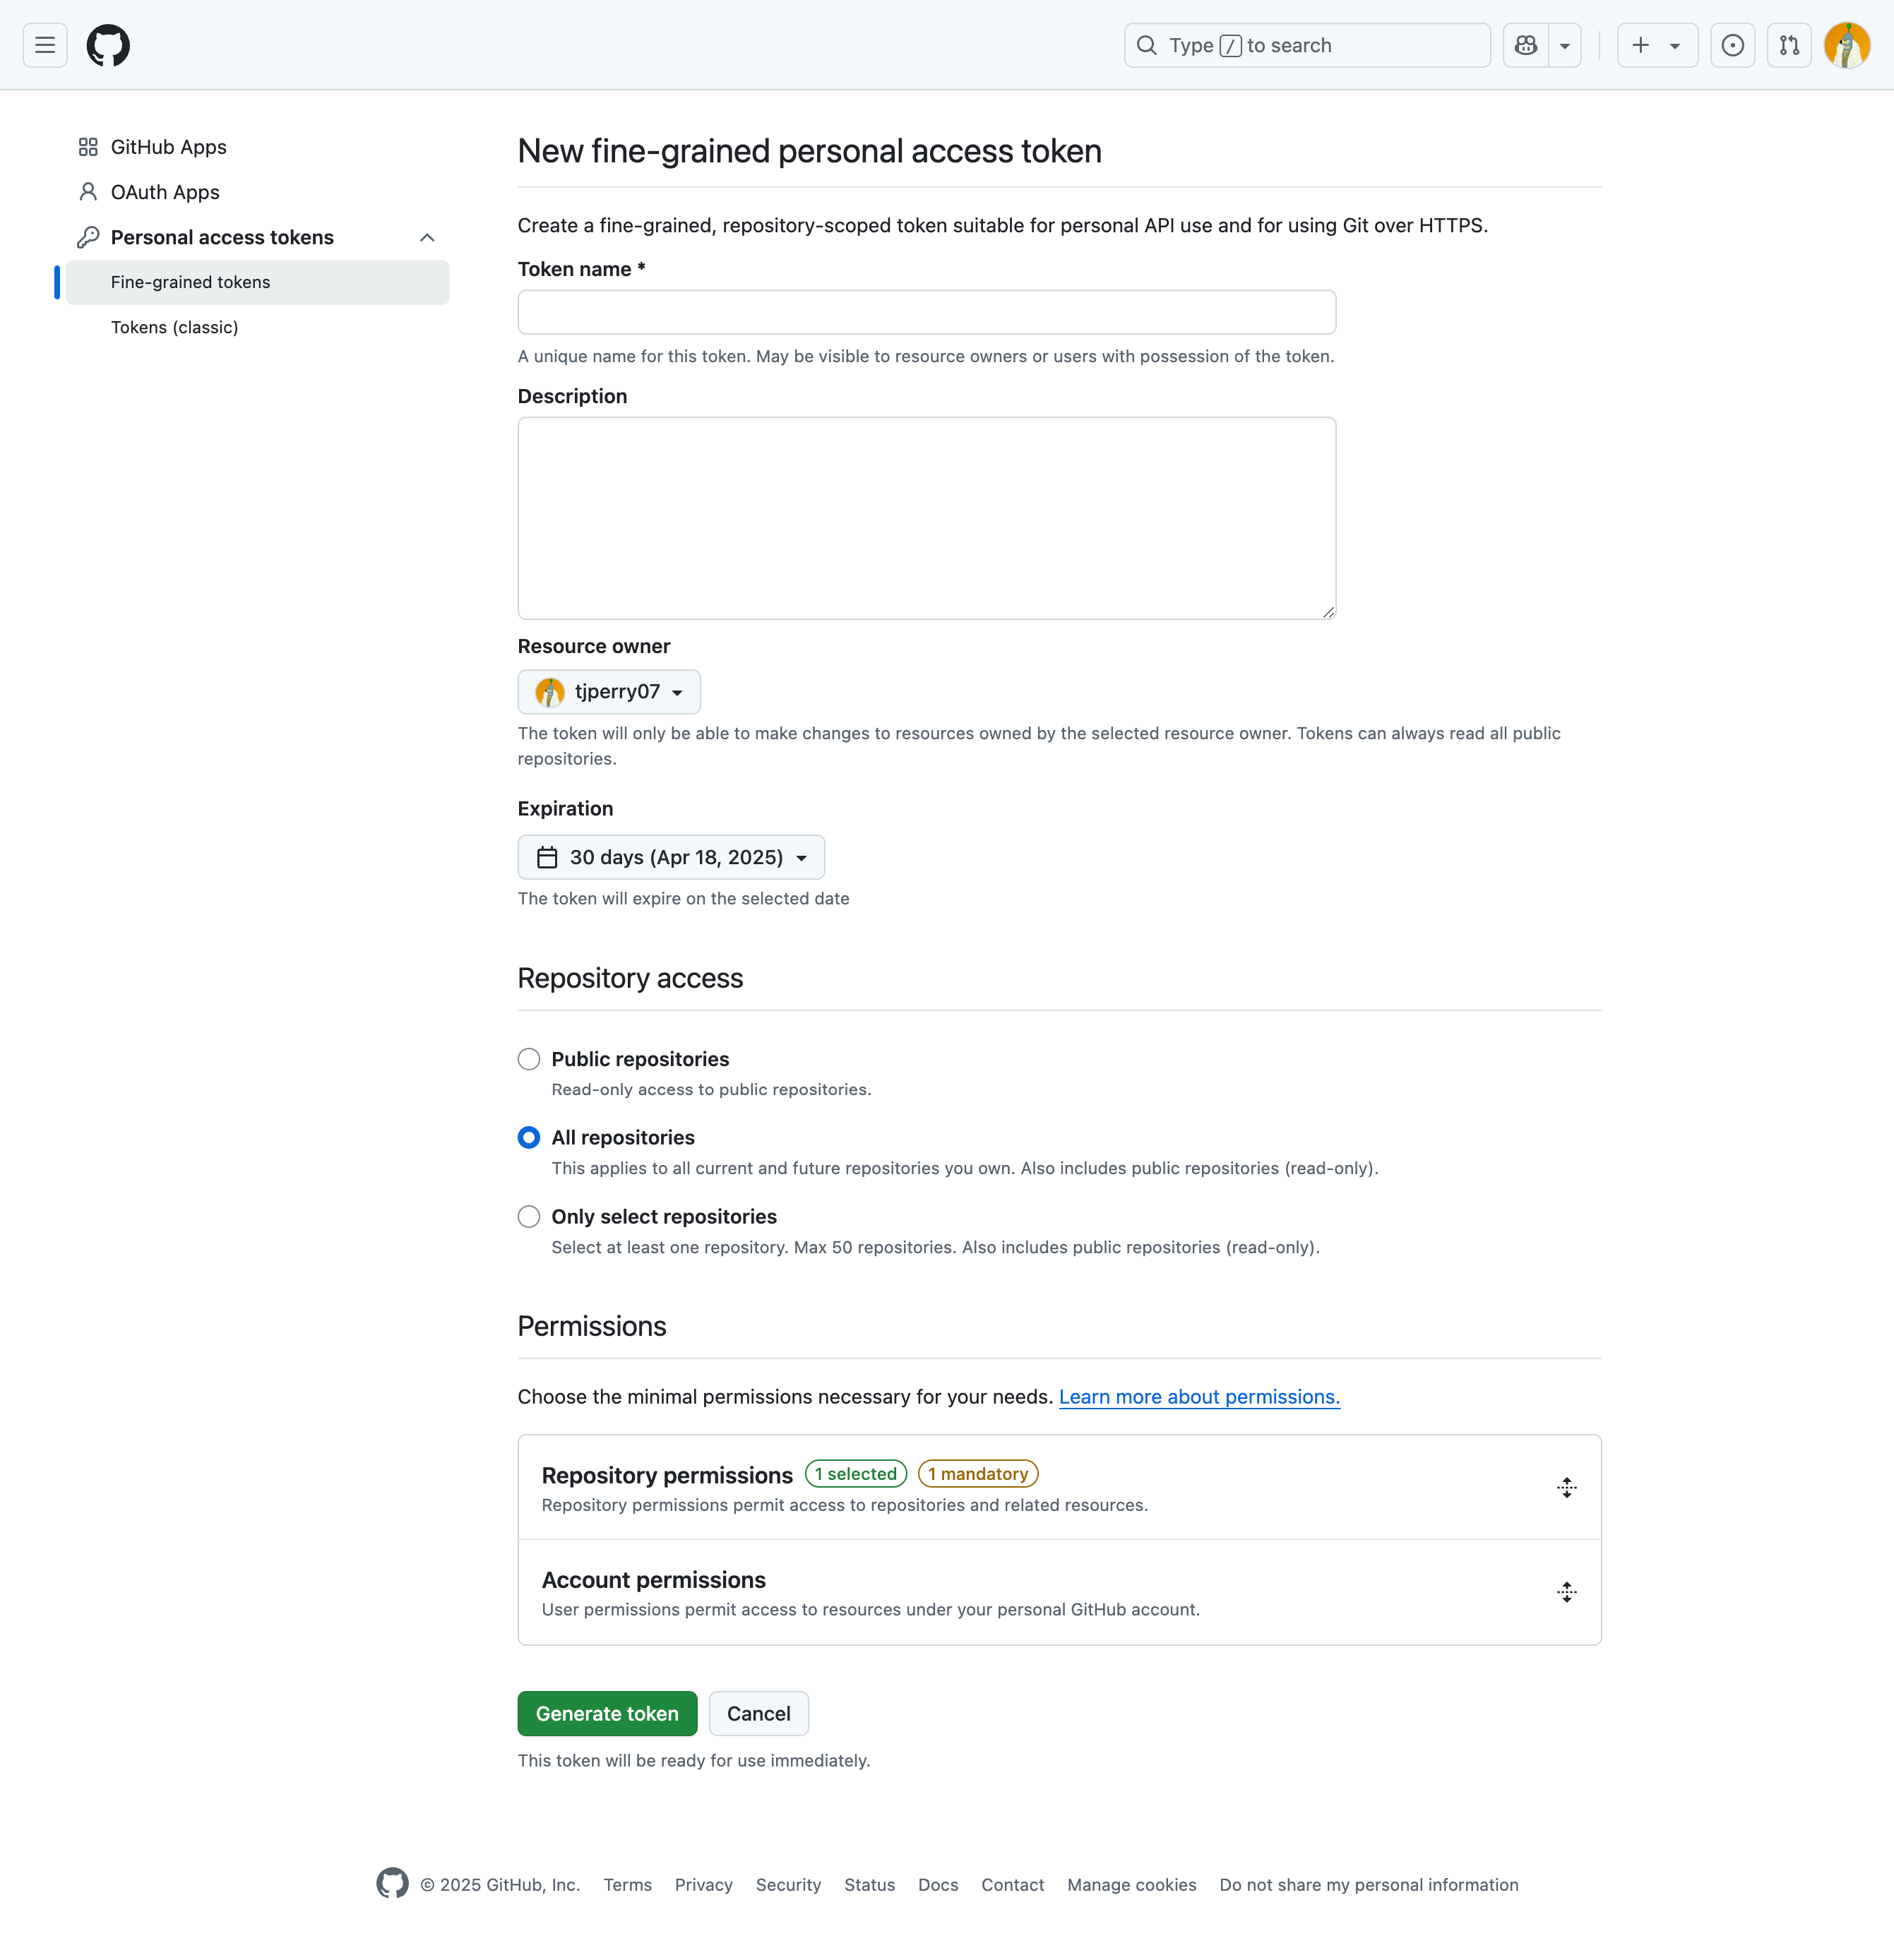
Click Personal access tokens > Fine-grained tokens.
-
Give the token a name and description.
-
Set the following based on your company policy.
- Resource owner
- Expiration date
- Repository access should be either All repositories or Only select repositories.
-
Open Permissions > Repository permissions.
-
Set Contents to Read and write. GitHub will also automatically grant Metadata, which is required.

-
Save your access token somewhere secure. You won't be able to recover it.
Add Your GitHub Token and Repo to Coalesce
Review the steps in Add your URL and Token to Coalesce.
Azure DevOps
Azure DevOps Git is Microsoft's enterprise-grade Git repository service that provides source code management with branch policies, code reviews, and integrated CI/CD pipelines.
Create Your Azure DevOps Repo and Token
In this step, you'll create your repo and get your URL.
-
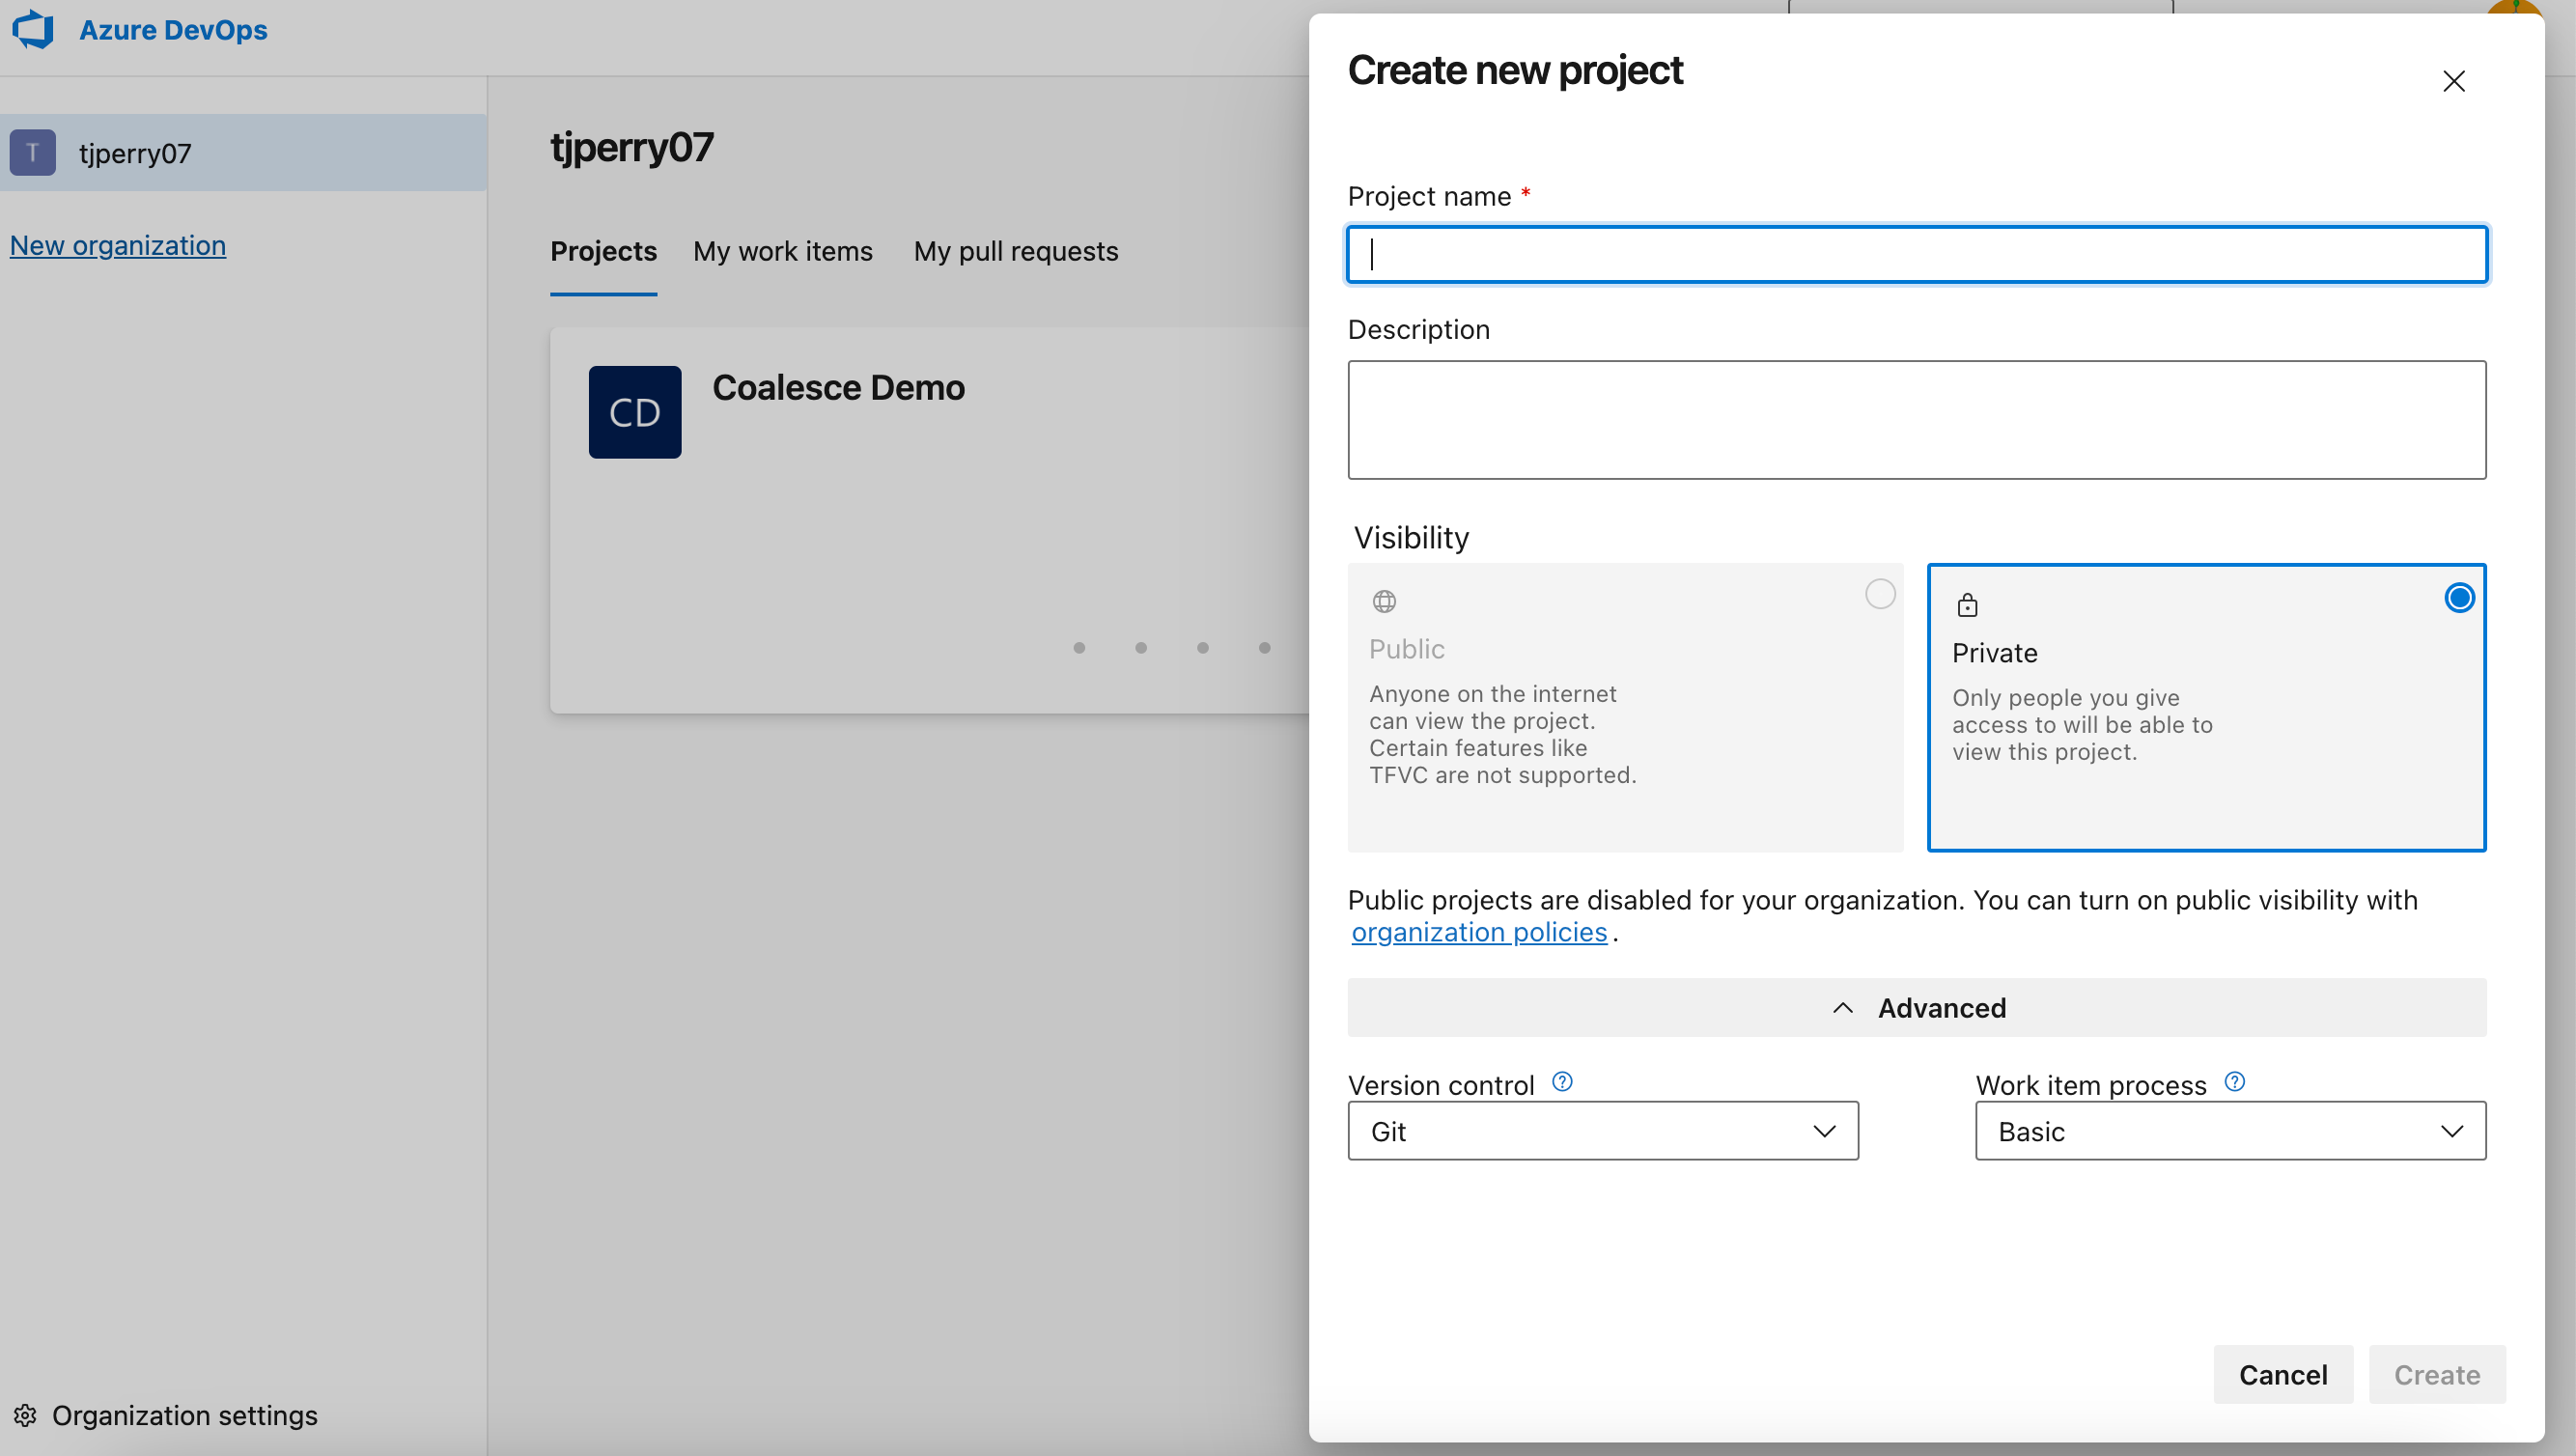
Log in to your organization, for example,
https://dev.azure.com/<Your_Organization>. -
If needed, create a new Project. Give it a name and description.
-
Then click on Repos.
-
You'll see your HTTPS repo URL. Save this for use in Coalesce.
-
You can generate your Git Credentials on this page, but make sure to update the permissions as listed starting in Step 7.
-
Scroll down to Initialize main branch with a Read or
gitignoreand uncheck the box.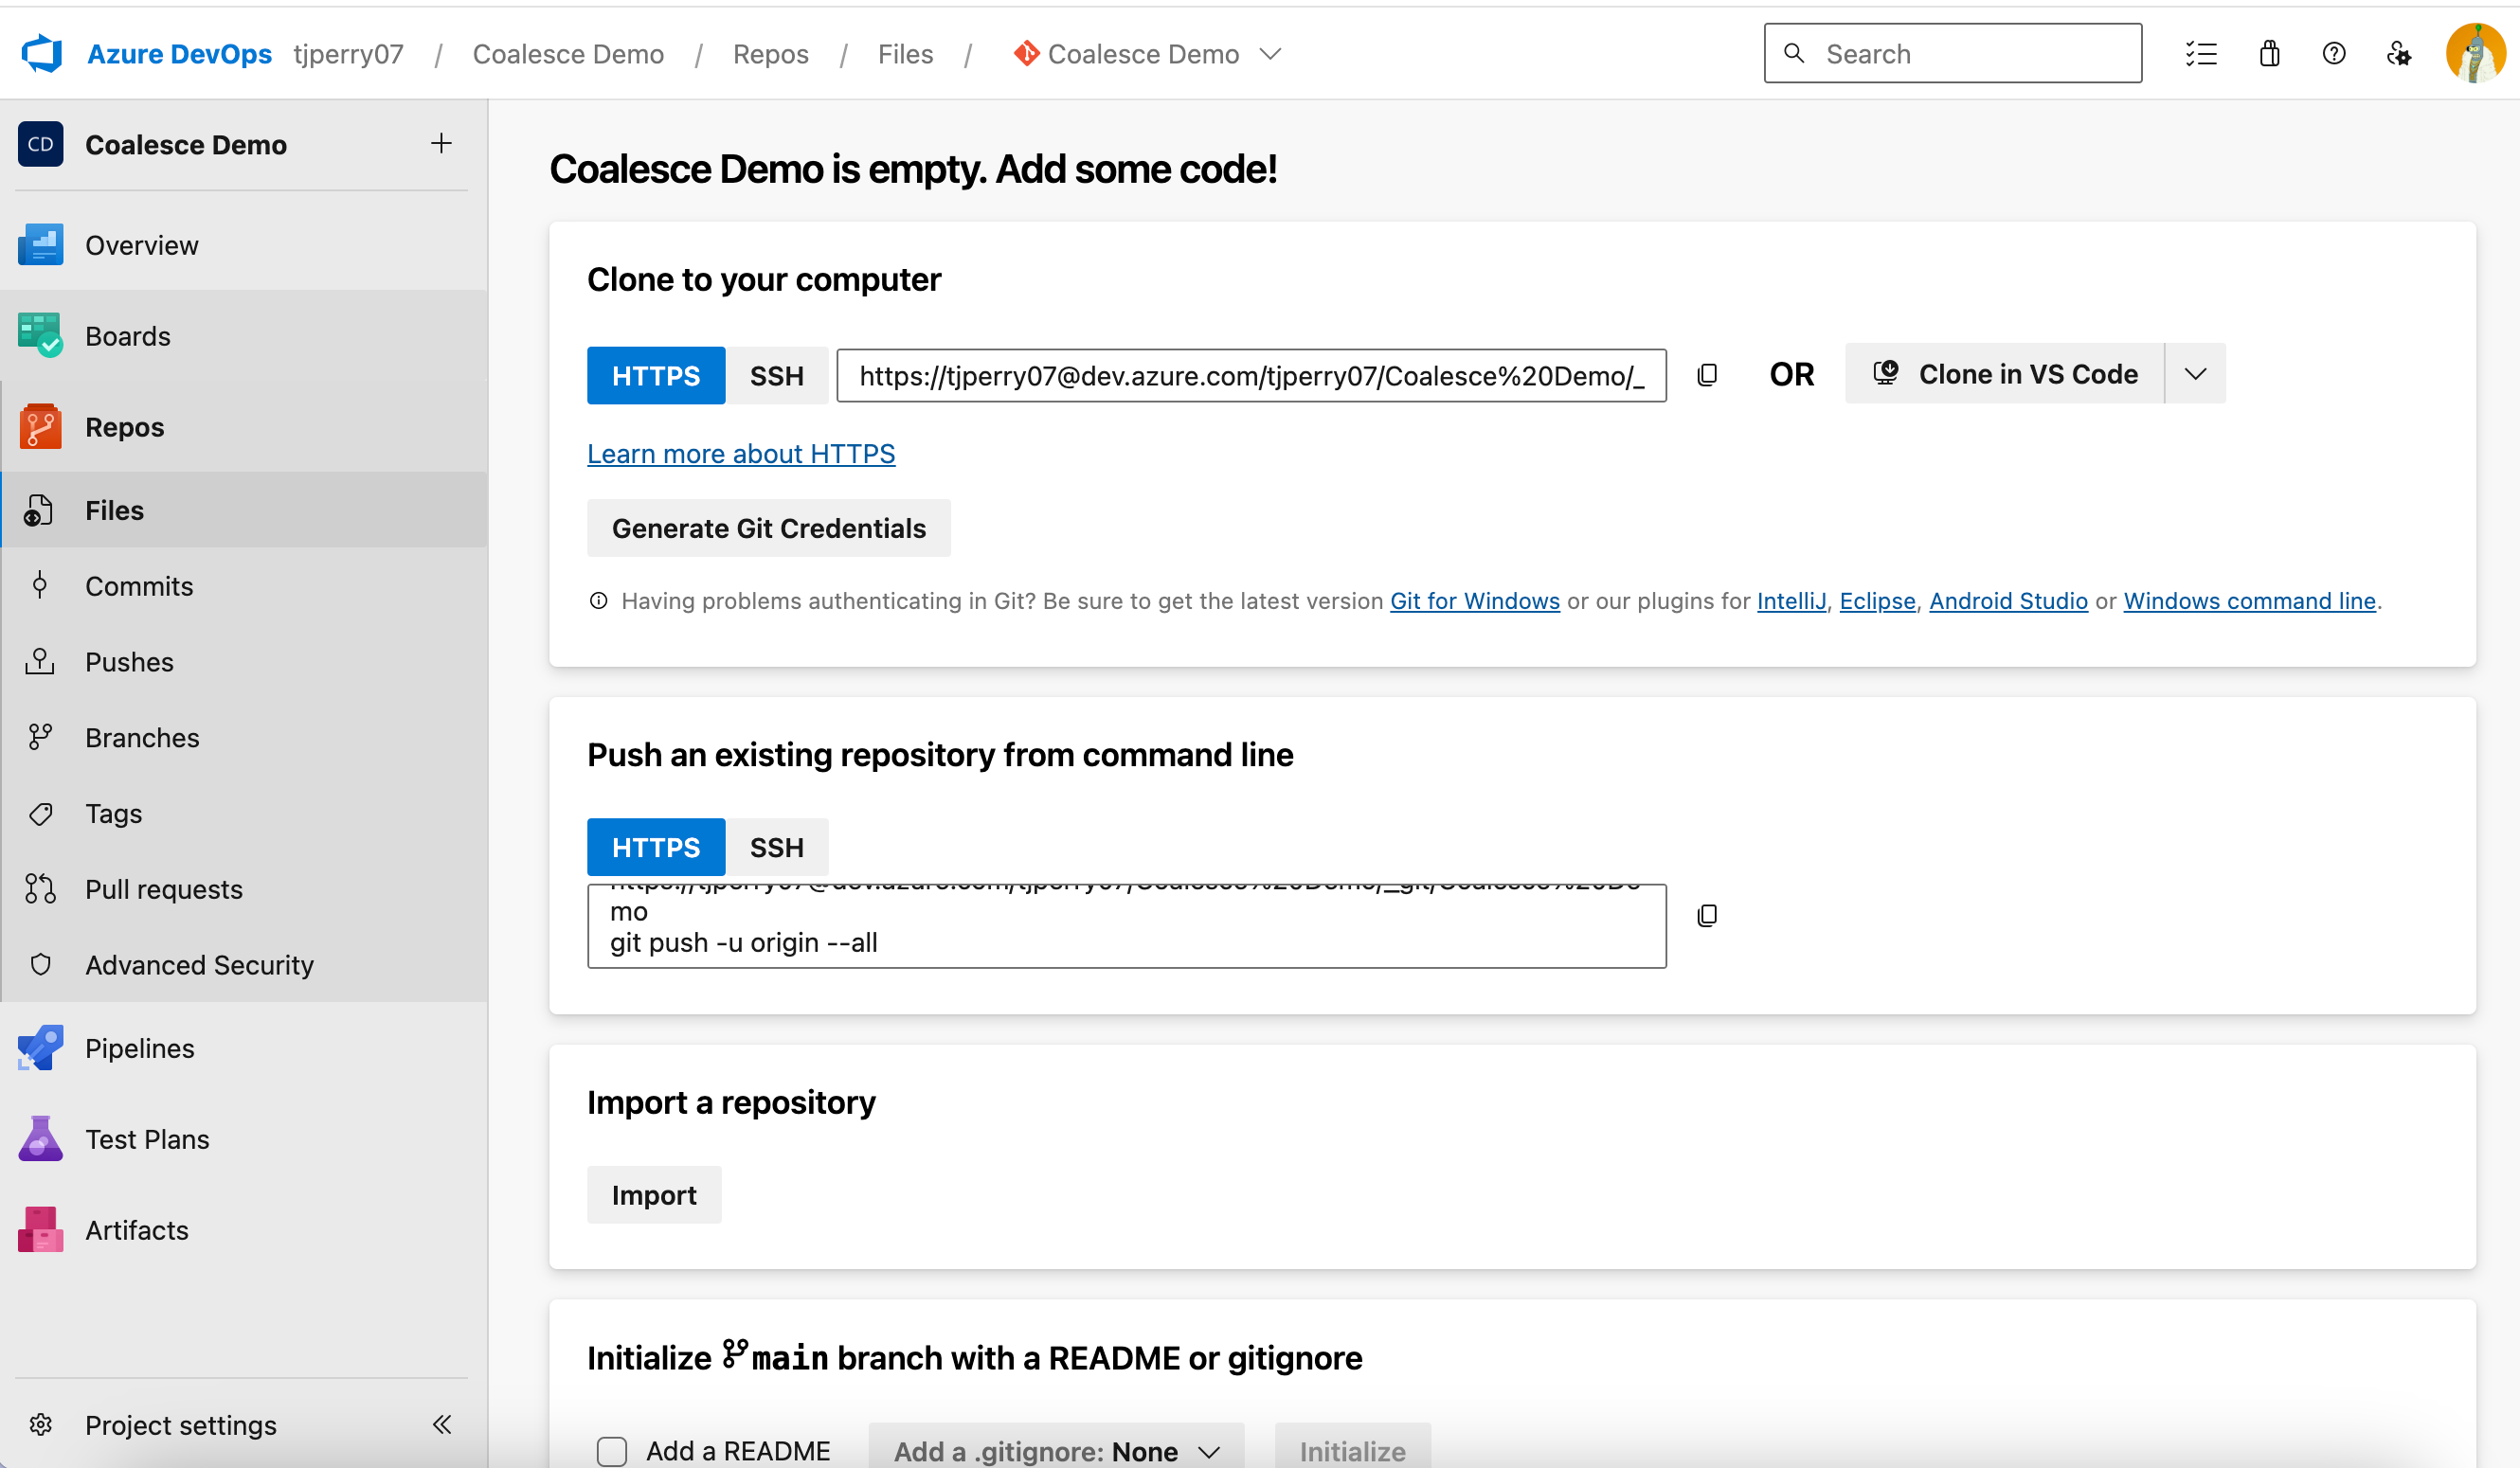
-
Go to User settings > Personal access tokens.
-
If you have an existing token, click Edit on the token you want to use in Coalesce. If there are no tokens, click New Token.
-
Set the expiration date based on company policy.
-
Change the Scopes to Custom defined.
-
Select the following:
- Work Items: Read, write, & manage
- Code: Read, write, & manage
- Packaging: Read, write, & manage
-
Click Create or Save.
.gitignoreDon't add a .gitignore to your repo when creating it. It should be completely empty of all files. This is so Coalesce can initiate the repo correctly. After the repo is initiated, you can create a .gitignore.
These file paths are protected paths and files and should NOT be in the .gitignore and should not be used for anything else.
- data.yml
- locations.yml
- nodes/
- subgraphs/
- packages/
- macros/
- nodeTypes/
- environments/
- jobs/
Add Your Azure Token and Repo to Coalesce
Review the steps in Add your URL and Token to Coalesce.
Bitbucket
Bitbucket is Atlassian's Git-based code hosting and collaboration platform. It offers both cloud and self-hosted options with features for code review and CI/CD pipelines.
Create Your Bitbucket Repo and URL
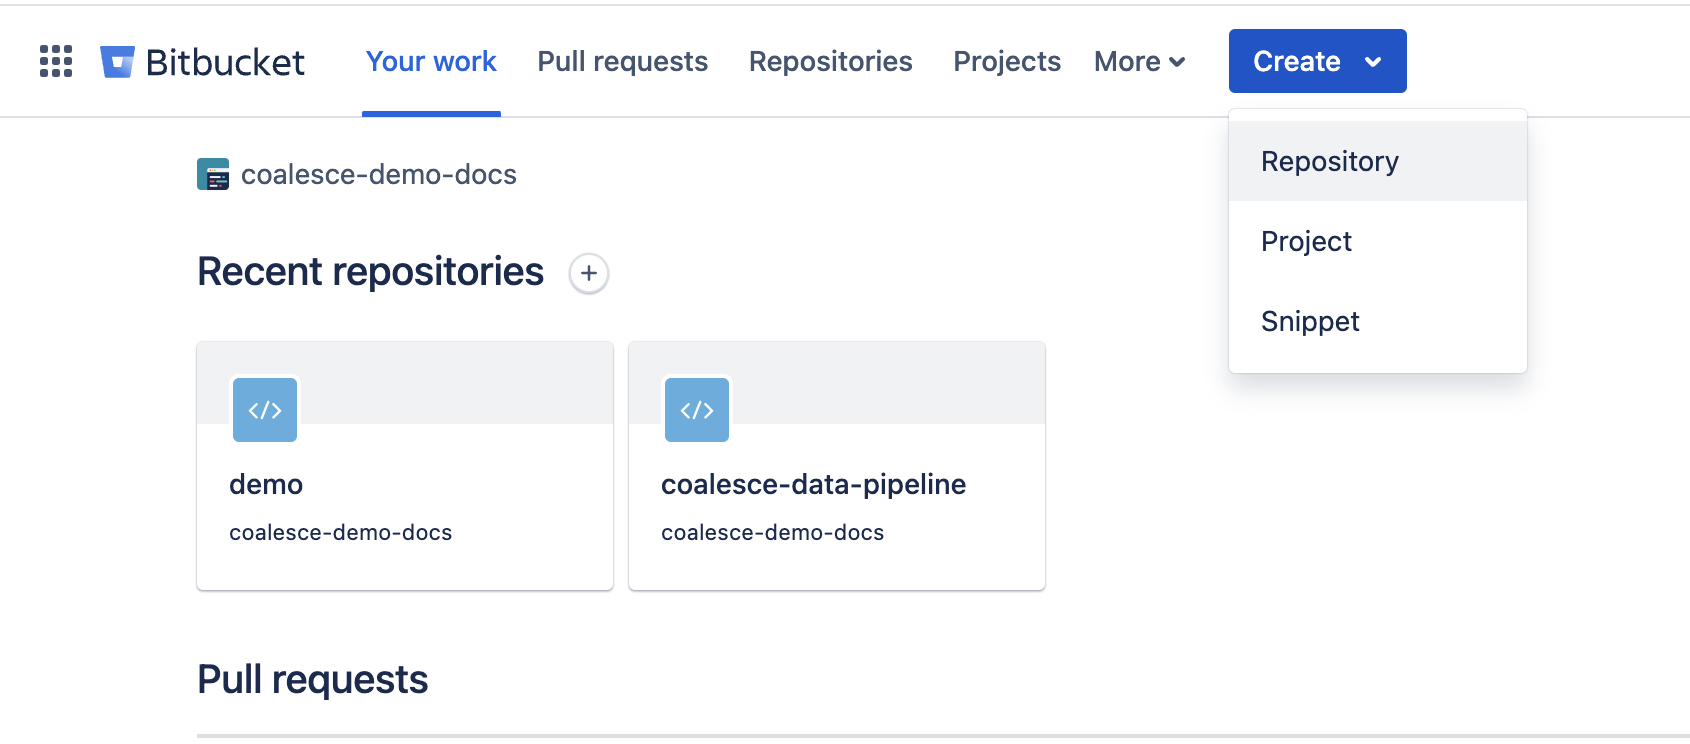
-
From the Workspace Overview, click Create and select Repository.
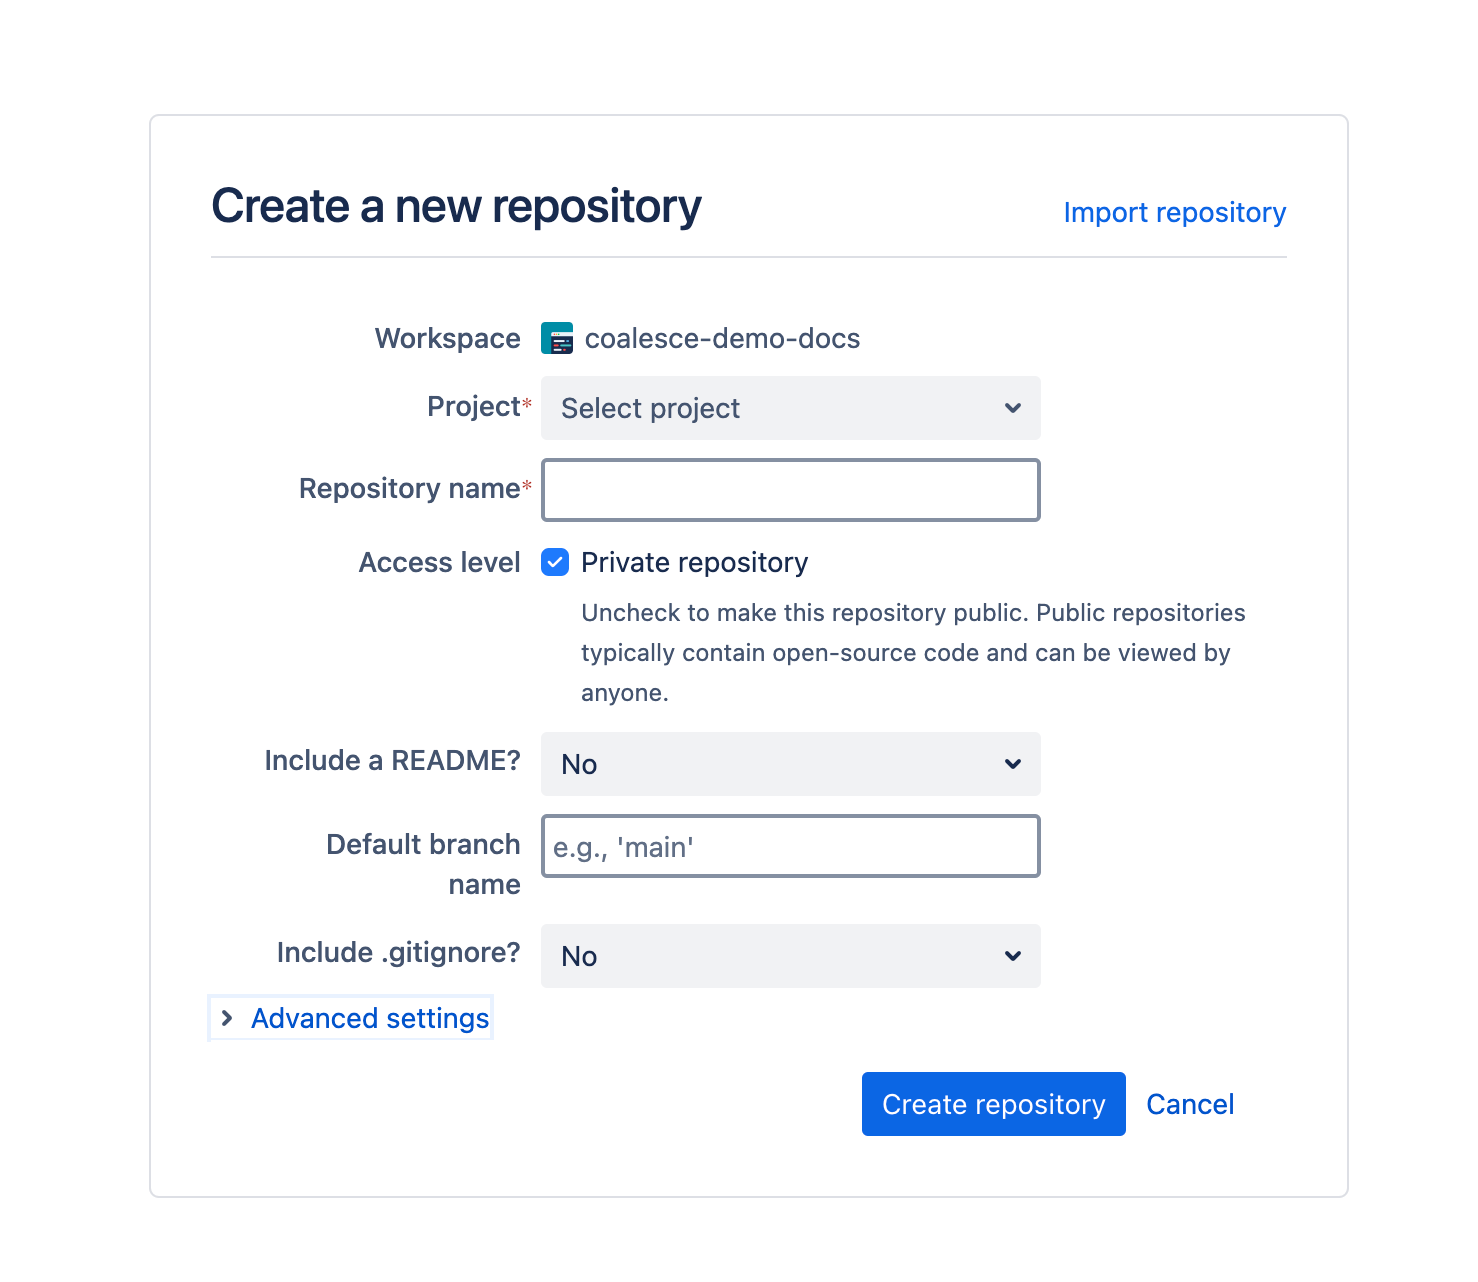
-
On the Create a new repository page, fill out the repo details.
- Include a README? is No.
- Include .gitignore? is No.
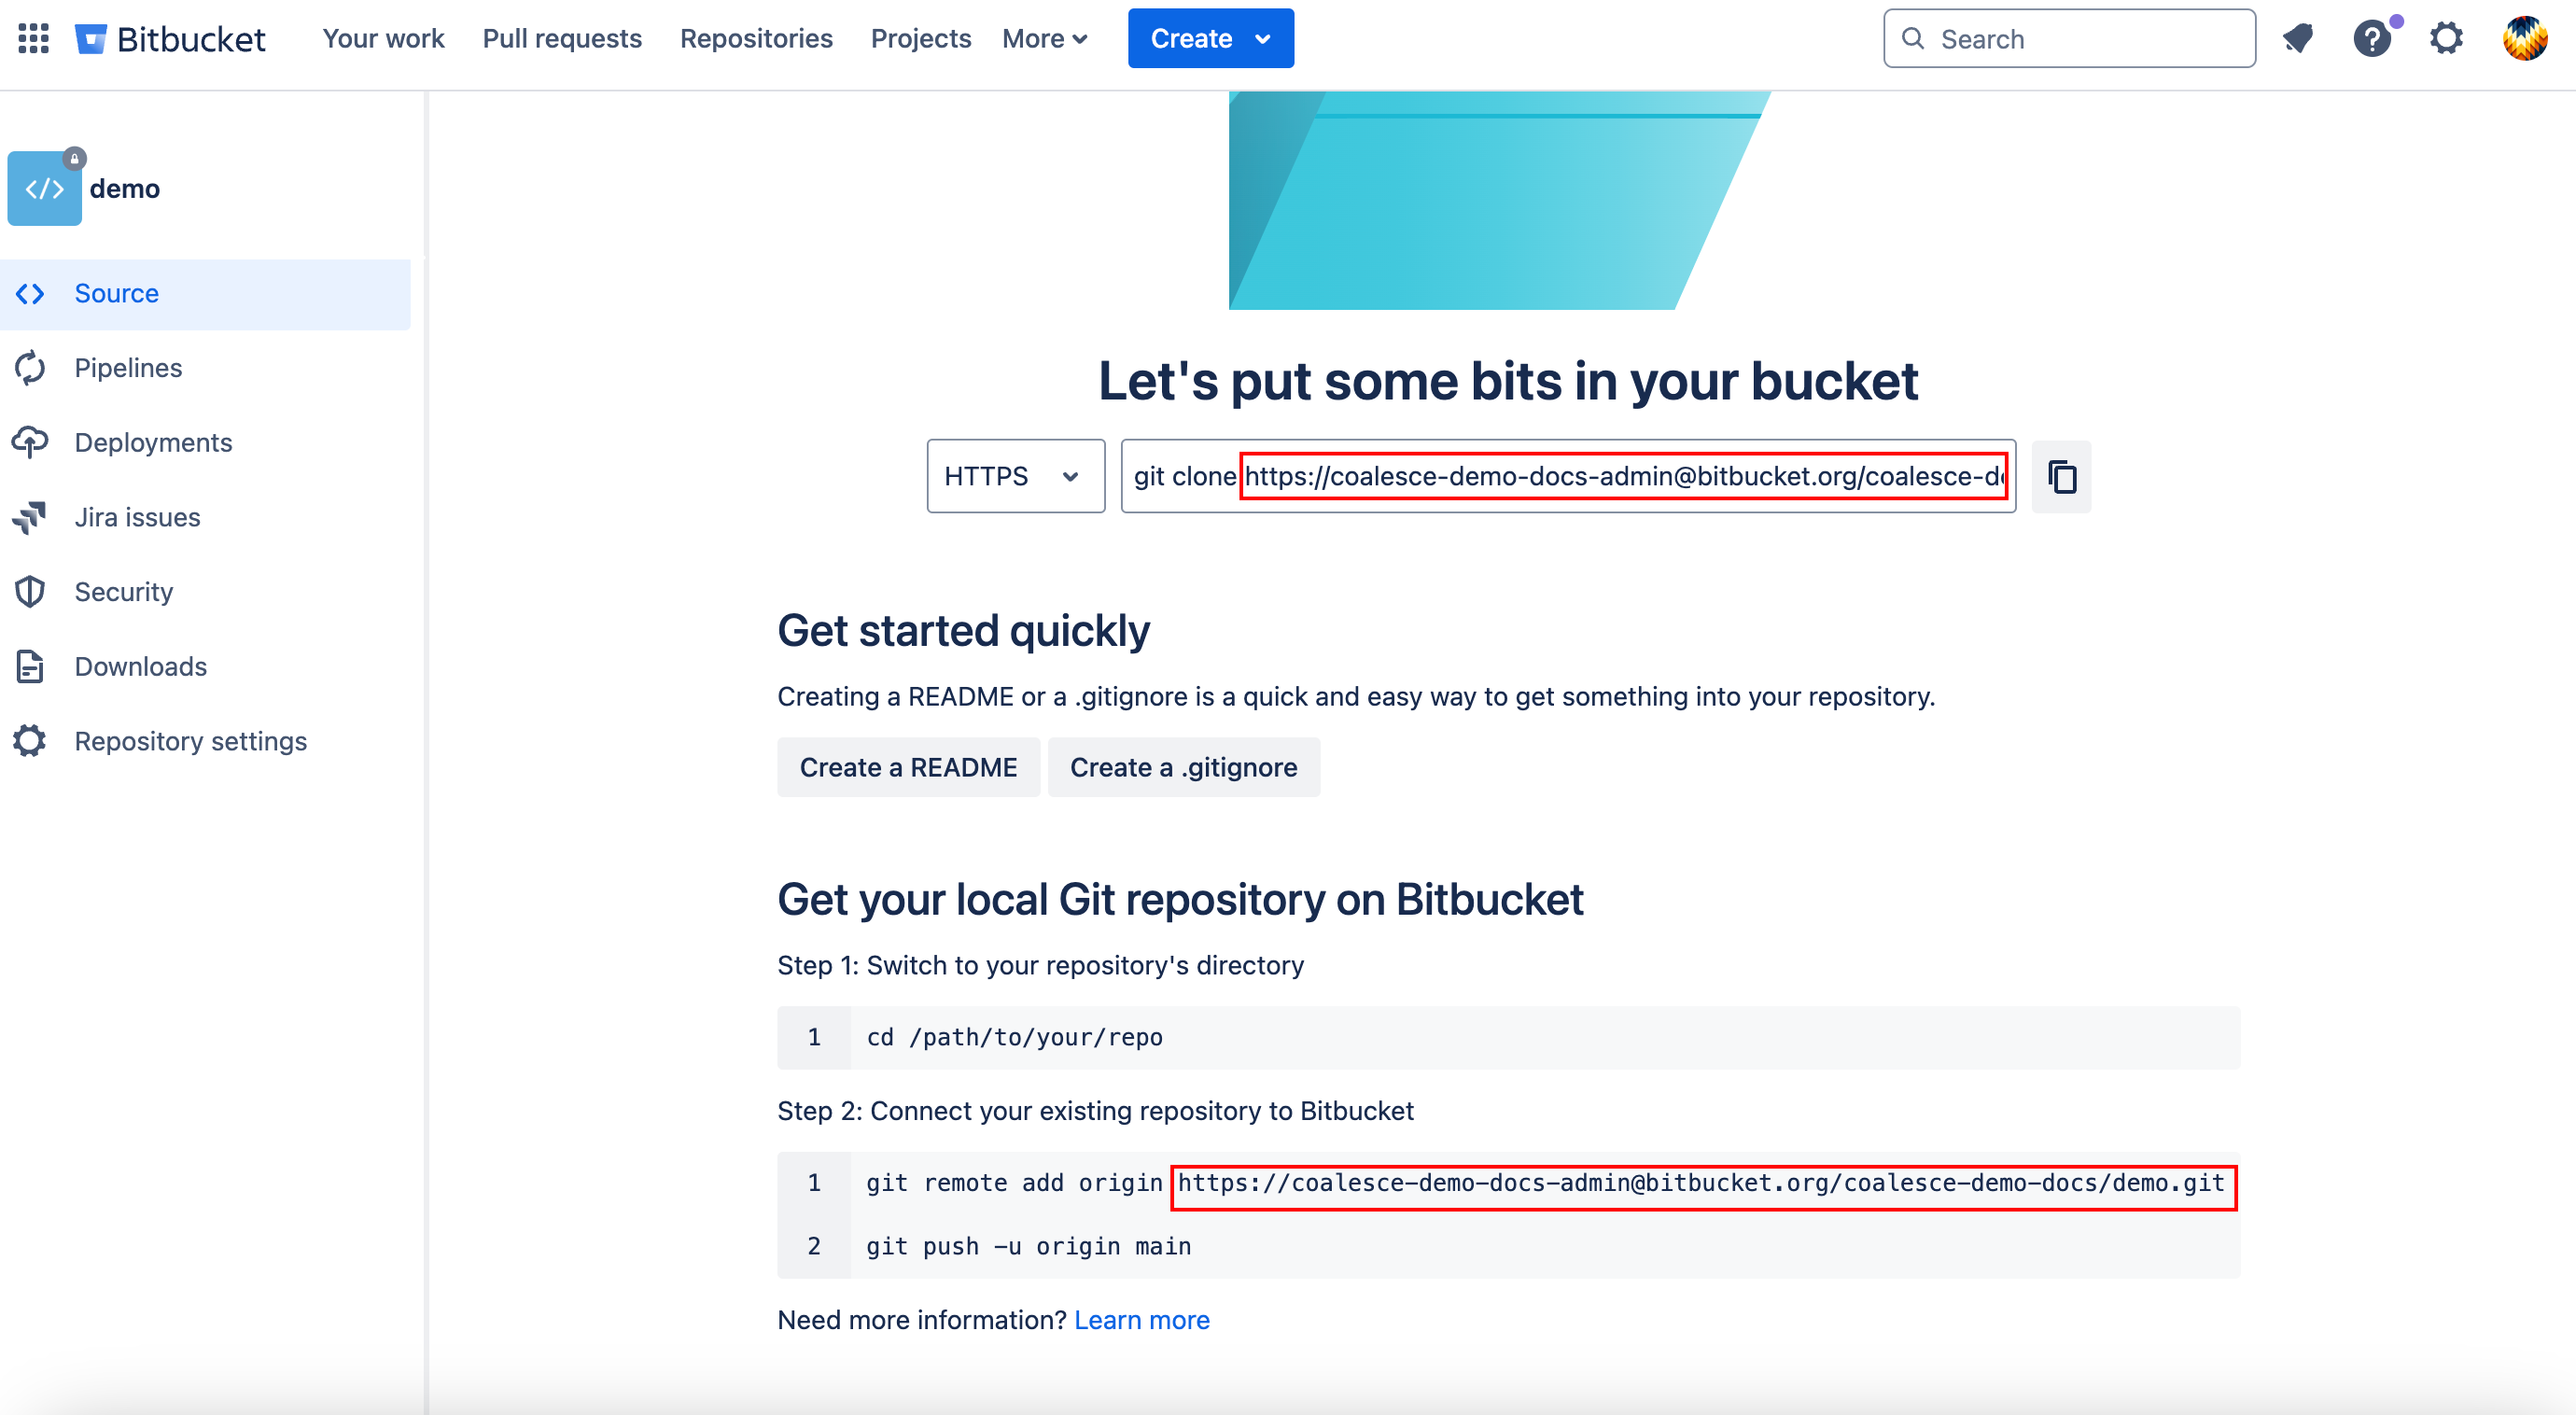
-
On the Repo page, you can find the URL in the HTTPS box or under Step 2: Connect your existing repository to Bitbucket.
.gitignoreDon't add a .gitignore to your repo when creating it. It should be completely empty of all files. This is so Coalesce can initiate the repo correctly. After the repo is initiated, you can create a .gitignore.
These file paths are protected paths and files and should NOT be in the .gitignore and should not be used for anything else.
- data.yml
- locations.yml
- nodes/
- subgraphs/
- packages/
- macros/
- nodeTypes/
- environments/
- jobs/
Get Your Bitbucket API Token
Bitbucket requires an API Token.
As of September 9, 2025 Bitbucket no longer allows the creating of app passwords. New integrations will require an API token. On June 9, 2026 all existing app passwords will stop working.
Learn more in Bitbucket Cloud enters phase two of app password deprecation
- Repository Scoped Access
- User Scoped Access
These access tokens are tied only to a specific repository, not to a user account. They are created from the repository settings.
-
Go to Repository Settings.
-
Under Security, select Access tokens.
-
Click Create Access Token.
-
Choose the scopes:
Repositories Read and Write. -
Give it a name and set the expiration date according to your workspaces policy.
-
Review the information is correct and click Create token.
-
Copy the token since it won't be shown again.
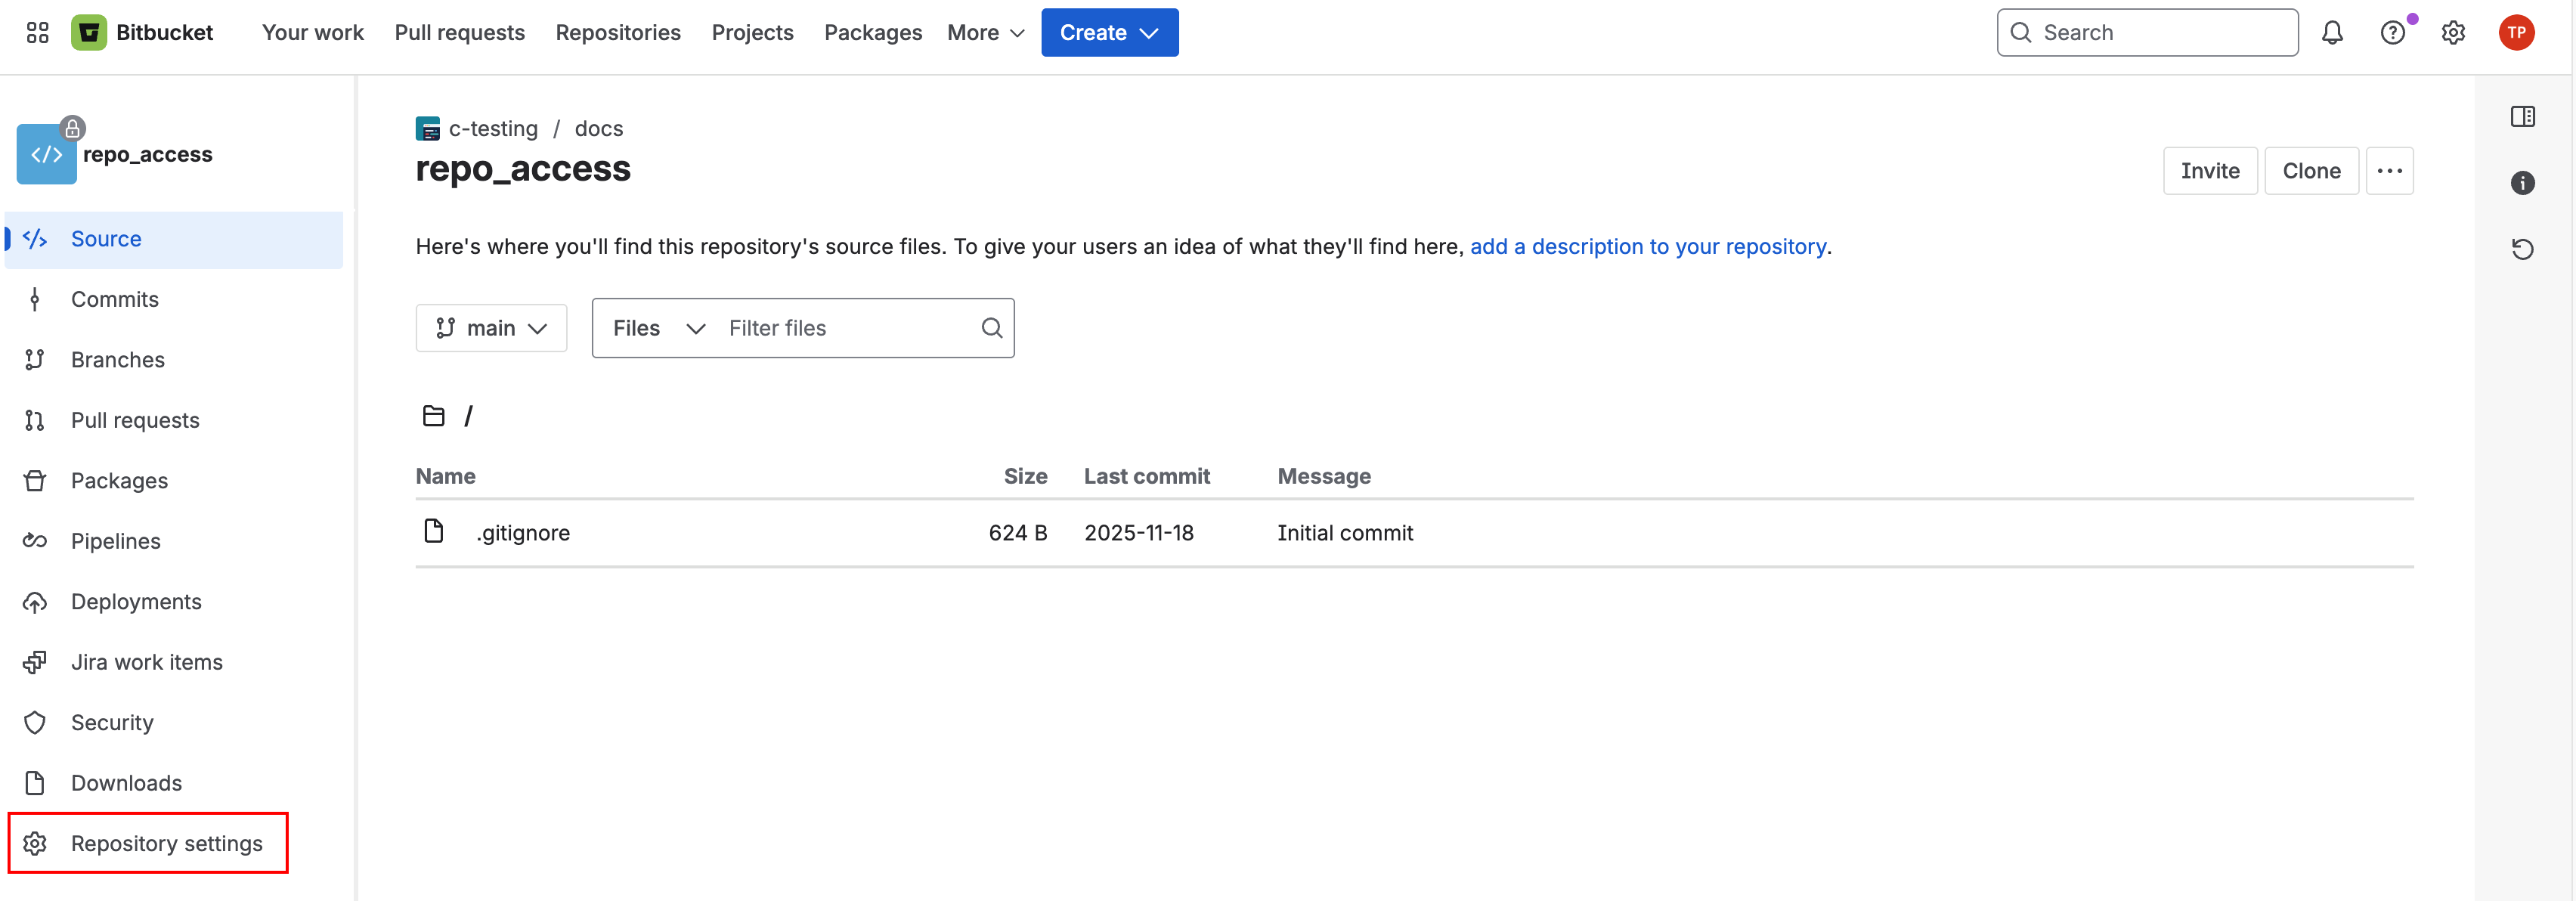
Repository Settings 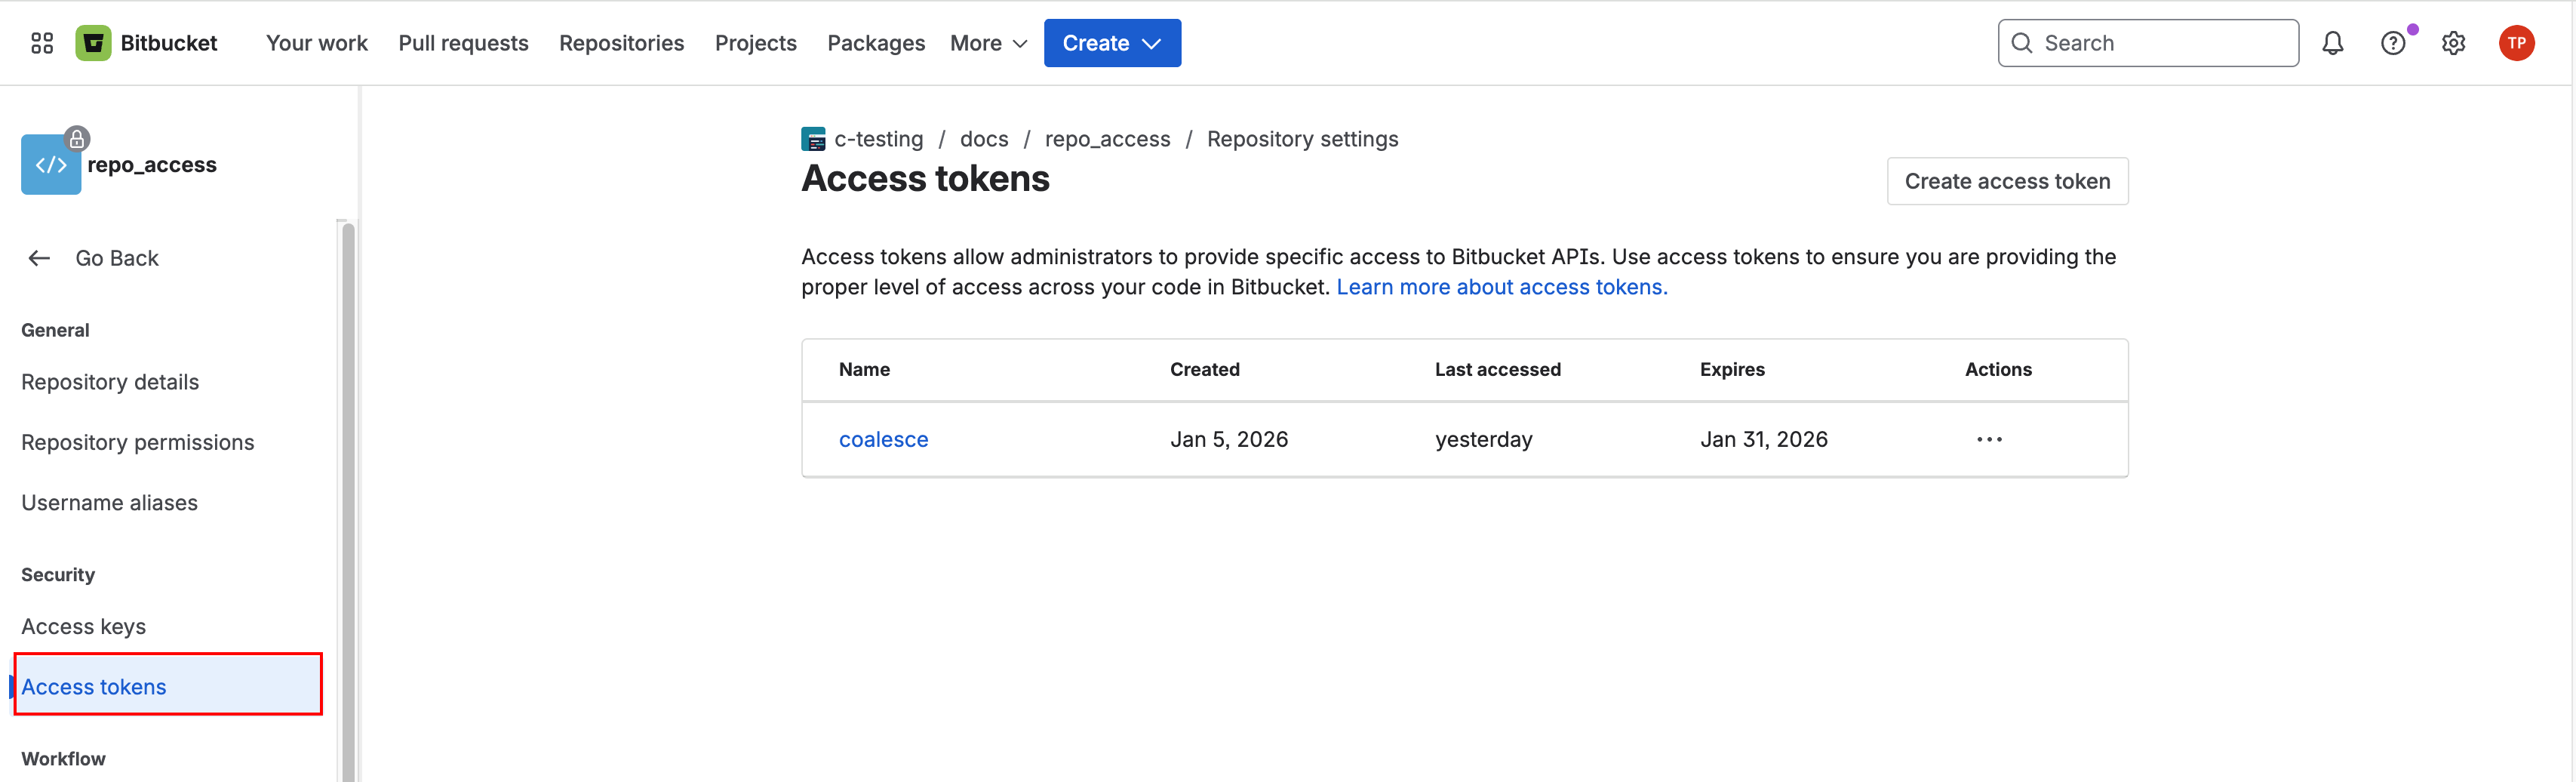
Security > Access tokens Create your repo access token
These are tokens tied to a user account. They act like a personal access token that can be used to authenticate API calls or Git operations where allowed.
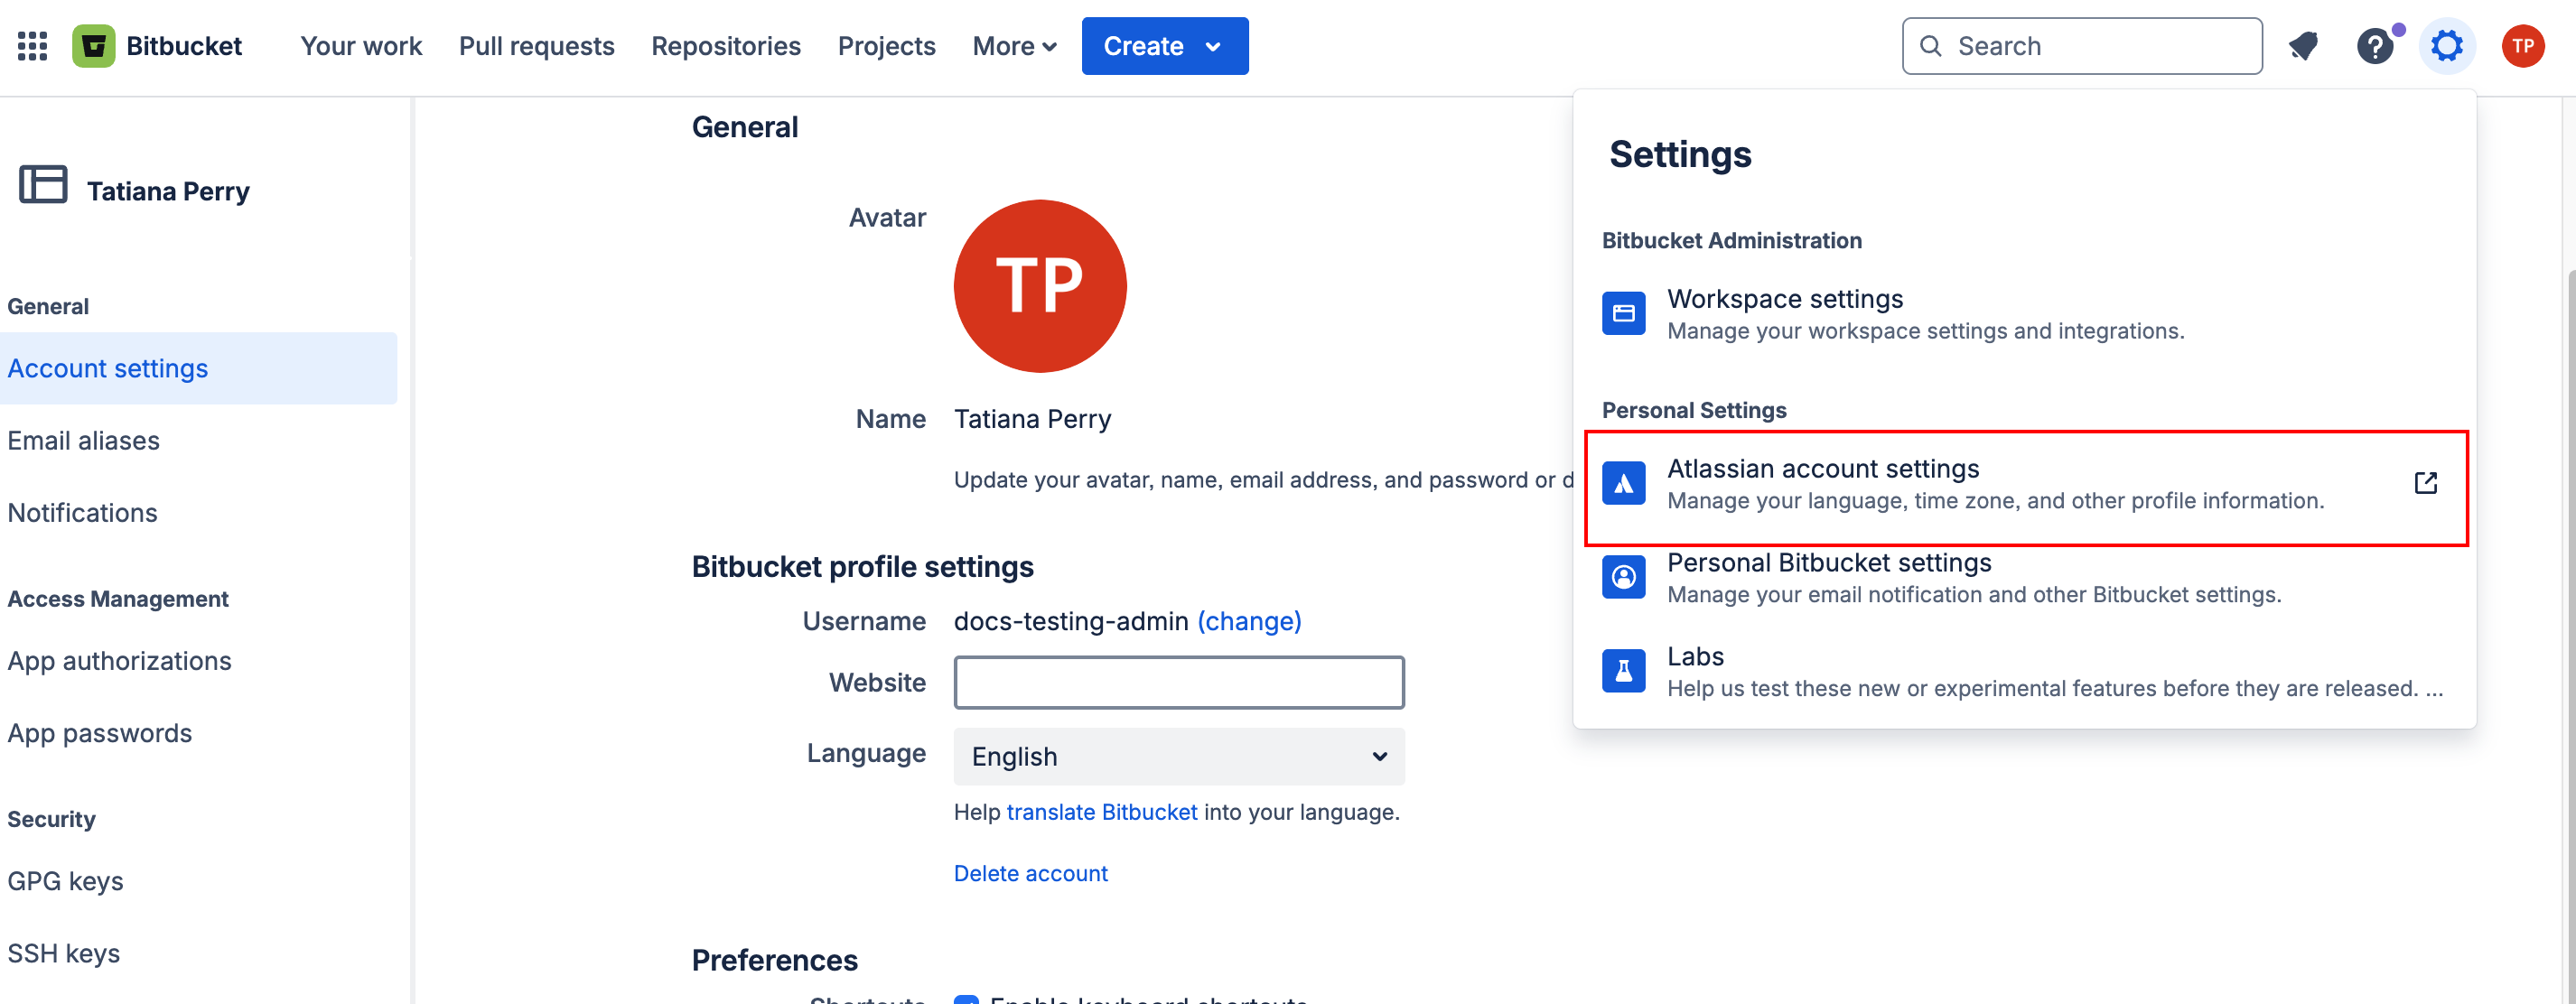
- Go to Settings and select Atlassian account settings.
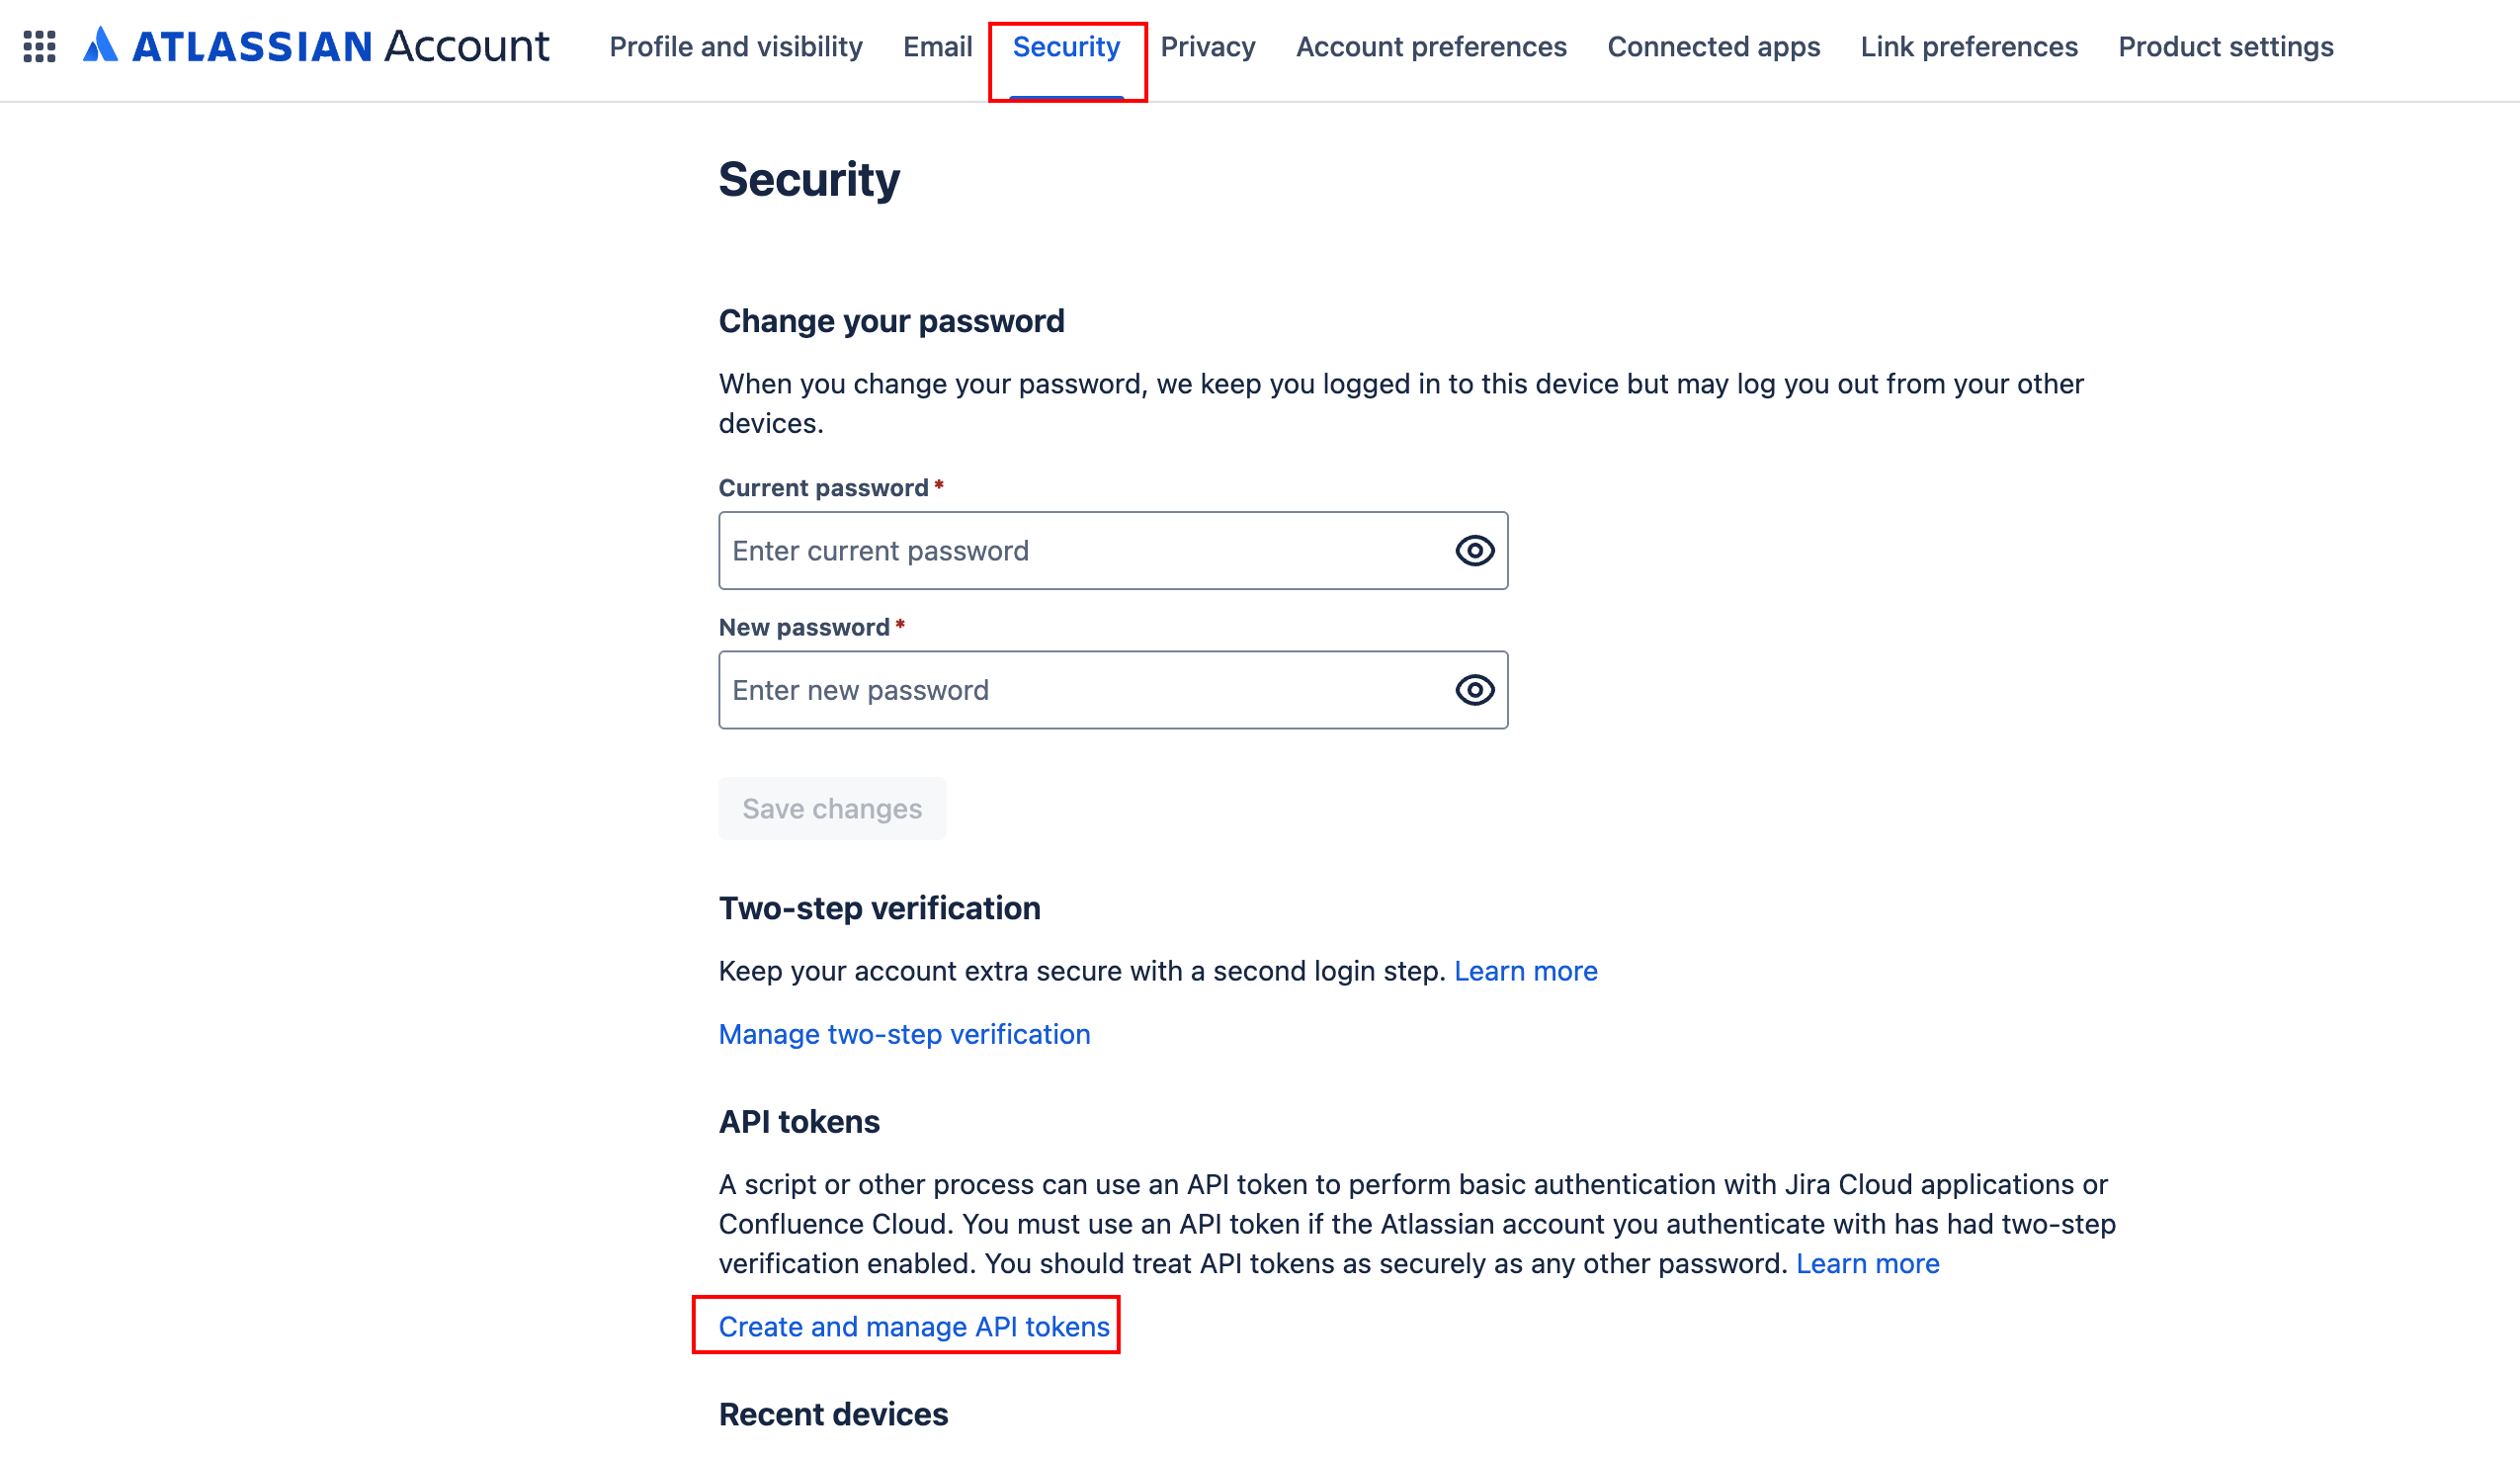
- Select Security.
- Scroll to API tokens.
- Click Create and manage API tokens.
- Click Create API token with scopes.
- Select Bitbucket as the app.
- In the search box type repository. Select:
read:repository:bitbucketwrite:repository:bitbucket
- Review the information is correct and click Create token.
- Copy the token since it won't be shown again.
Add Your Bitbucket API Token and Repo to Coalesce
Review the steps in Add your URL and Token to Coalesce.
GitLab
GitLab is an open-core DevOps platform that provides a complete software development lifecycle tool with integrated Git repository management, CI/CD, monitoring, and security features.
Create Your GitLab Repo and URL
-
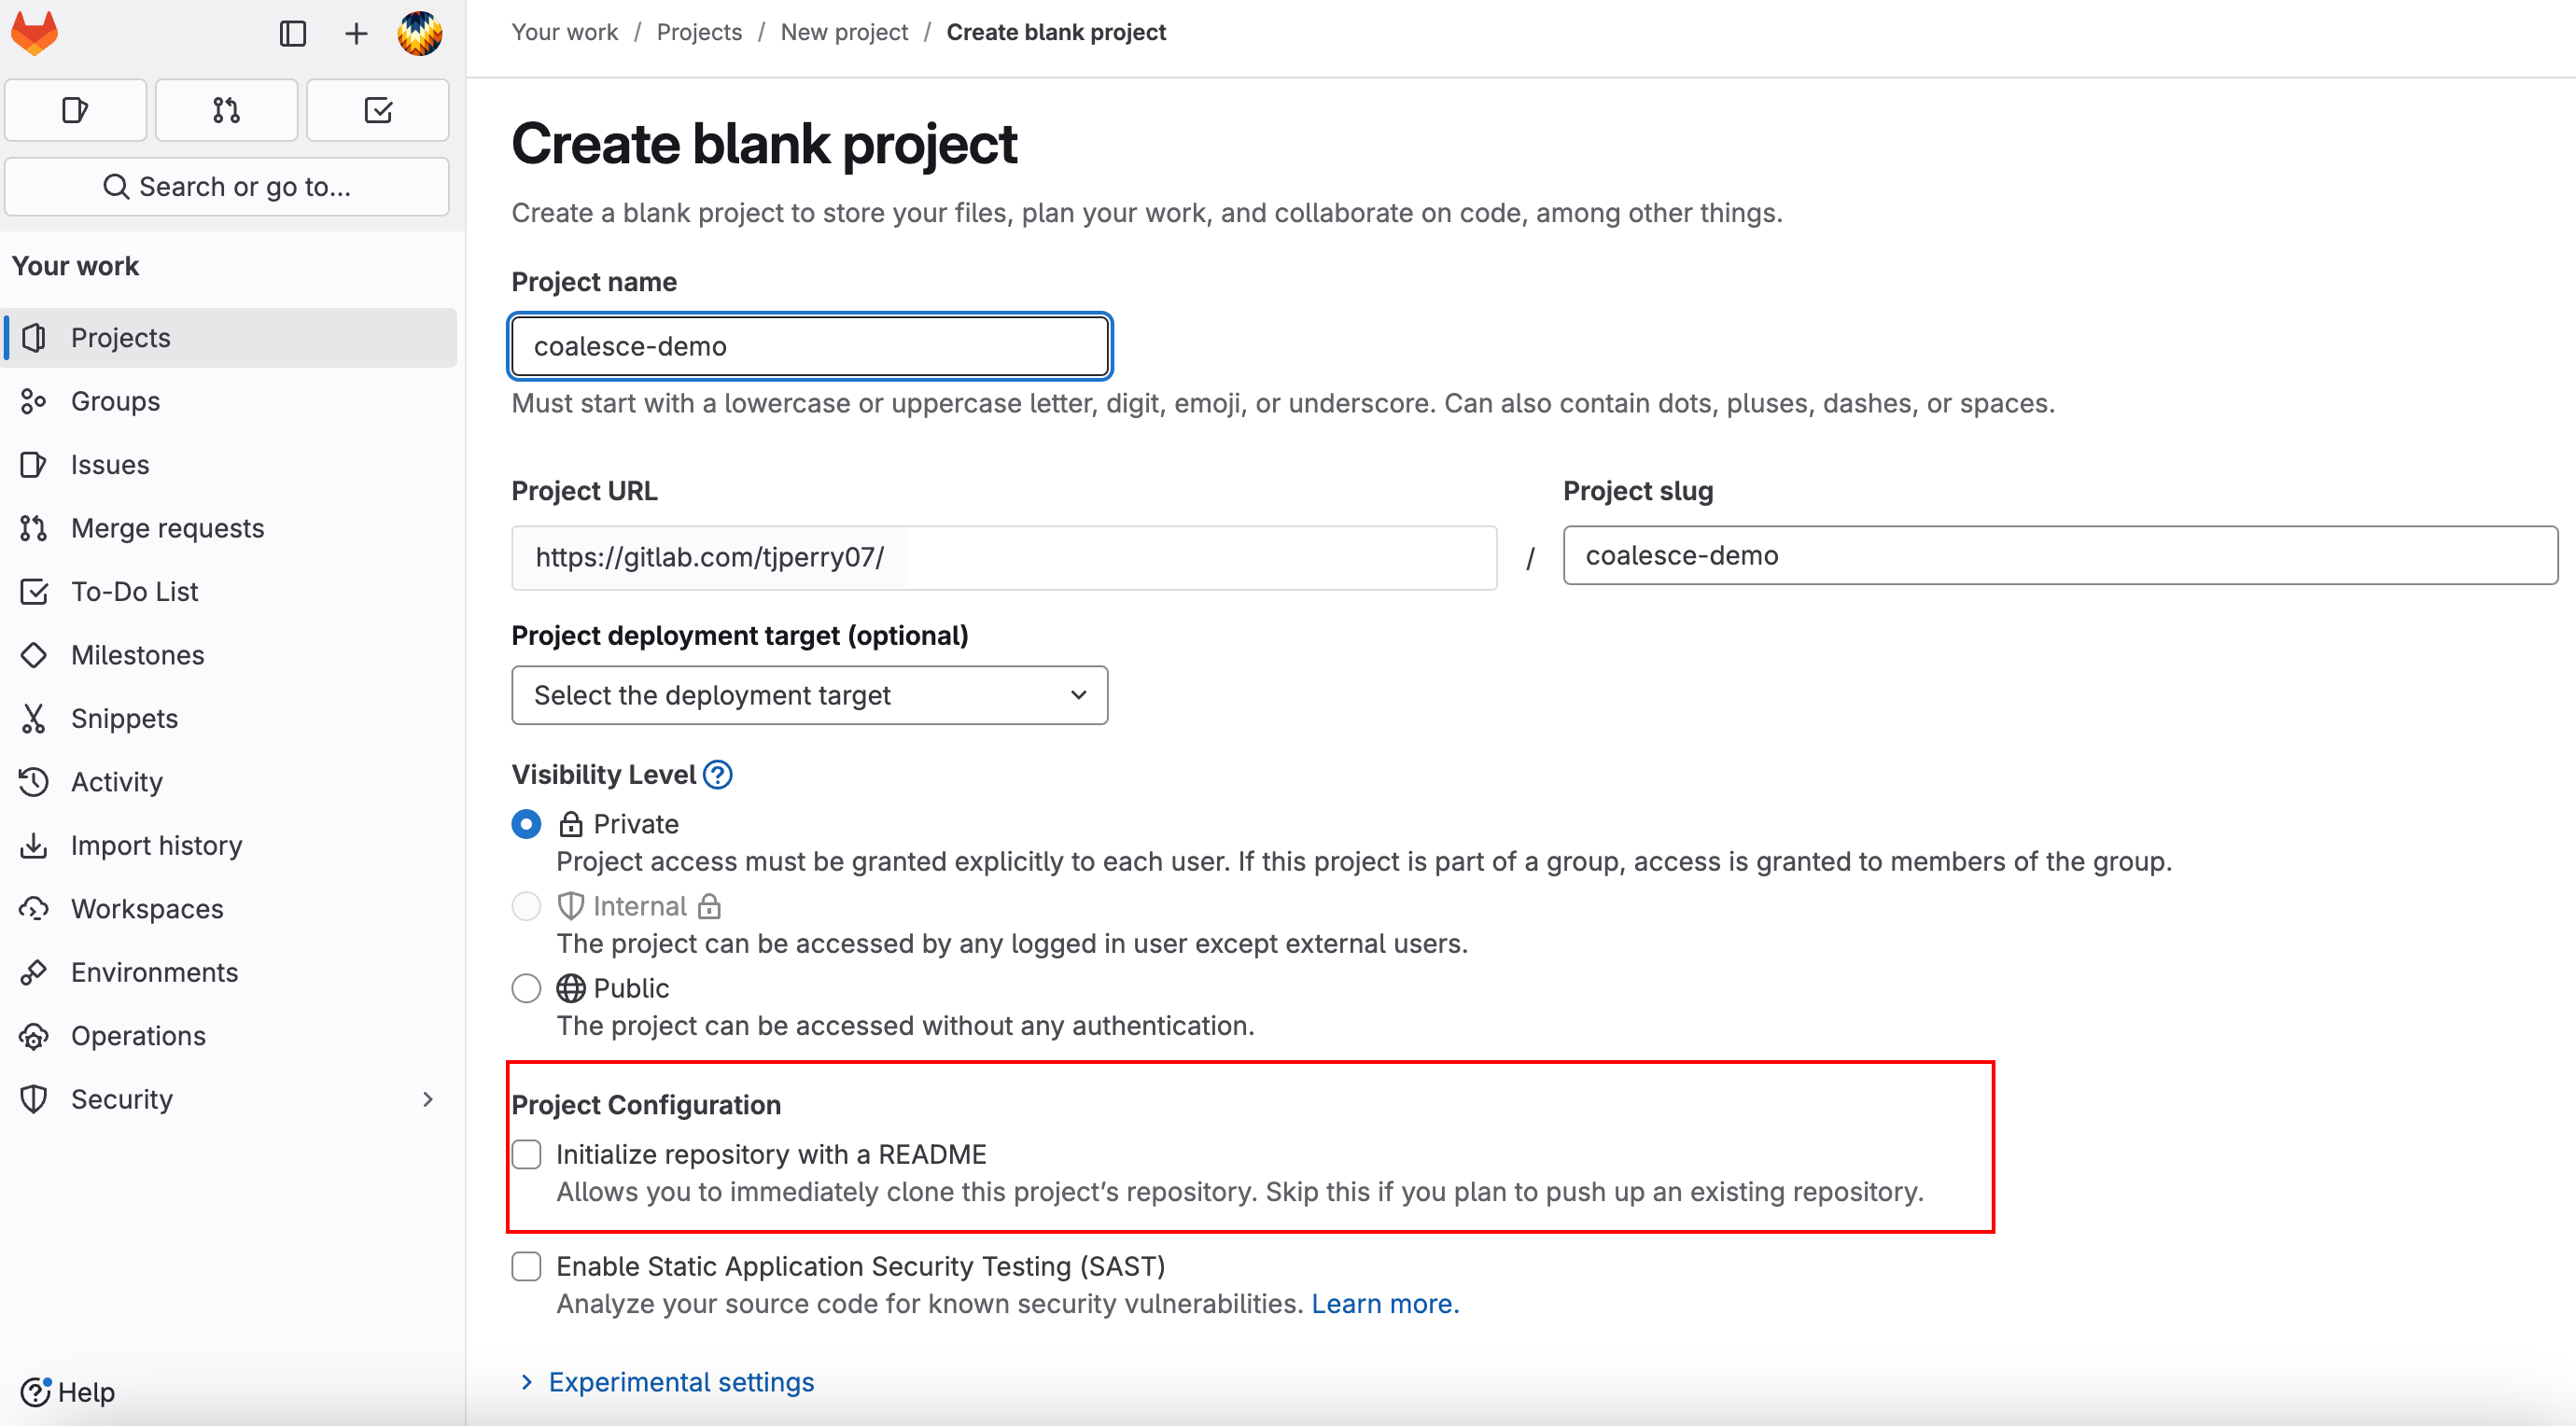
From the Projects page, click New Project.
-
Create a Blank project.
-
On the Create blank project page, make sure to uncheck Initialize repository with a README.
-
Click Create project.
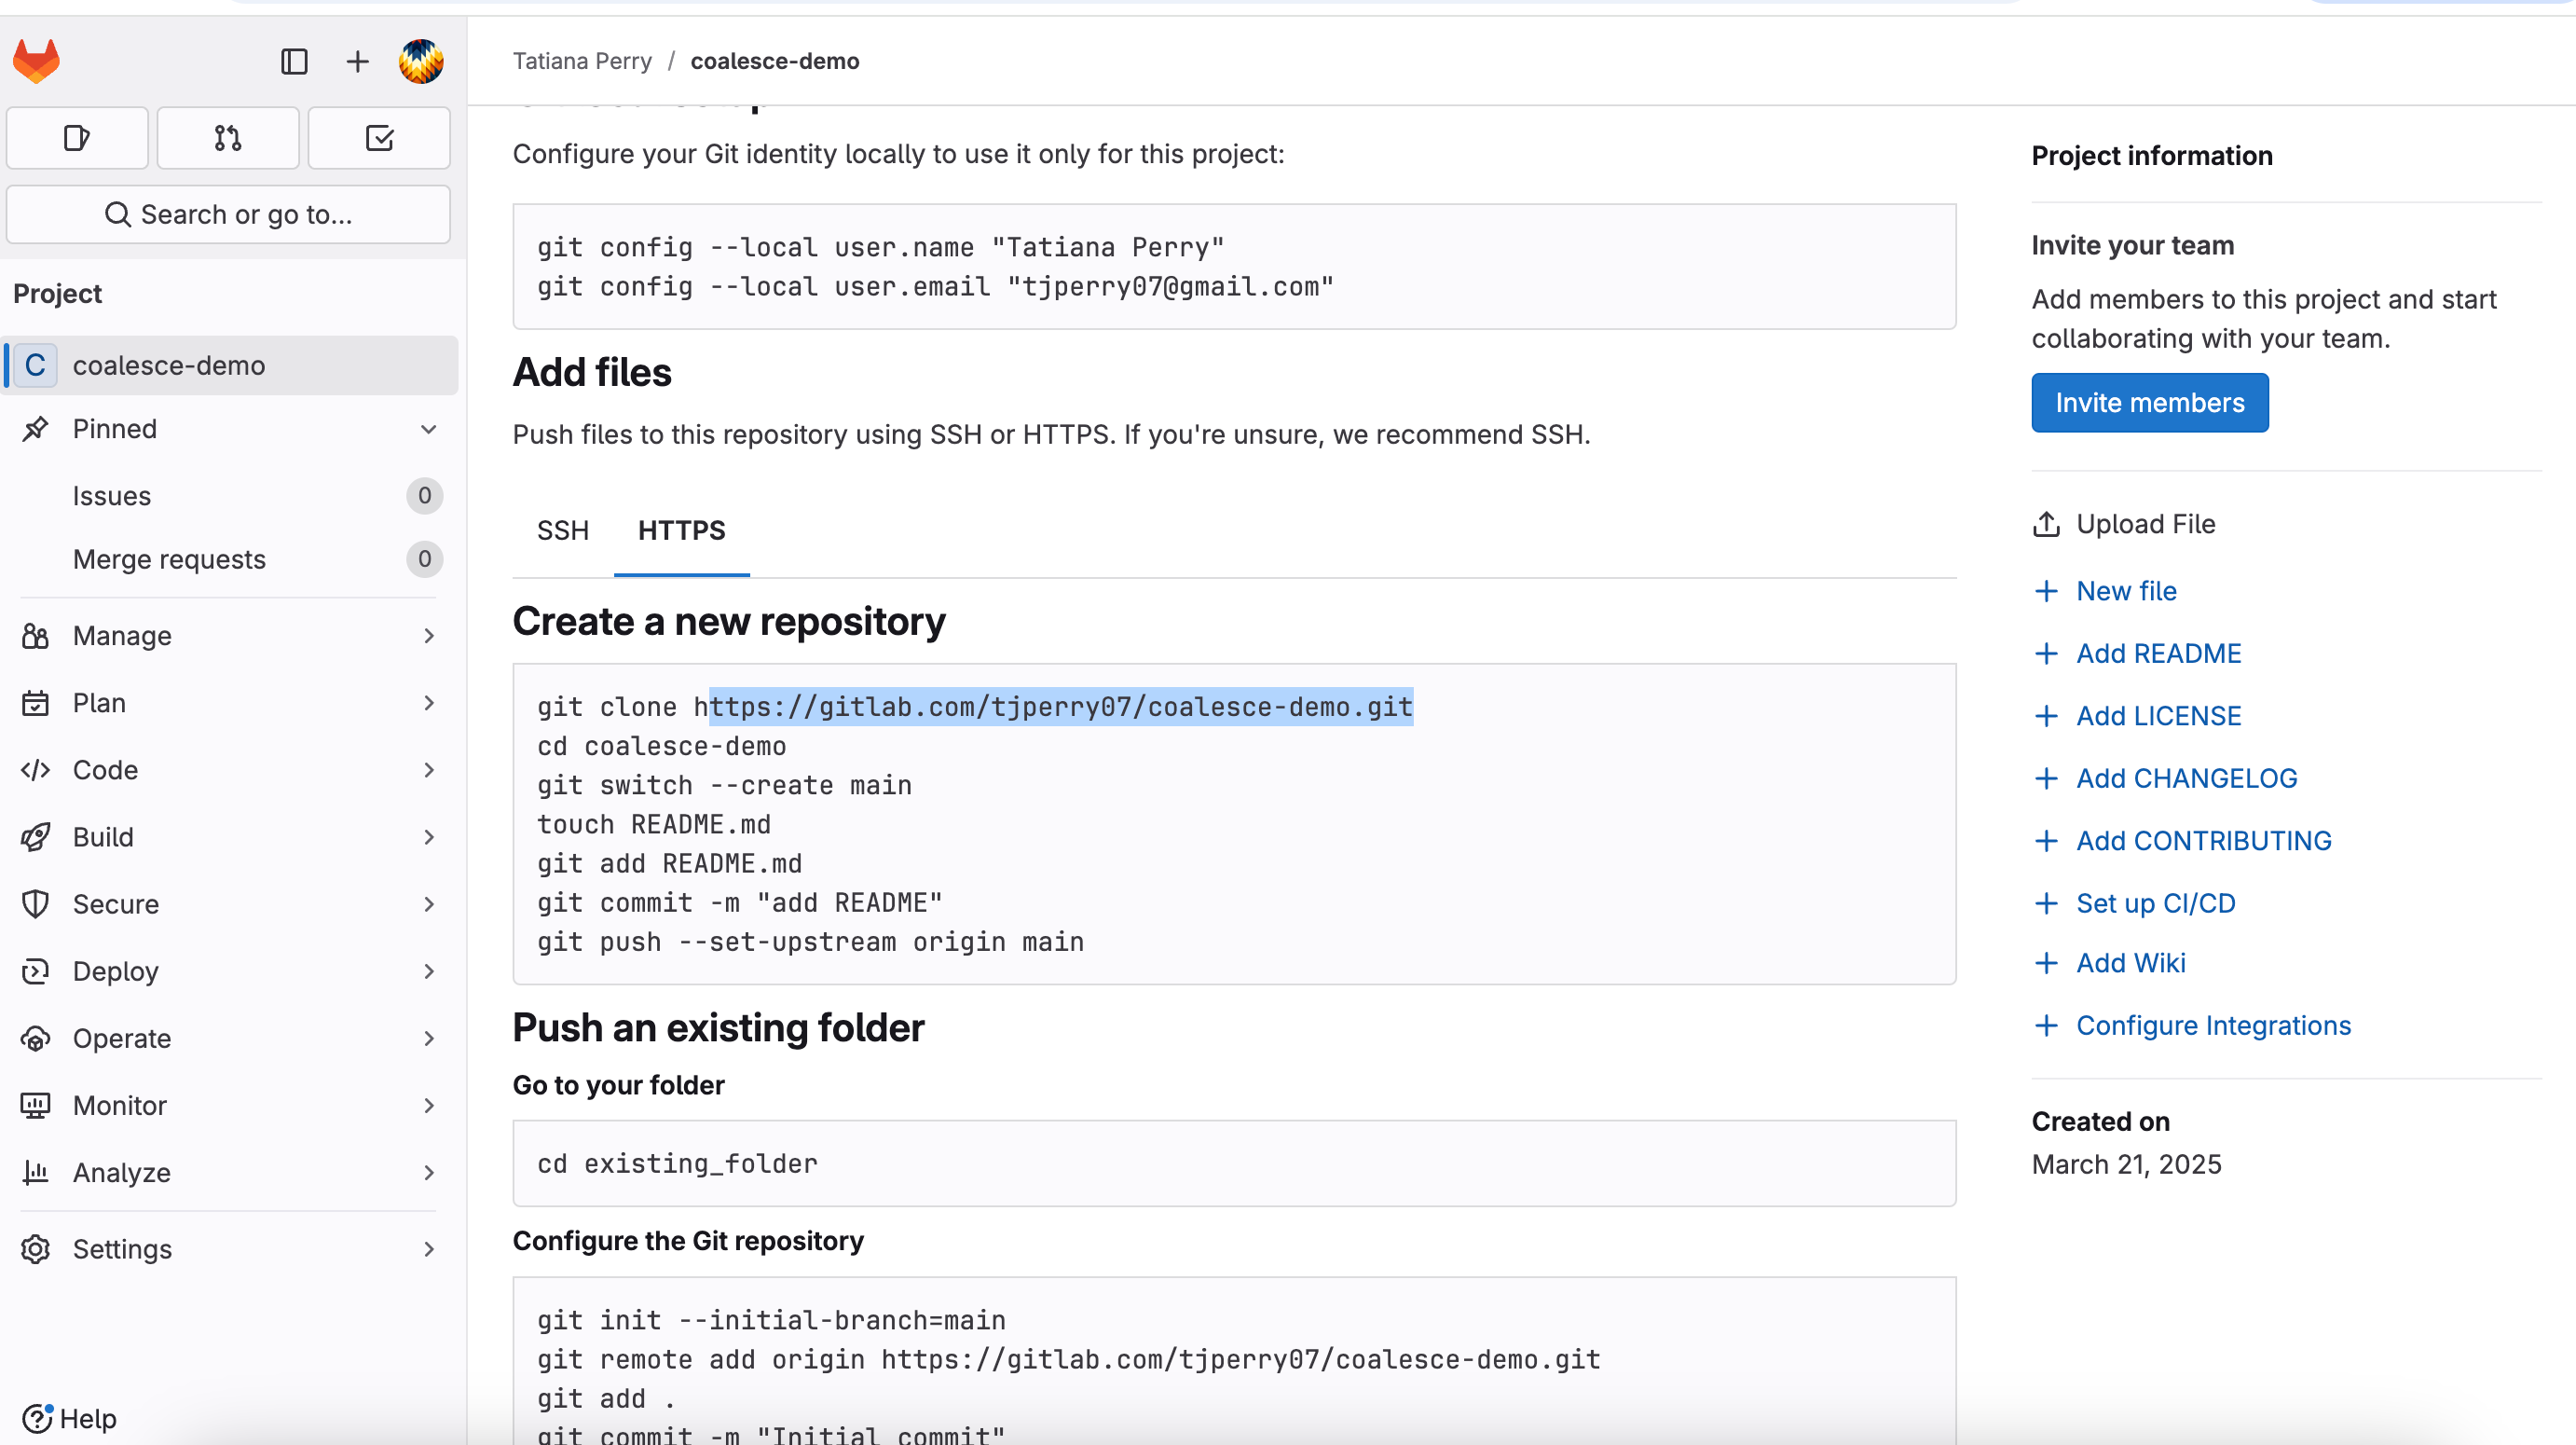
-
On the project page, scroll down to Add files, and change the tab to HTTPS. Copy your repo URL.
.gitignoreDon't add a .gitignore to your repo when creating it. It should be completely empty of all files. This is so Coalesce can initiate the repo correctly. After the repo is initiated, you can create a .gitignore.
These file paths are protected paths and files and should NOT be in the .gitignore and should not be used for anything else.
- data.yml
- locations.yml
- nodes/
- subgraphs/
- packages/
- macros/
- nodeTypes/
- environments/
- jobs/
Get Your GitLab Access Token
-
Click your avatar and select Preferences.
-
Select Access tokens.
-
Under Personal access tokens, click Add new token.
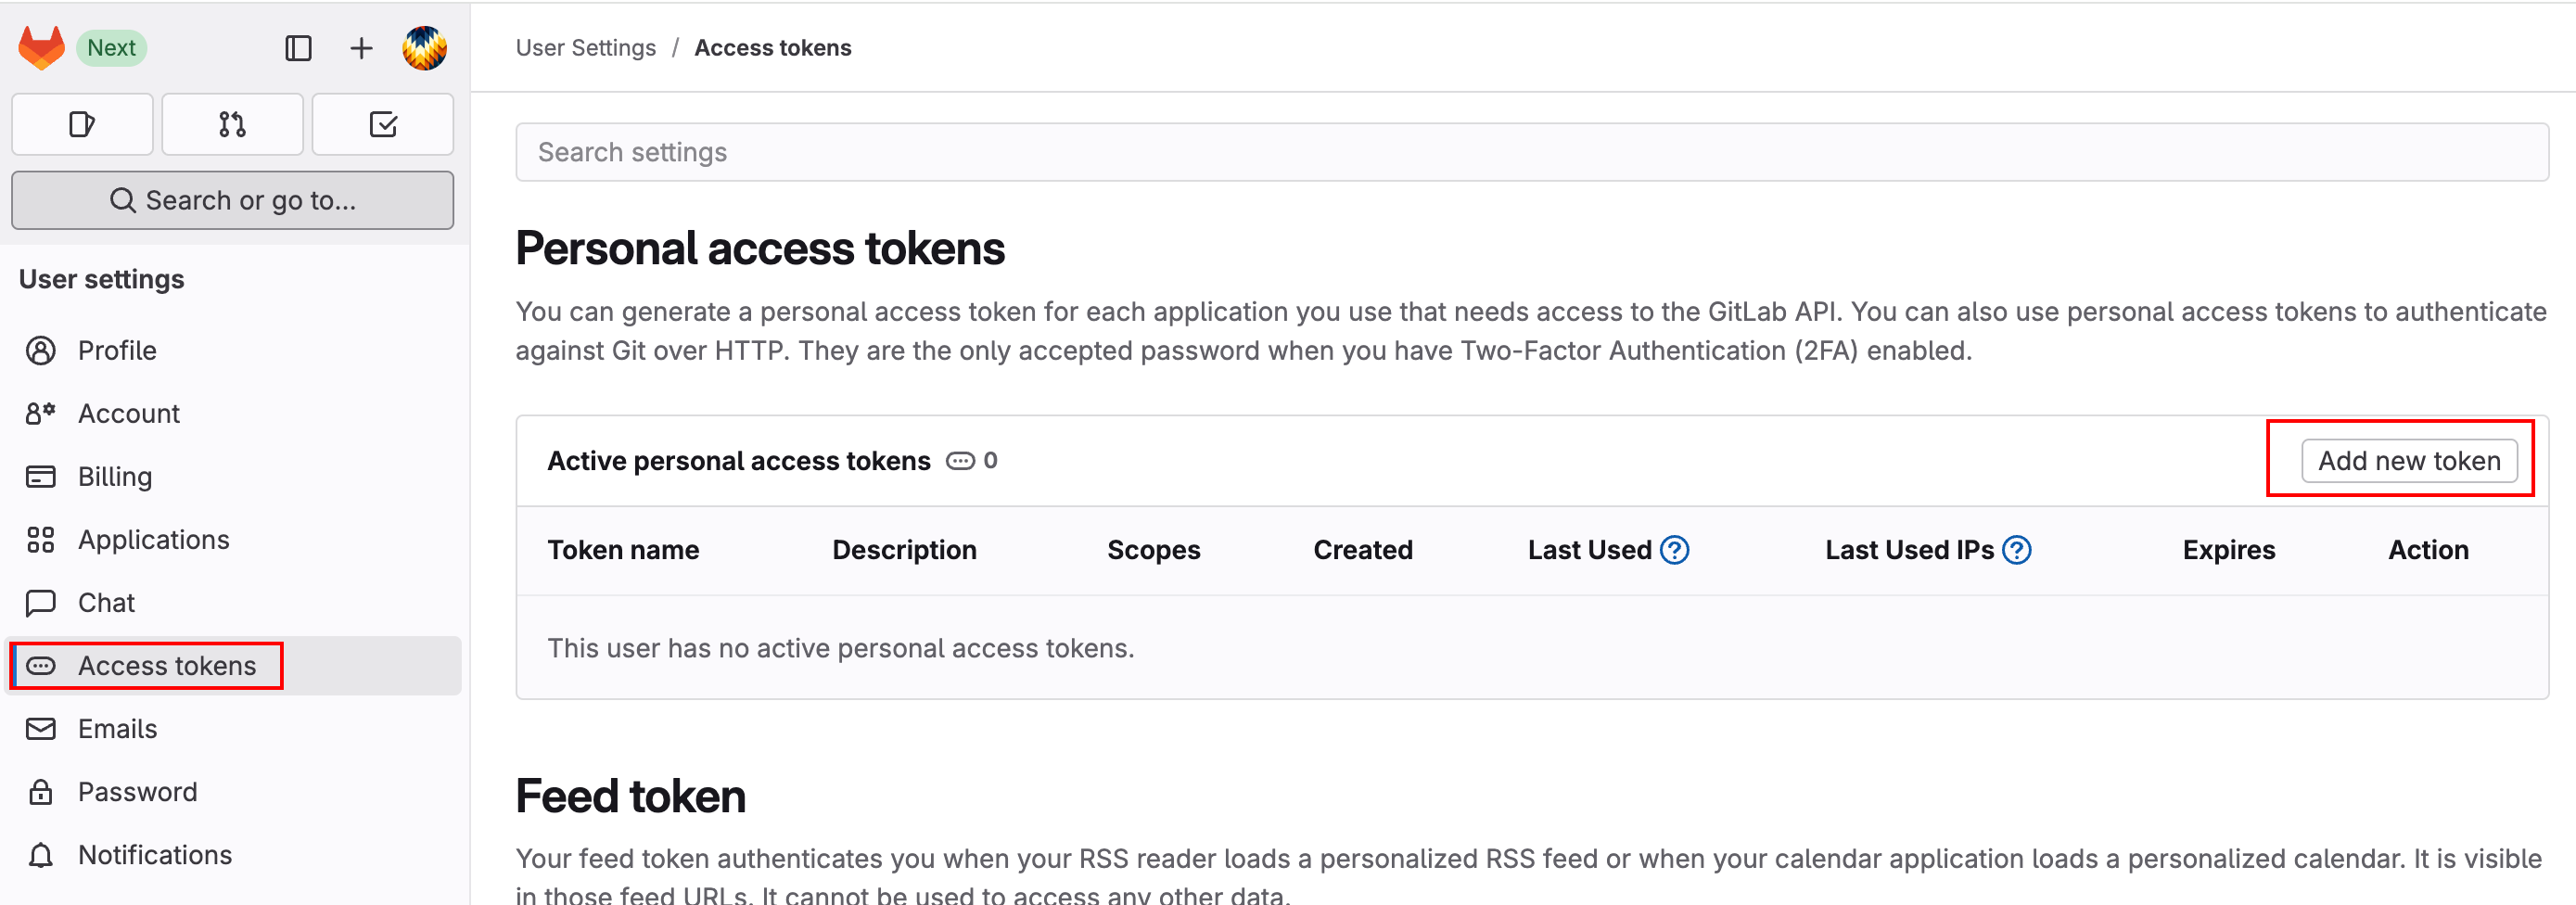
-
Give the token a name.
-
Select the scopes:
read_repositorywrite_repository
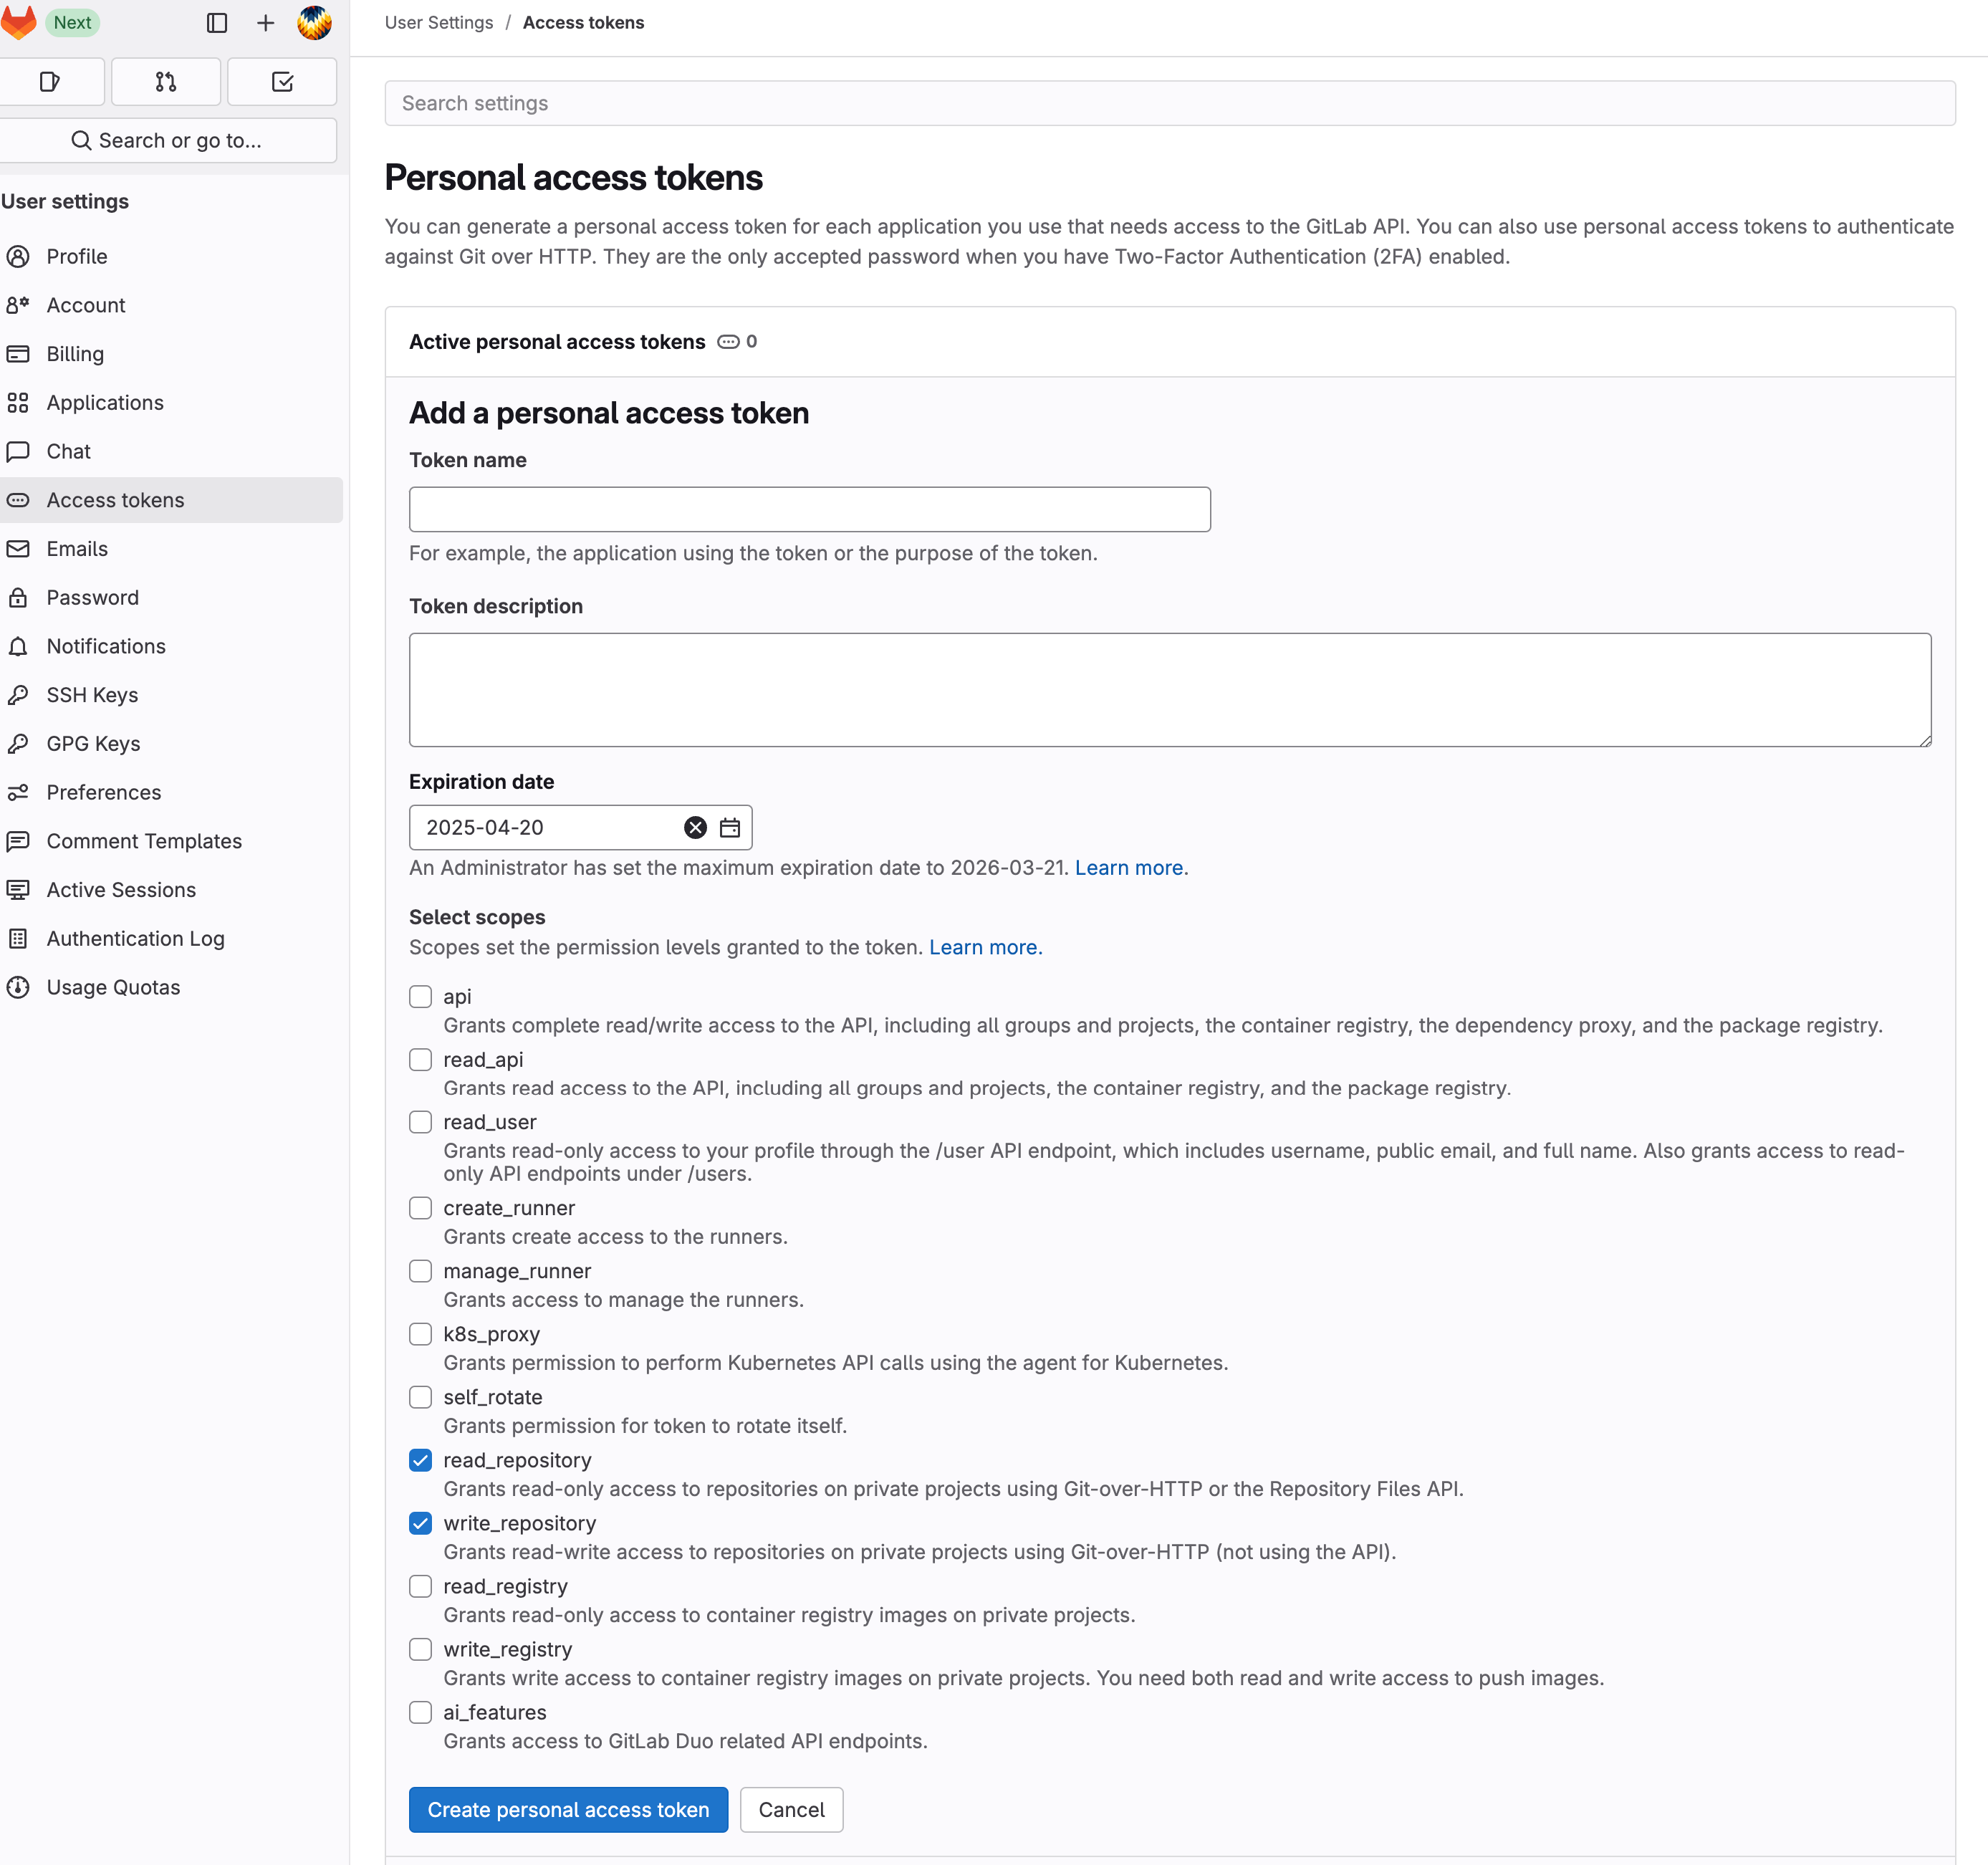
-
Create personal access token. Make sure to save this some where secure.
Add Your GitLab Token and Repo to Coalesce
Review the steps in Add your URL and Token to Coalesce.
Add Your Token and Repo To Coalesce
Make sure to set the username as x-token-auth when adding a version control account in Coalesce for Bitbucket repo access generated tokens only.
These instructions show you how to add your token and repo URL to your Project in Coalesce. The steps are the same for each provider.
After you have your access token, you need to add it to Coalesce and connect your Git account. You can do this as part of creating a project or by adding it your User Settings. In this example, we'll add it while creating a project.
-
Go to the Project page. If you are on the Build page , click the back arrow.
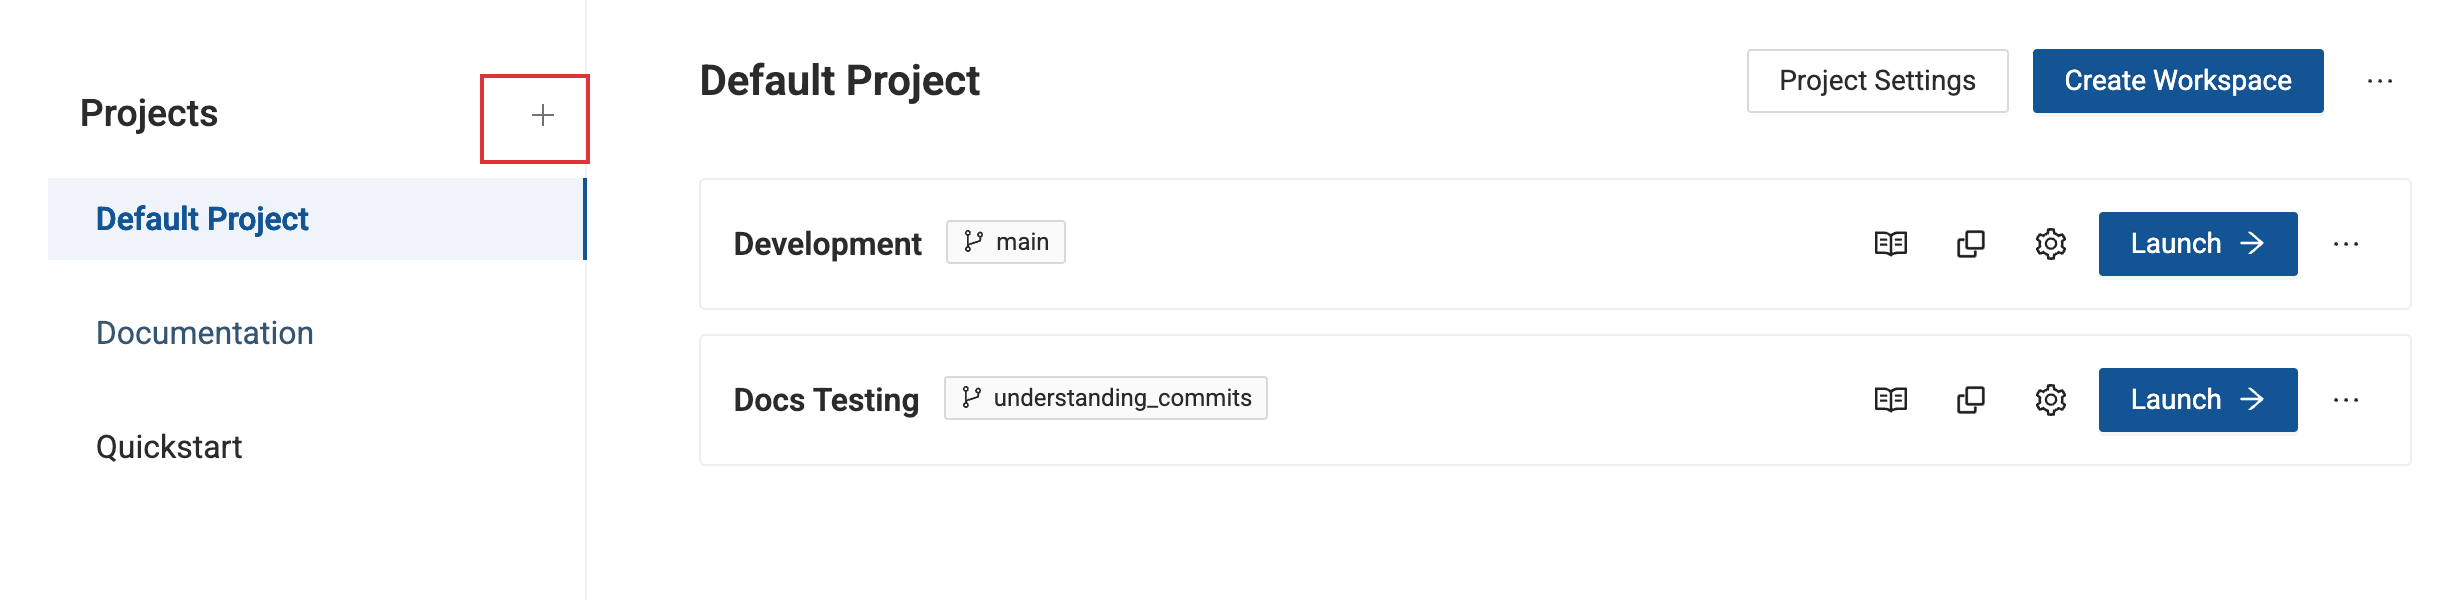
-
Click the plus sign(+) next to Projects.
-
Enter the Project name and description. Click Next.

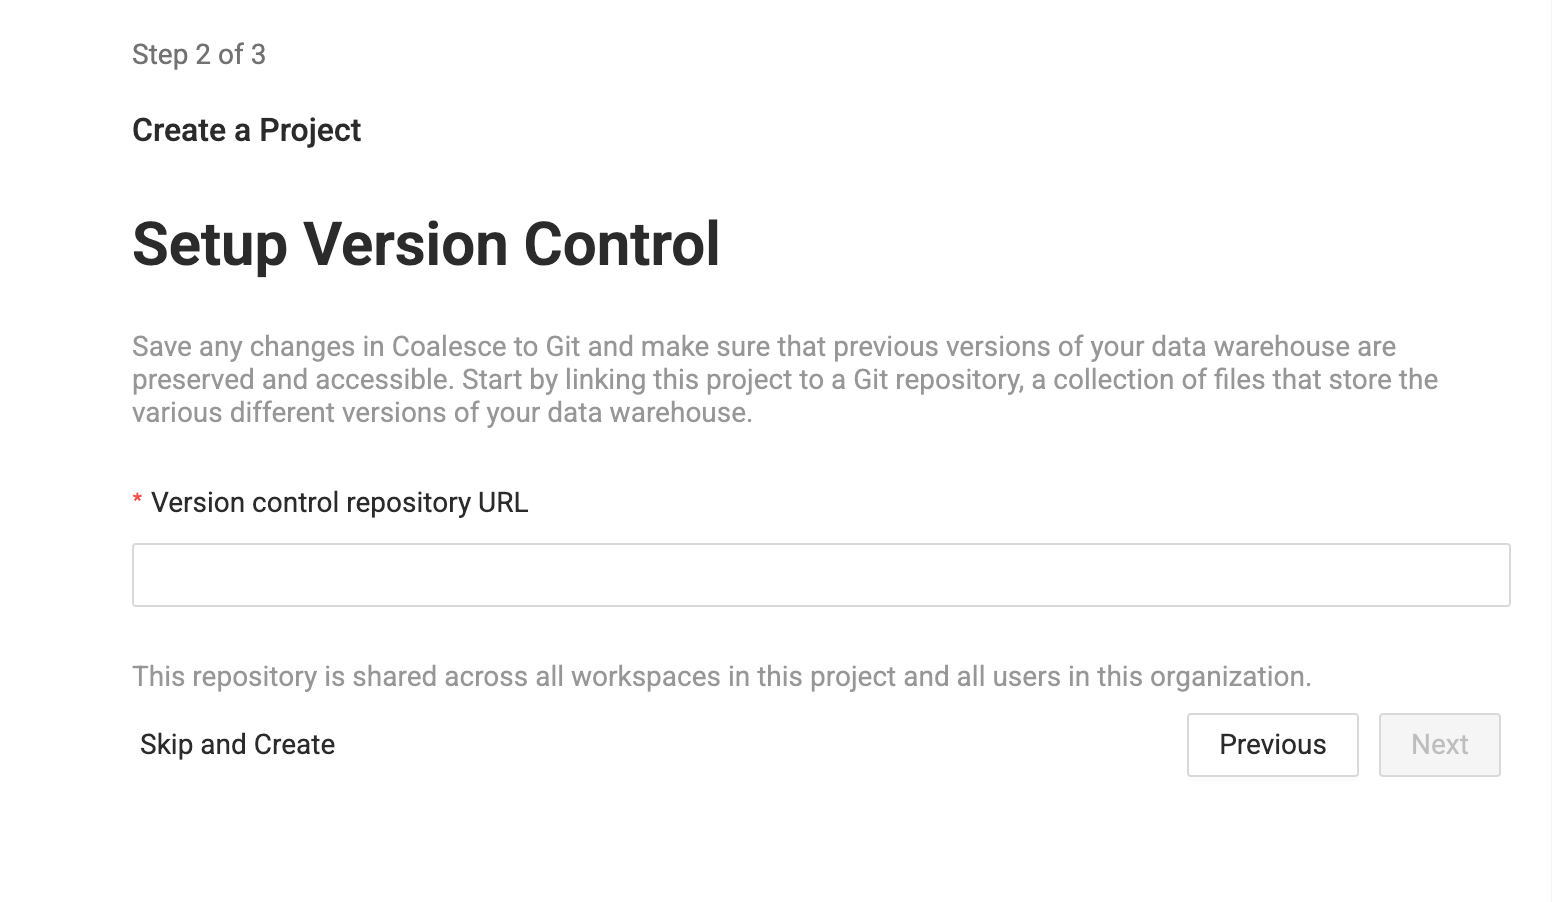
-
Enter your Version control repository URL.
-
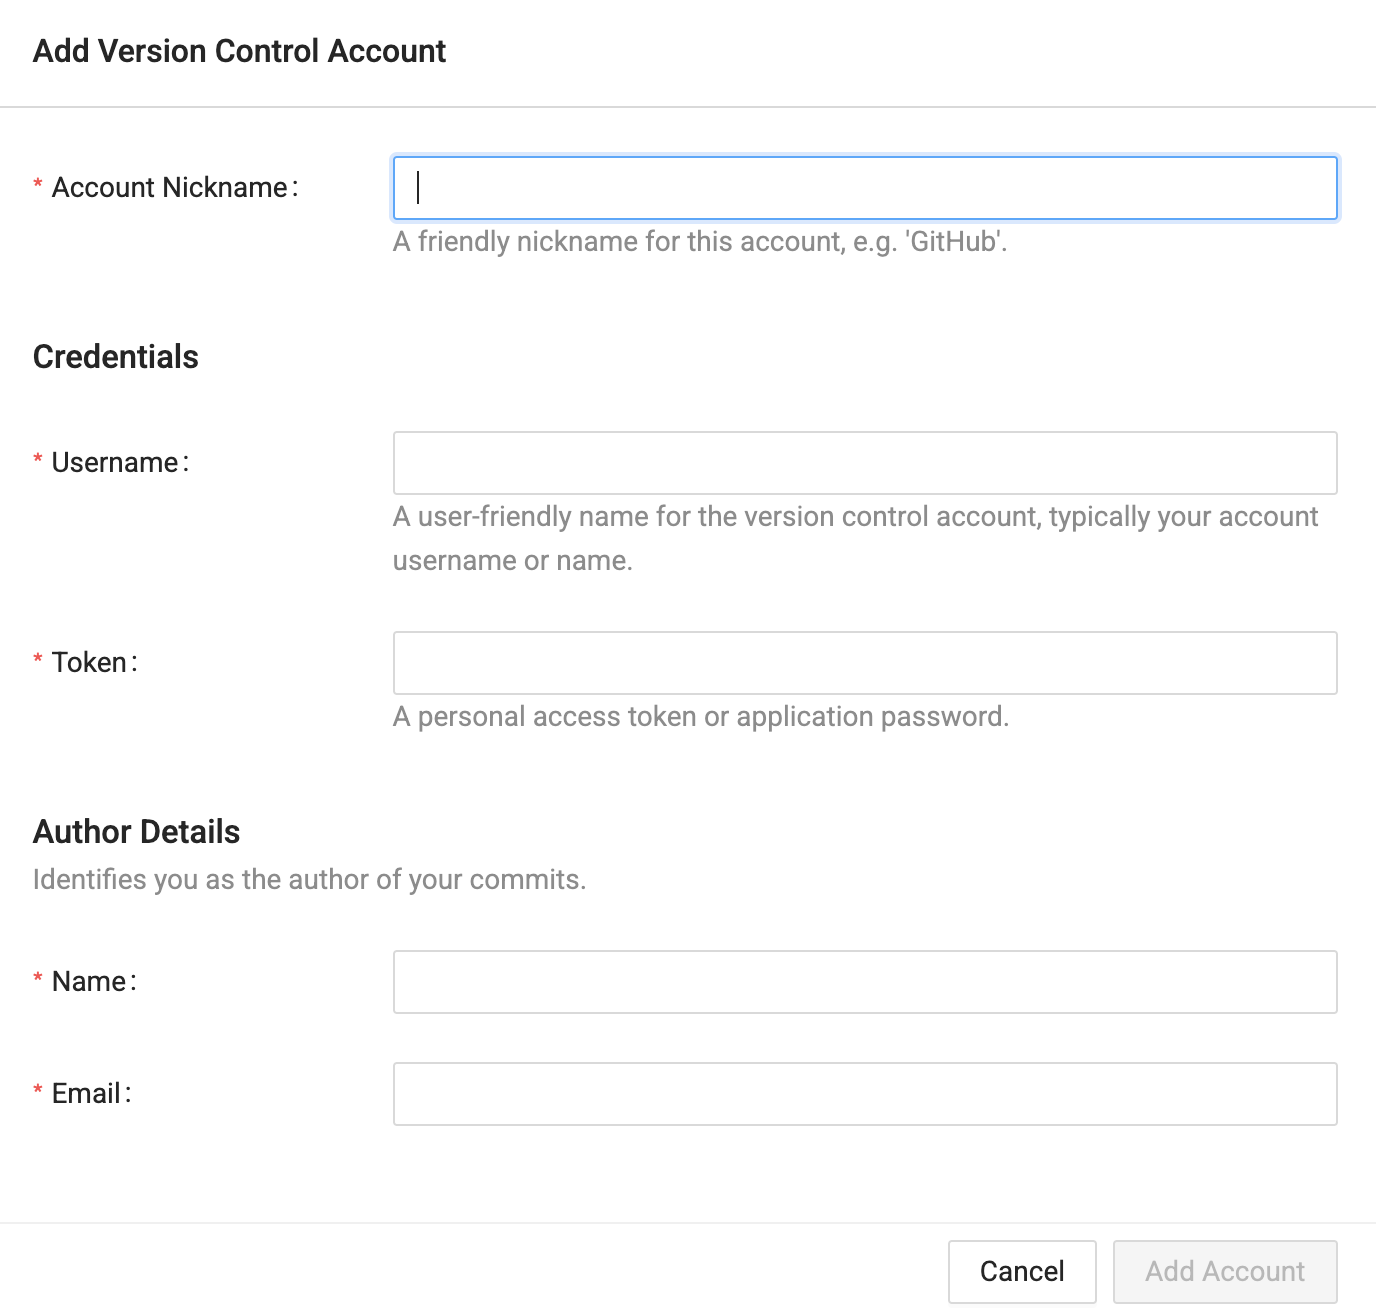
On the next page, Click Add New Account.
- Enter an account nickname. This will displayed in the interface.
- Enter your username. If you are using Bitbucket AND generated a repo access token, set
x-token-authas the username. - Enter your token. This will be either the GitLab token, Git token, Azure token, or Bitbucket Token
- Enter the Author Name, which identifies the committer. This doesn't have to match your version control account.
- Enter the Author Email, which identifies the committer email. This doesn't have to match your version control account.
- Click Add.
-
Select the Git account you just created in the drop down, then click Test Account.
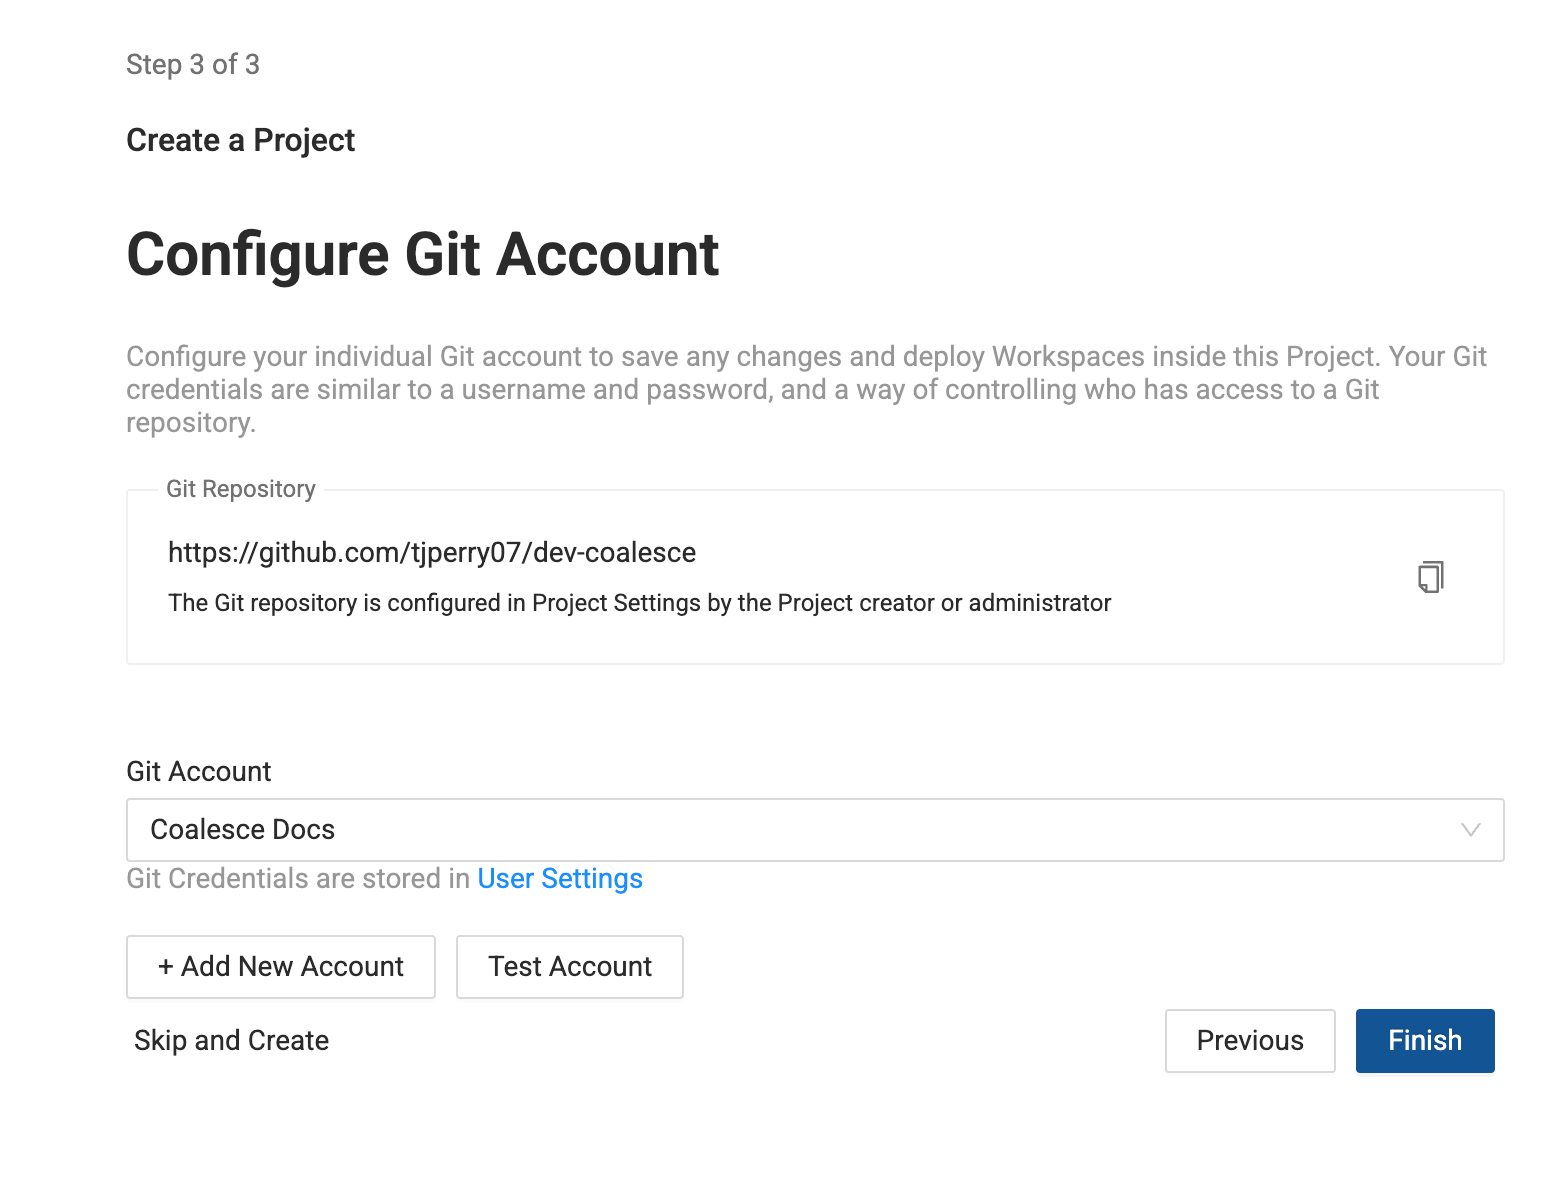
-
Then click Finish to create your Project.
You can move to Step 3: Create a Workspace since you've already created a Project in this step.
What's Next
- Make sure each user is added to the repo.
- Each user needs to create an access token and update their Git Account in Coalesce. They can follow the instructions for each provider on creating a token. They can go to User Settings > Version Control Accounts.