Documentation index: llms.txt. This page is also available as markdown: append .md to this URL or send Accept: text/markdown.
Sync Back to Snowflake
Automatically push documentation from Catalog to your Snowflake instance. You can sync descriptions, also called comments, for tables, views, dynamic tables, external tables, and columns so they appear natively in Snowflake.
Prerequisites
You need a Catalog managed Snowflake integration to push back information to Snowflake. Configure it first if you haven't already.
How It Works
What Is Synchronized?
Catalog synchronizes descriptions for:
- Tables
- Views
- Dynamic tables
- External tables
- Columns
When Does It Run?
Once Sync Back is enabled, Catalog automatically checks for new or updated descriptions every 24 hours.
How Are Descriptions Updated?
Catalog writes a description to Snowflake only if the object has no existing description, or if the existing description was originally written by Catalog. Catalog never overwrites a description that was authored directly in Snowflake.
Network Policy
This step is only needed if you use Snowflake network policies, meaning your Snowflake instance only accepts connections from specific IPs. In that case you must allow Catalog's IPs. Otherwise Sync Back fails with an error such as:
OperationFailedError: Incoming request with IP/Token <IP> is not allowed to access Snowflake. Contact your account administrator.
Here are the Catalog fixed IPs for the allowlist:
- For instances on app.us.castordoc.com:
34.42.92.72 - For instances on app.castordoc.com:
35.246.176.138
Sync Back authenticates with a key pair, so its network policy applies at the user level. Make sure the policy that applies to the CATALOG_SYNC_BACK user allows these IPs. Review the Snowflake network policies documentation and Snowflake's instructions on how to whitelist an IP address.
If a network policy already exists, add the Catalog IPs to its ALLOWED_IP_LIST instead of replacing the policy. Replacing it can lock other users out of Snowflake.
Setup
Complete the Snowflake procedure, role, and credential configuration below to enable Sync Back.
Activating the Snowflake integration data source and setting up Sync Back are two distinct configurations. Completing the integration setup does not enable Sync Back. Follow the steps below to configure it.
Technical Details
Catalog leverages Snowflake Procedures in order to safely update the descriptions in your Snowflake instance. As Snowflake states, procedures can run user-defined code with privileges of the role that owns the procedure, rather than with the privileges of the role that runs the procedure.
One of the top-level roles on Snowflake will create and own a secure procedure specifically made for updating comments in Snowflake and will delegate to a specific user and role only the ability to call said procedure.
Finally, enter the credentials for the user in Catalog. Use this user for Sync Back only.
For more information on how Stored Procedures work, review the Snowflake documentation:
Before You Start
Complete the steps in the Technical Details and procedure sections below.
You'll need one of the following top-level roles on Snowflake to create the Catalog user:
- SECURITYADMIN
- ACCOUNTADMIN
- SYSADMIN
If your configuration allows, you can use different roles.
The role used for this setup needs rights to update comments on all objects in the Snowflake instance. If the top-level role cannot update a specific object, Catalog Sync Back cannot update it either.
Step 1: Create the Sync Back Catalog User
1.1 Create a Dedicated Role
Create a role called CATALOG_SYNC_BACK_ROLE. This role inherits the public role from your instance and won't have any rights initially. Assign this role to the Catalog Sync Back user.
USE ROLE SECURITYADMIN;

CREATE ROLE CATALOG_SYNC_BACK_ROLE;
GRANT ROLE CATALOG_SYNC_BACK_ROLE TO ROLE SYSADMIN;
1.2 Create a Dedicated Warehouse
Catalog only updates your table and column descriptions once per day and the auto-suspend setup is on.
USE ROLE SYSADMIN;

CREATE WAREHOUSE CATALOG_SYNC_BACK_WH
WITH WAREHOUSE_SIZE = XSMALL
  AUTO_SUSPEND = 59
  AUTO_RESUME = TRUE
  INITIALLY_SUSPENDED = TRUE
  COMMENT = 'warehouse used for catalog sync-back';
1.3 Grant Usage on the New Warehouse to New Role
Add rights to the role you created in Step 1.1. This role is granted usage rights to the new warehouse you created in Step 1.2.
GRANT USAGE ON WAREHOUSE CATALOG_SYNC_BACK_WH TO ROLE CATALOG_SYNC_BACK_ROLE;
1.4 Create the Catalog User on Snowflake
Create a user called CATALOG_SYNC_BACK.
USE ROLE SECURITYADMIN;
-- You may need to use ACCOUNTADMIN
CREATE OR REPLACE USER CATALOG_SYNC_BACK
    LOGIN_NAME = CATALOG_SYNC_BACK
    DEFAULT_ROLE = CATALOG_SYNC_BACK_ROLE
    DEFAULT_WAREHOUSE = CATALOG_SYNC_BACK_WH;

-- Setting DEFAULT_ROLE does not grant the role. Grant it explicitly, otherwise
-- the user falls back to PUBLIC and cannot use the warehouse or the procedure.
GRANT ROLE CATALOG_SYNC_BACK_ROLE TO USER CATALOG_SYNC_BACK;
Step 2: Create the Snowflake Procedure
Create a procedure called CATALOG_SYNC_BACK_DESCRIPTIONS. This name is only a suggestion. You can use any name, database, or schema, as long as the full path matches the Procedure Path in your Catalog Sync Back settings.
If you already had Sync Back running with an earlier procedure, you don't need to redo the whole setup. The database, schema, role, user, and network policy you created before still apply. At minimum:
-
Re-create the procedure with the new definition from Step 2.2, keeping the same name as before (the one in your Procedure Path). Include
COPY GRANTSso existing grants are preserved. The new signature is(TABLES VARIANT), so this adds a new version alongside your old one rather than overwriting it. The app calls the new version automatically. -
Grant usage on the new procedure to the Sync Back role, as shown in Step 2.3:
GRANT USAGE ON PROCEDURE <your-procedure-path>(VARIANT) TO ROLE CATALOG_SYNC_BACK_ROLE;
If you take this opportunity to rename the procedure, remember to also update the Procedure Path in the Catalog app.
Step 2.1: Create the Catalog Utility Database
Before creating the procedure, you need a database and schema for it. You can use any database and schema you like. Note its full path, DATABASE.SCHEMA.PROCEDURE, because you'll enter it in the Catalog settings later. We recommend a dedicated one:
USE ROLE SECURITYADMIN;
-- You may need to use ACCOUNTADMIN

CREATE DATABASE IF NOT EXISTS CATALOG_UTILS;
CREATE SCHEMA IF NOT EXISTS CATALOG_UTILS.PUBLIC;
Step 2.2: Create the Sync Back Procedure
Create the Snowflake procedure that the CATALOG_SYNC_BACK user calls. It receives a batch as a single VARIANT payload, applies each object's column descriptions in one grouped ALTER (efficient even on very wide tables), and returns one result per object. It treats every input safely to prevent SQL injection.
USE ROLE SECURITYADMIN;
-- You may need to use ACCOUNTADMIN

CREATE OR REPLACE PROCEDURE CATALOG_UTILS.PUBLIC.CATALOG_SYNC_BACK_DESCRIPTIONS(TABLES VARIANT)
COPY GRANTS   -- keep existing grants when re-running this CREATE OR REPLACE
RETURNS VARIANT
LANGUAGE SQL
EXECUTE AS OWNER
AS
$$
-- Applies Catalog descriptions as COMMENTs, one grouped ALTER per object (with a per-column fallback).
-- Input : [{ objectType, objectName, table?: { id, newComment }, columns: [{ id, columnName, newComment }] }]
-- Output: [{ objectName, status: 'SUCCESS' | 'PARTIAL' | 'FAILED', failed?: [{ id, error }] }]
DECLARE
  results ARRAY := ARRAY_CONSTRUCT();
  failed ARRAY;
  tobj VARIANT;
  n_tables INTEGER;
  n_cols INTEGER;
  t INTEGER;
  c INTEGER;
  tbl VARIANT;
  cols VARIANT;
  col VARIANT;
  otype STRING;
  oname STRING;
  clauses STRING;
BEGIN
  n_tables := ARRAY_SIZE(:TABLES);
  FOR t IN 0 TO n_tables - 1 DO
    tbl := GET(:TABLES, :t);
    otype := UPPER(TRIM(GET(:tbl, 'objectType')::string));
    oname := GET(:tbl, 'objectName')::string;
    IF (NOT (:otype IN ('TABLE', 'VIEW', 'DYNAMIC TABLE'))) THEN
      results := ARRAY_APPEND(:results, OBJECT_CONSTRUCT('objectName', :oname, 'status', 'FAILED', 'error', 'invalid objectType: ' || :otype));
    ELSE
      cols := NVL(GET(:tbl, 'columns'), ARRAY_CONSTRUCT());
      n_cols := ARRAY_SIZE(:cols);
      tobj := GET(:tbl, 'table');
      failed := ARRAY_CONSTRUCT();

      -- object-level comment (optional)
      IF (:tobj IS NOT NULL) THEN
        BEGIN
          EXECUTE IMMEDIATE 'ALTER ' || :otype || ' IDENTIFIER(?) SET COMMENT = ''' || REPLACE(GET(:tobj, 'newComment')::string, '''', '''''') || '''' USING (oname);
        EXCEPTION
          WHEN OTHER THEN
            failed := ARRAY_APPEND(:failed, OBJECT_CONSTRUCT('id', GET(:tobj, 'id')::string, 'error', SQLERRM));
        END;
      END IF;

      -- column comments: one grouped multi-column ALTER, with a per-column fallback on failure
      IF (:n_cols > 0) THEN
        clauses := '';
        FOR c IN 0 TO n_cols - 1 DO
          col := GET(:cols, :c);
          clauses := :clauses || IFF(:c > 0, ', ', '')
            || 'COLUMN "' || REPLACE(GET(:col, 'columnName')::string, '"', '""') || '" COMMENT '''
            || REPLACE(GET(:col, 'newComment')::string, '''', '''''') || '''';
        END FOR;
        BEGIN
          EXECUTE IMMEDIATE 'ALTER ' || :otype || ' IDENTIFIER(?) ALTER ' || :clauses USING (oname);
        EXCEPTION
          WHEN OTHER THEN
            FOR c IN 0 TO n_cols - 1 DO
              col := GET(:cols, :c);
              BEGIN
                EXECUTE IMMEDIATE 'ALTER ' || :otype || ' IDENTIFIER(?) ALTER COLUMN "'
                  || REPLACE(GET(:col, 'columnName')::string, '"', '""') || '" COMMENT '''
                  || REPLACE(GET(:col, 'newComment')::string, '''', '''''') || '''' USING (oname);
              EXCEPTION
                WHEN OTHER THEN
                  failed := ARRAY_APPEND(:failed, OBJECT_CONSTRUCT('id', GET(:col, 'id')::string, 'error', SQLERRM));
              END;
            END FOR;
        END;
      END IF;

      IF (ARRAY_SIZE(:failed) = 0) THEN
        results := ARRAY_APPEND(:results, OBJECT_CONSTRUCT('objectName', :oname, 'status', 'SUCCESS'));
      ELSE
        results := ARRAY_APPEND(:results, OBJECT_CONSTRUCT('objectName', :oname, 'status', 'PARTIAL', 'failed', :failed));
      END IF;
    END IF;
  END FOR;
  RETURN :results;
END
$$;
If you customize this procedure, keep its return contract: an array with one entry per object, each { objectName, status: 'SUCCESS' | 'PARTIAL' | 'FAILED', failed?: [{ id, error }] }. Catalog writes a description back only for the objects and columns it reports as successful, and retries the rest on the next run. If the whole call cannot run (for example, the procedure is unreachable), let it raise so Catalog does not treat the batch as done.
Step 2.3: Grant Usage on the Database, Schema, and Procedure to the Sync Back Role
USE ROLE SECURITYADMIN;
-- You may need to use ACCOUNTADMIN

-- The role must be able to traverse the database and schema to reach the procedure.
-- Without these, the procedure call fails with a misleading "does not exist" error.
GRANT USAGE ON DATABASE CATALOG_UTILS TO ROLE CATALOG_SYNC_BACK_ROLE;
GRANT USAGE ON SCHEMA CATALOG_UTILS.PUBLIC TO ROLE CATALOG_SYNC_BACK_ROLE;

GRANT USAGE ON PROCEDURE CATALOG_UTILS.PUBLIC.CATALOG_SYNC_BACK_DESCRIPTIONS(VARIANT)
TO ROLE CATALOG_SYNC_BACK_ROLE;
Step 2.4: Test the Sync Back User
The Catalog Sync Back user should now be correctly set up. Before you give Catalog the credentials, run a test to make sure everything works. Use the created role and run the following statements.
Check Warehouse
You must see the warehouse CATALOG_SYNC_BACK_WH as the default one.
USE ROLE CATALOG_SYNC_BACK_ROLE;

SHOW WAREHOUSES;
Check Role
You must see the role CATALOG_SYNC_BACK_ROLE as the current and default one.
SHOW ROLES;
Check Procedure
You must see the procedure CATALOG_UTILS.PUBLIC.CATALOG_SYNC_BACK_DESCRIPTIONS in the list of returned values.
USE ROLE CATALOG_SYNC_BACK_ROLE;

SHOW PROCEDURES IN ACCOUNT;
Step 3: Create a Key Pair
Review the Snowflake documentation about Key Pair Authentication for more details.
3.1 Create Private Key
Open the terminal on your computer and generate a private key without a passphrase using the following command:
openssl genrsa 2048 | openssl pkcs8 -topk8 -inform PEM -out rsa_key.p8 -nocrypt
3.2 Create Public Key
Generate the public key using the private key you created above with the following command:
openssl rsa -in rsa_key.p8 -pubout -out rsa_key.pub
The key generated will be in the following format:
-----BEGIN PUBLIC KEY-----
MIIBIj...
-----END PUBLIC KEY-----
3.3 Assign Public Key to the Catalog User
Execute an ALTER USER command to add the public key to the Catalog user. Insert the public key without its delimiters in the command. Here is an example:
ALTER USER CATALOG_SYNC_BACK SET RSA_PUBLIC_KEY='MIIBIjANBgkqh...';
Step 4: Add New Credentials in Catalog App
You must be a Catalog admin to complete this step.
You can now enter the newly created credentials in the Catalog App.
-
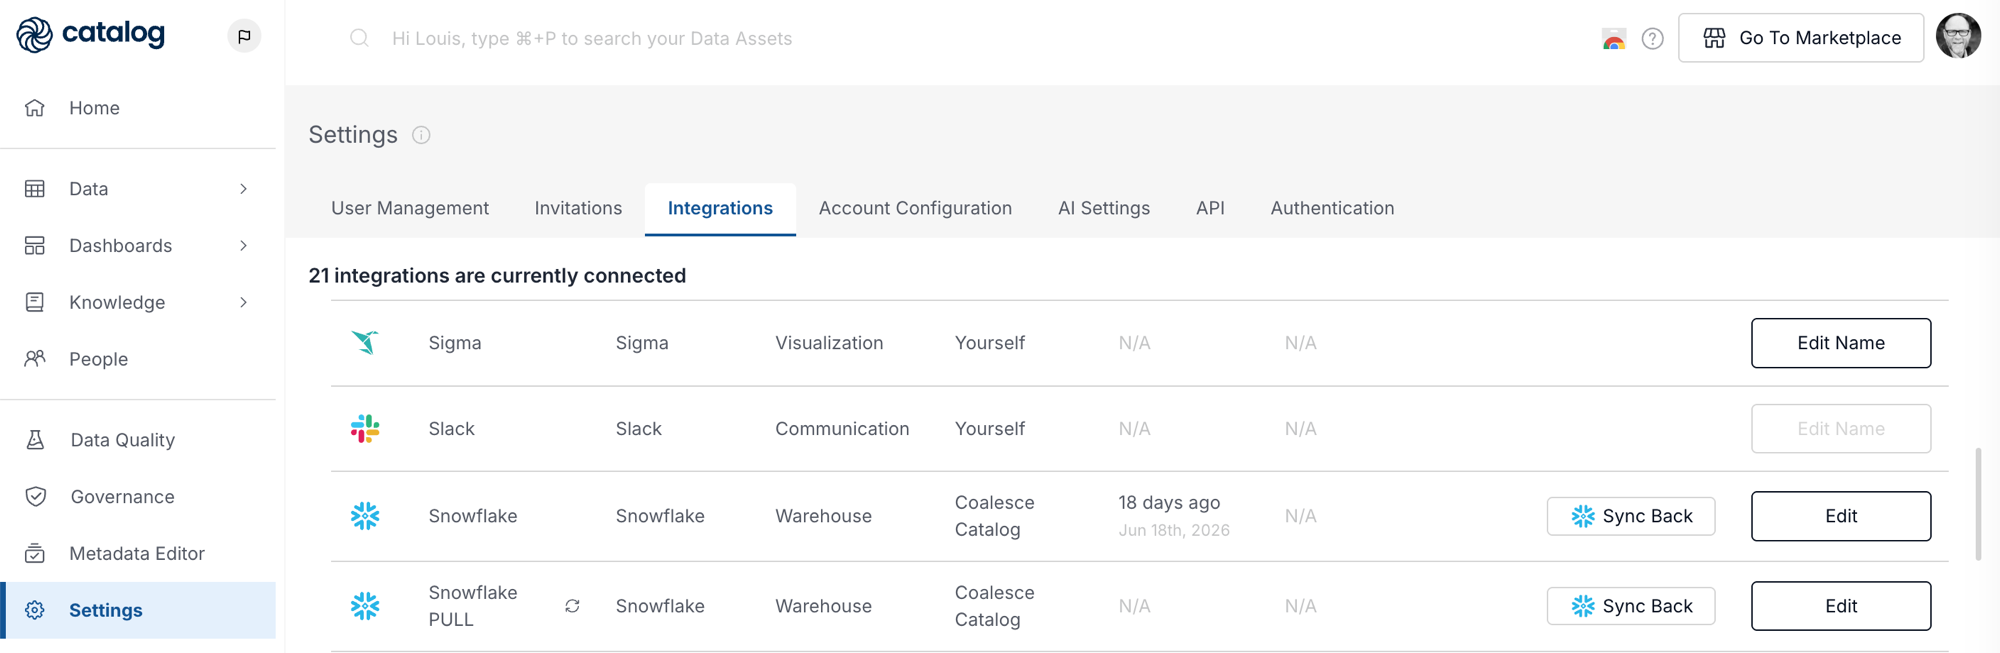
Go to Settings > Integrations.
-
Click the Sync Back button for your Snowflake integration.
-
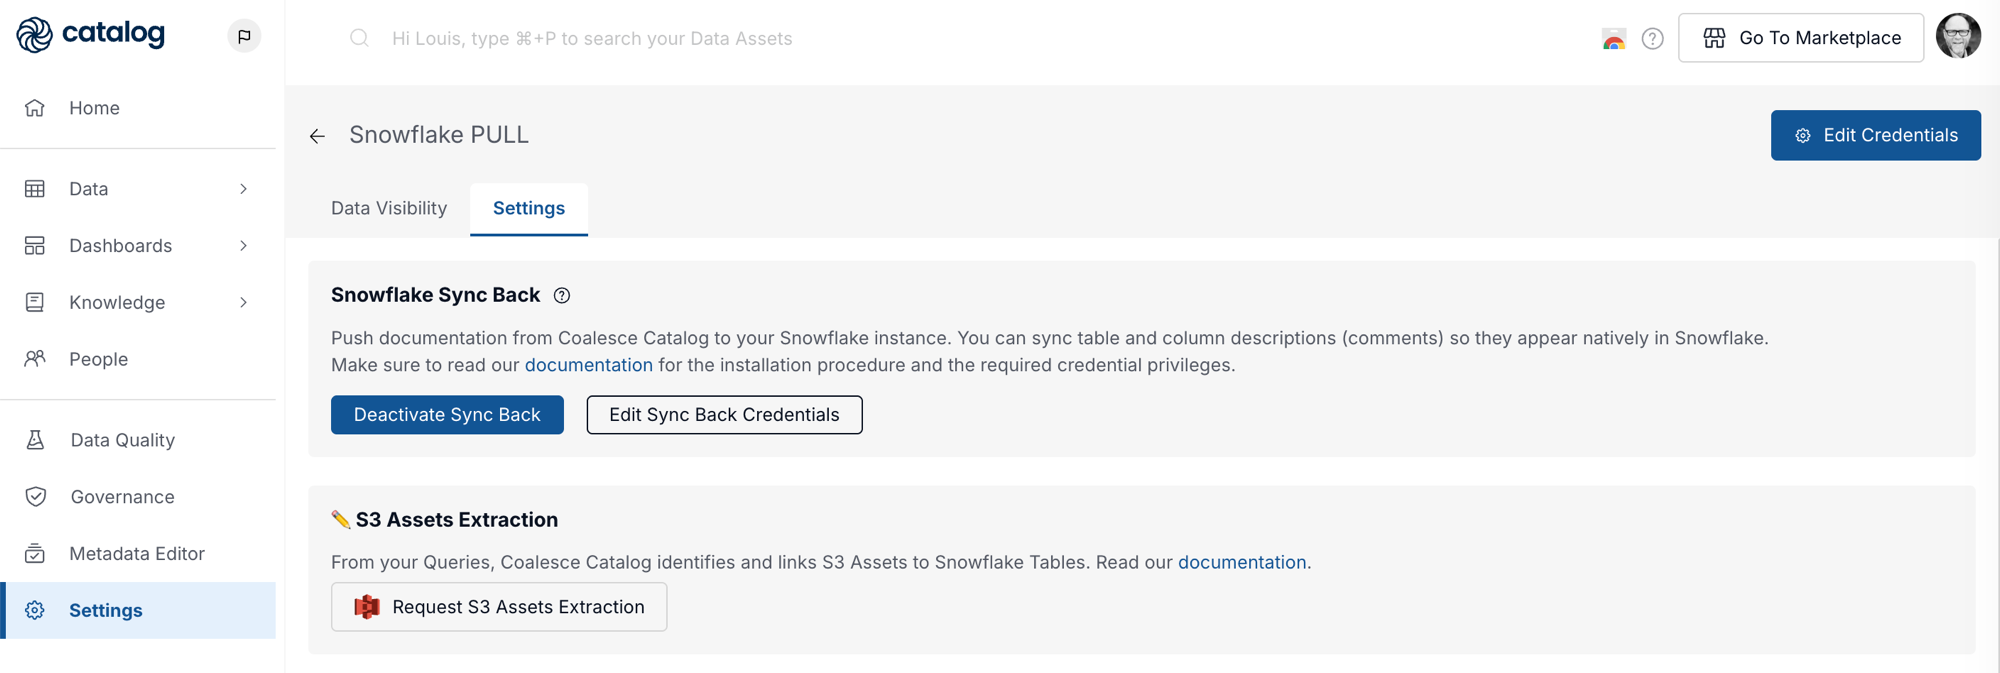
Click the Edit Sync Back Credentials button in the Snowflake Sync Back section.
-
Add the following credentials.
-
Account field: enter the Account Locator of your Snowflake instance. You can find it in either of these ways:
-
From the hostname, AWS Private Link, or Azure Private Link endpoint of your instance (for example
example.us-west-1). -
By running the following query in a Snowflake worksheet:
SELECT t.value:host::string AS hostFROM TABLE(FLATTEN(input => PARSE_JSON(SYSTEM$ALLOWLIST()))) tWHERE t.value:type = 'SNOWFLAKE_DEPLOYMENT';This returns your account hostname, for example
example.eu-west-2.aws.snowflakecomputing.com. Enter only the part before.snowflakecomputing.com, for exampleexample.eu-west-2.aws.
-
-
Username field: enter the
LOGIN_NAMEof the user you created. -
Procedure Path field: paste the path of the procedure you created, for example
CATALOG_UTILS.PUBLIC.CATALOG_SYNC_BACK_DESCRIPTIONSif you did not rename it. -
Private Key field: paste the private key using the following format:
-----BEGIN PRIVATE KEY-----<PRIVATE_KEY>-----END PRIVATE KEY-----
-
Don't add .snowflakecomputing.com in the Account form. Only include the account and region.