Snowflake OAuth
Coalesce supports OAuth authentication with Snowflake. When Snowflake OAuth is enabled, users can authorize their Development credentials using Single Sign-On (SSO) via Snowflake rather than submitting a username and password to Coalesce directly.
OAuth is configured per Environment and Workspace, this allows for the flexibility of different Snowflake accounts per environment and workspace. If your organization uses the same Snowflake account and OAuth configuration for multiple environments, you will need to manually copy your configuration to each environment respectively. Workspaces can be easily duplicated including their settings.
Only a Snowflake ACCOUNTADMIN role or a role with the global CREATE INTEGRATION privilege can create security integrations.
Step 1: Add Your Snowflake Account Identifier
- Follow the instructions in Snowflake for Finding the organization and account name for an account.
- On the Account Details screen, copy the Account/Server URL. You'll need the first part. For example, if your URL is
ABC123-1234567.snowflakecomputing.com, you'll needABC123-1234567.
Step 2: Create a Security Integration in Snowflake
In Snowflake, execute a query to create a security integration to get the CLIENT ID and CLIENT Secret. Please see the complete documentation for this in Snowflake's Create Security Integration documentation. You can find a sample CREATE OR REPLACE security integration query below. Make sure to update your domain.
Replace <COALESCE_APP_DOMAIN> with your Coalesce app domain. For example, app.coalescesoftware.io.
Run the first part of the code, Create Security Integration. Update the OAUTH_REDIRECT_URI to your app URL. Make sure it runs successfully. Then run the second part of the code to get the OAUTH_CLIENT_ID and OAUTH_CLIENT_SECRET.
- Create Security Integration - Run First
- Fetch ClientID and ClientSecret - Run Second
-- Create Security Integration
CREATE OR REPLACE SECURITY INTEGRATION "COALESCE_OAUTH"
ENABLED = TRUE
TYPE = OAUTH
OAUTH_CLIENT = CUSTOM
OAUTH_CLIENT_TYPE = 'CONFIDENTIAL'
OAUTH_REDIRECT_URI = 'https://<COALESCE_APP_DOMAIN>/oauthredirect'
OAUTH_ISSUE_REFRESH_TOKENS = TRUE
OAUTH_REFRESH_TOKEN_VALIDITY = 7776000;
    -- Fetch ClientID and ClientSecret
    WITH INTEGRATION_SECRETS AS (
        SELECT parse_json(system$show_oauth_client_secrets('COALESCE_OAUTH')) AS SECRETS
    )
    SELECT
        SECRETS:"OAUTH_CLIENT_ID"::STRING AS CLIENT_ID,
        SECRETS:"OAUTH_CLIENT_SECRET"::STRING AS CLIENT_SECRET
    FROM
        INTEGRATION_SECRETS;
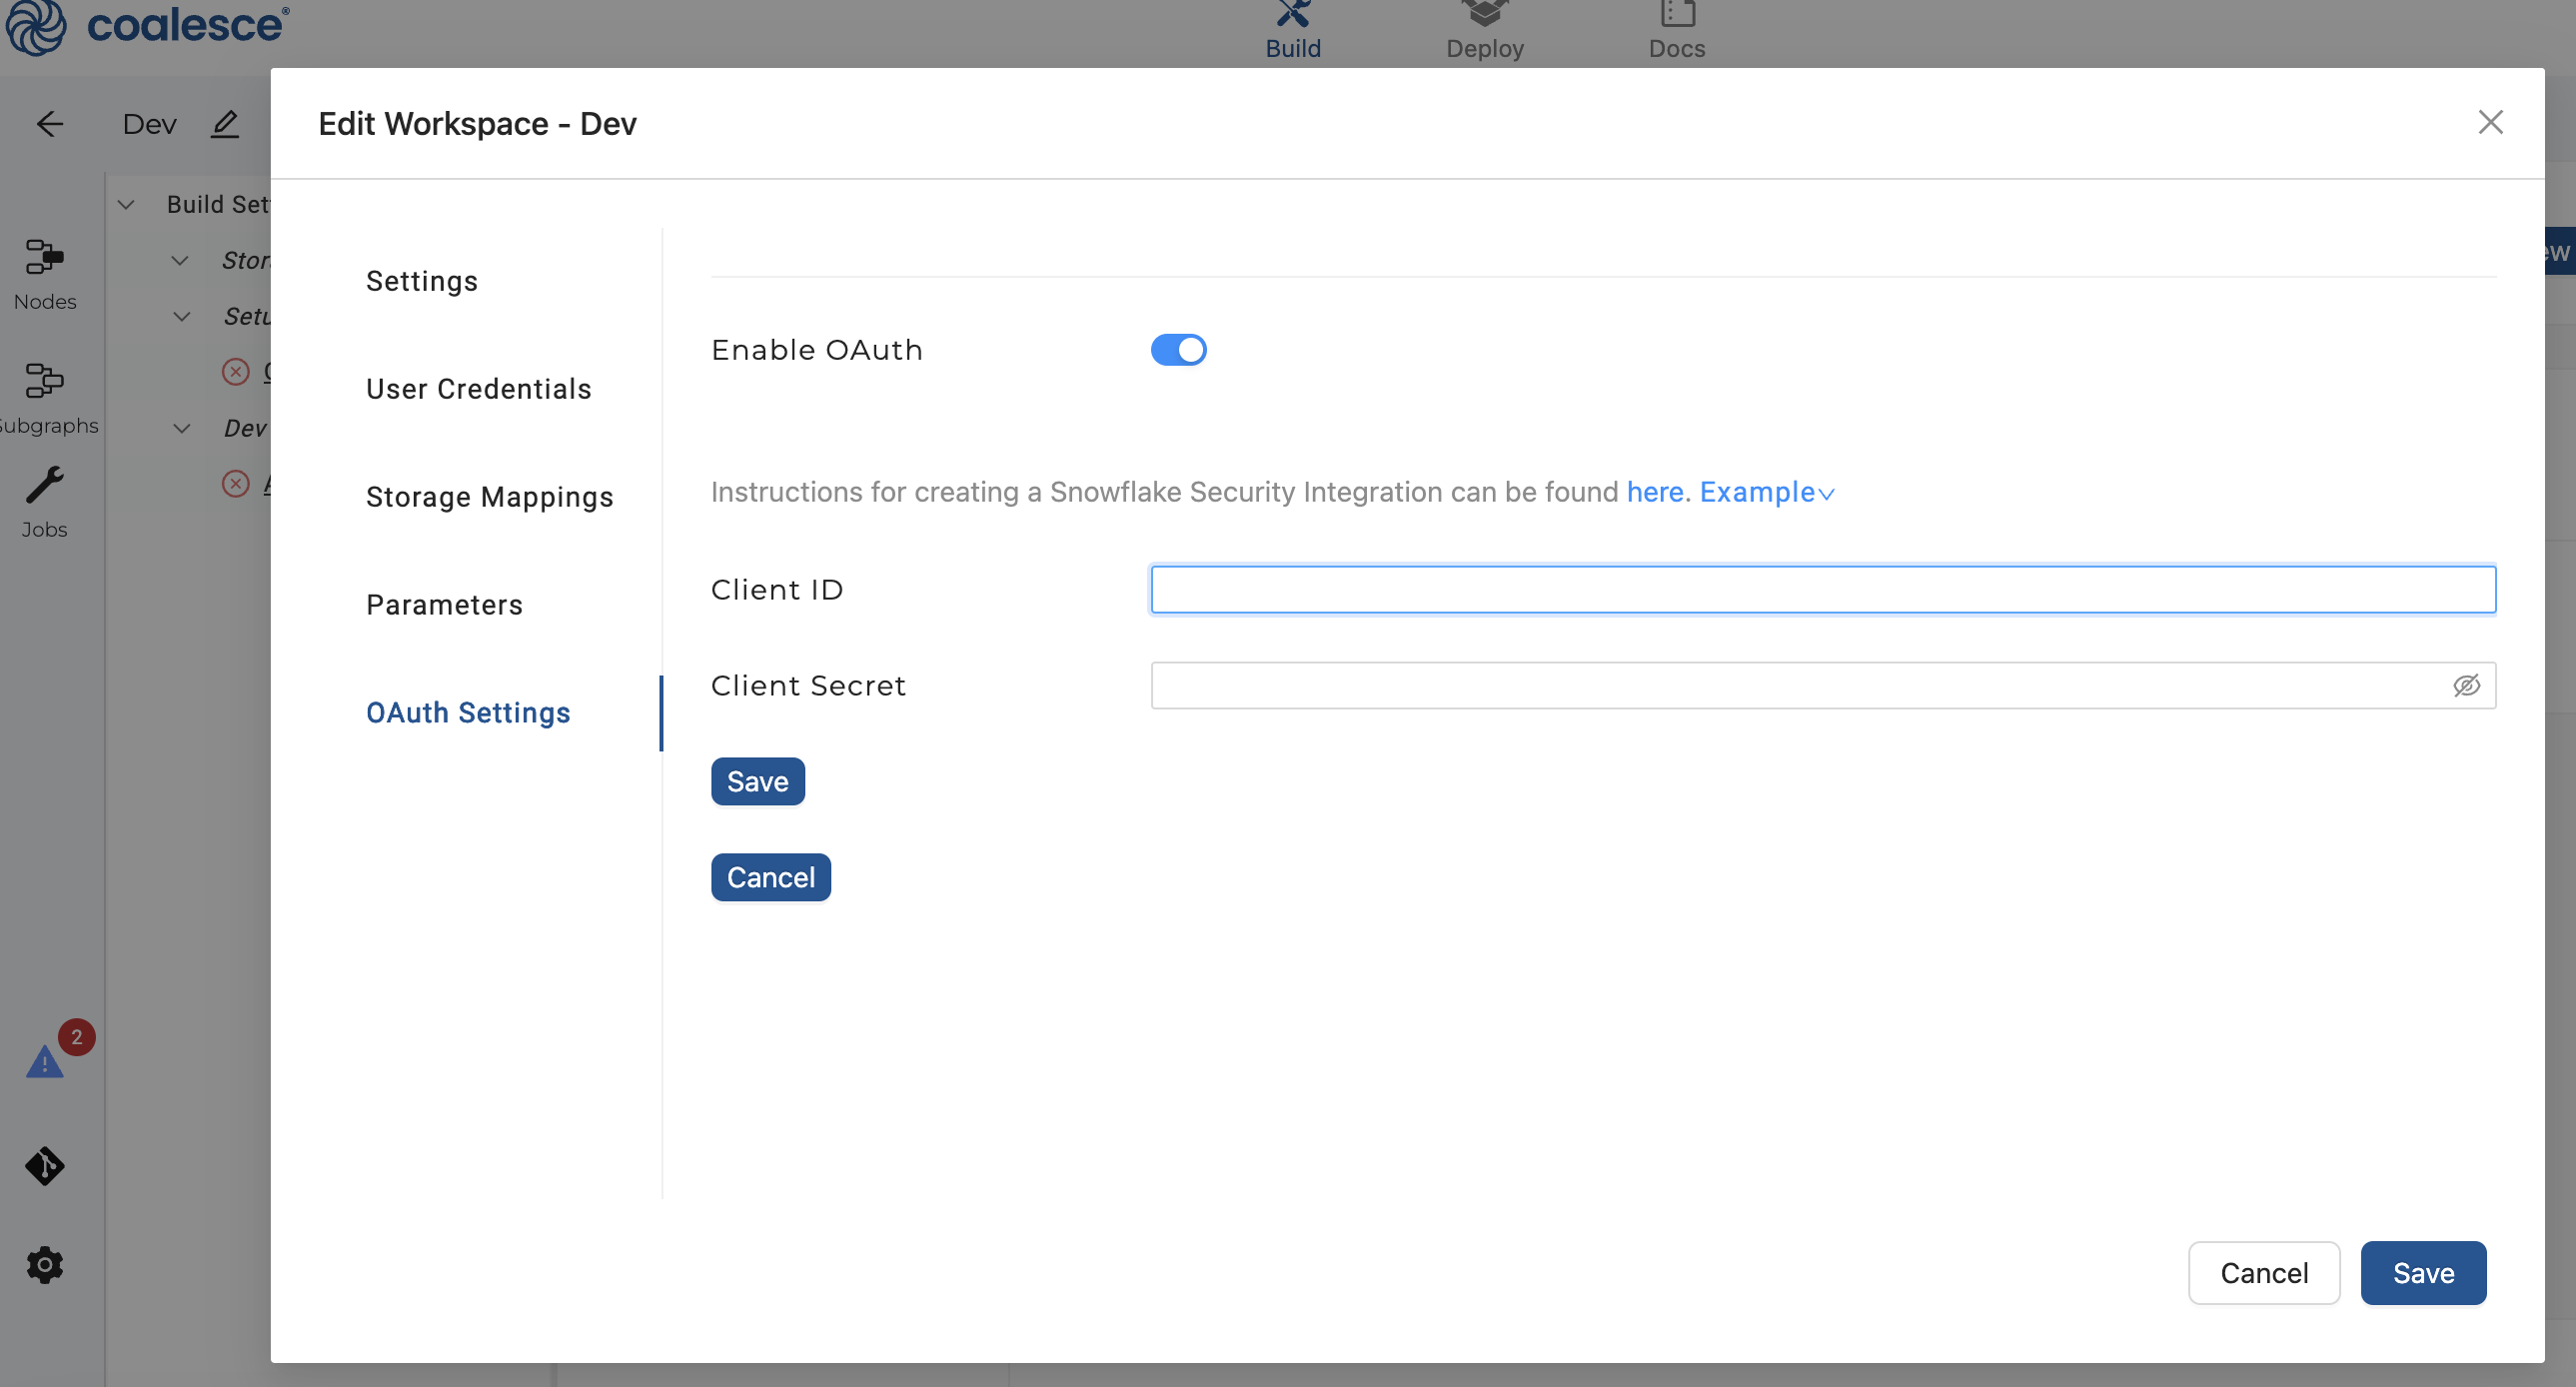
Step 3: Enter the Client ID and Client Secret
As a Coalesce Organization Admin:
- Edit your Workspace or Environment by selecting the cog icon, , next to the Workspace or Environment name.
- Go to OAuth Settings, click Enable OAuth, and click Edit.
- Enter the Client ID and Client Secret. Click Save and then Save again.
If you need to get the values again, you can use the following:
WITH INTEGRATION_SECRETS AS (
  SELECT parse_json(system$show_oauth_client_secrets('COALESCE_OAUTH')) AS SECRETS
)
SELECT
  SECRETS:"OAUTH_CLIENT_ID"::STRING     AS CLIENT_ID,
  SECRETS:"OAUTH_CLIENT_SECRET"::STRING AS CLIENT_SECRET
FROM
  INTEGRATION_SECRETS;
Step 4: Login with Snowflake OAuth
- Go to the Authentication Type, set Authentication Type to Snowflake OAuth.
- Enter desired Role then select Authenticate and follow the directions in the Snowflake OAuth popup. Only certain roles are able to authenticate, review the
BLOCKED_ROLES_LISTin Snowflake OAuth. - Once successfully authenticated, you may input a desired Warehouse, Test Connection, and Save.
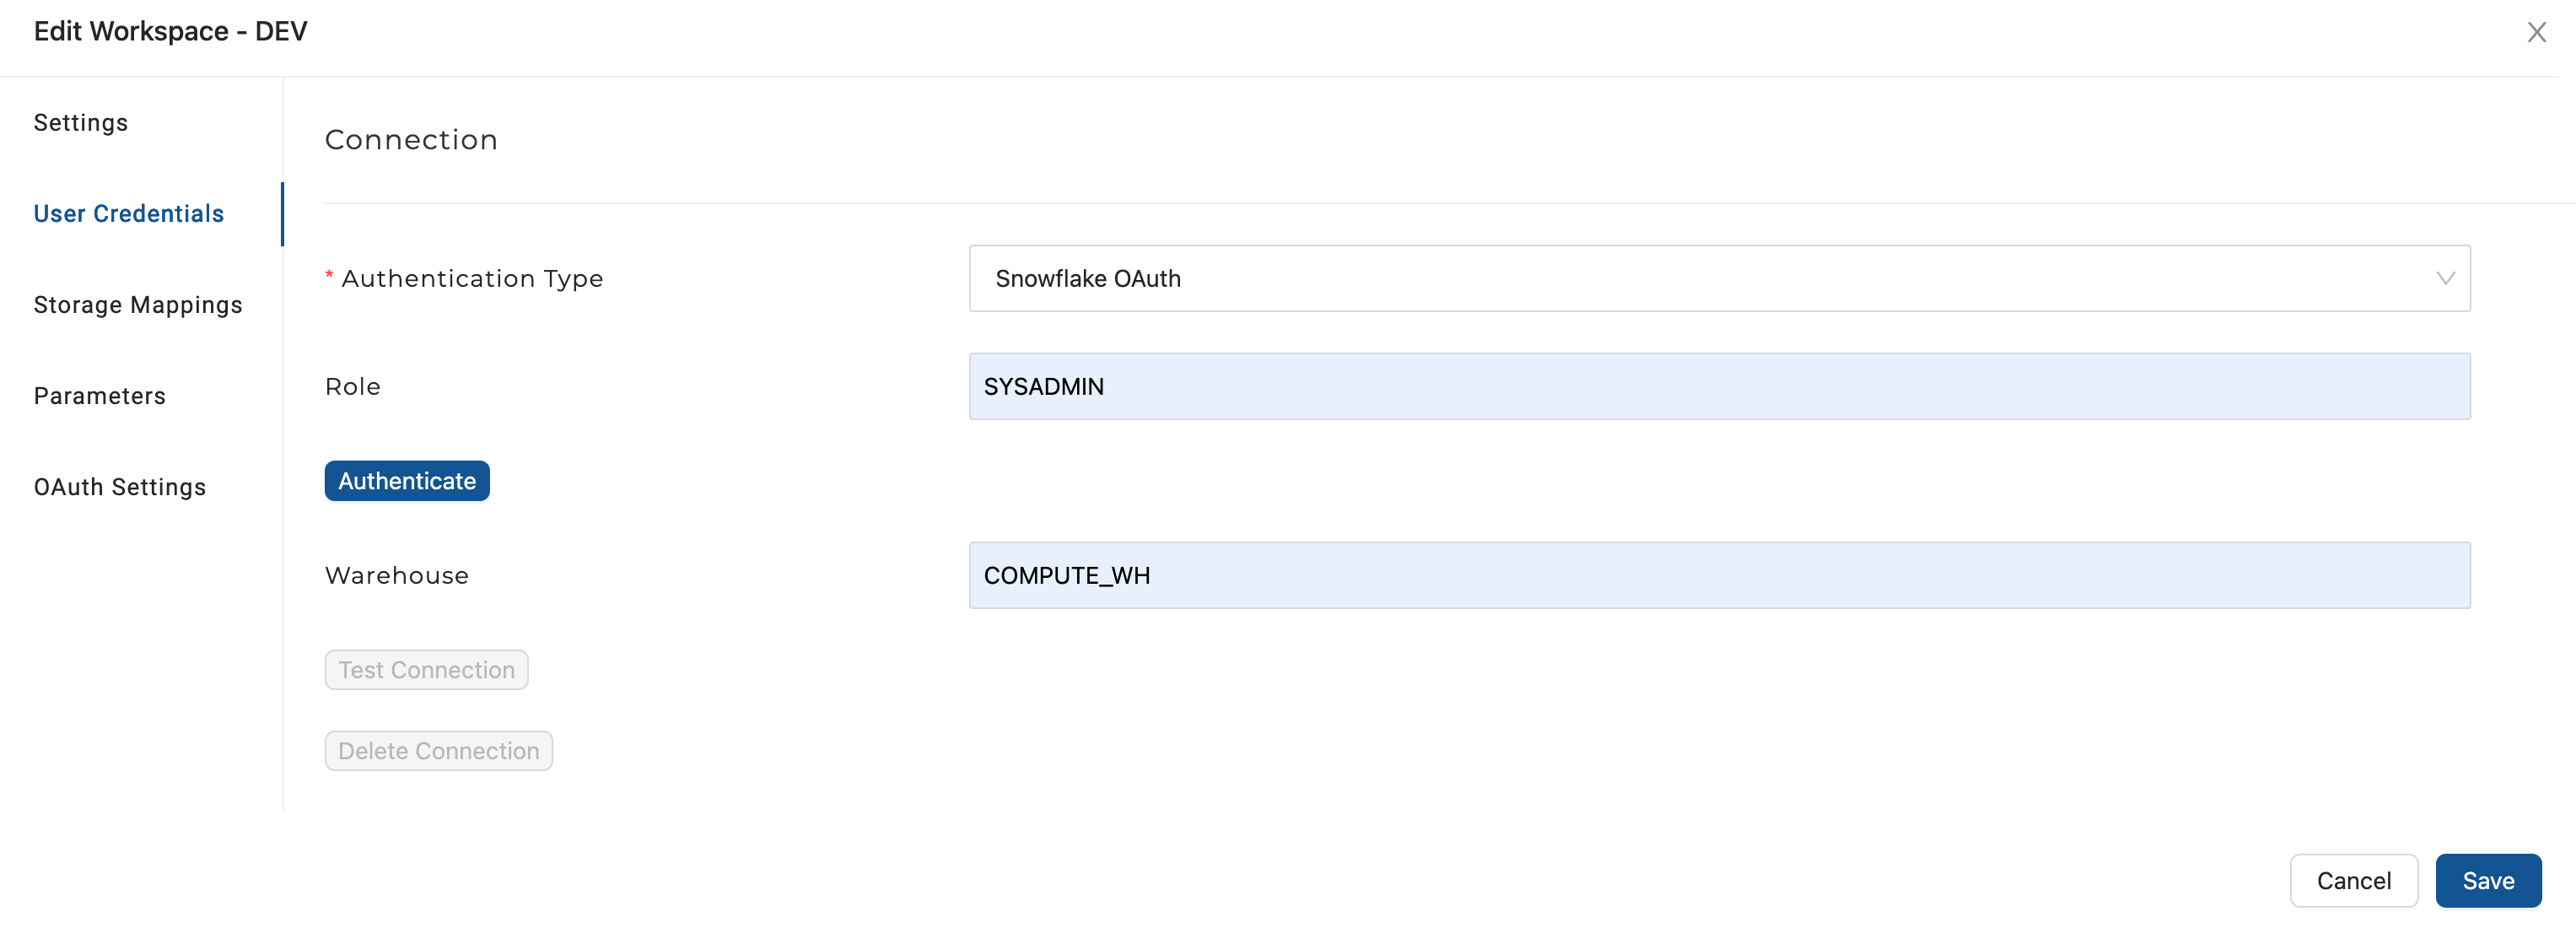
After OAuth has been configured for the desired Coalesce Environment or Workspace, you need to log in using Snowflake OAuth.
Snowflake does not allow login using OAuth while specifying a role of ACCOUNTADMIN for security reasons.
Security Integration Parameters
For more configuration options, see Snowflake's Create Security Integration documentation.
| Parameter | Description |
|---|---|
| ENABLED (Required) | Coalesce requires this field to be set to TRUE to enable Coalesce's Snowflake OAuth support. Enabled specifies whether to initiate operation of the integration or suspend it. Note: Although not required in Snowflake documentation, ENABLED defaults to FALSE. |
| TYPE (Required) | Coalesce requires this field to be set to OAUTH which uses Snowflake OAuth rather than External OAuth. |
| OAUTH_CLIENT (Required) | Coalesce requires this field to be set toCUSTOM. |
| OAUTH_CLIENT_TYPE (Required) | Coalesce requires this field to be set to CONFIDENTIAL. Client type specifies the type of client being registered. Confidential clients can store a secret. They run in a protected area where end users cannot access them. |
| OAUTH_REDIRECT_URI (Required) | Coalesce requires this field to be set to <https://app.coalescesoftware.io/oauthredirect>. Specifies the client URI. After a user is authenticated, the web browser is redirected to this URI. |
| OAUTH_ISSUE_REFRESH_TOKENS | Boolean that specifies whether to allow the client to exchange a refresh token for an access token when the current access token has expired. If set to FALSE, a refresh token is not issued regardless of the integer value set in OAUTH_REFRESH_TOKEN_VALIDITY. User consent is revoked, and the user must confirm authorization again. Default: TRUE |
| OAUTH_REFRESH_TOKEN_VALIDITY | Integer that specifies how long refresh tokens should be valid (in seconds). This can be used to expire the refresh token periodically. Note that OAUTH_ISSUE_REFRESH_TOKENS must be set to TRUE. Use a smaller value to force users to re-authenticate with Snowflake more frequently. Default: 7776000 (90 days) |
OAuth and Snowflake Role
The role will be fixed for each OAuth connection established. If you'd like to change role, you'll need to disconnect, change role, and then reconnect.
SSO OAuth
Once a user has authorized Coalesce with Snowflake using their identity provider, Snowflake will return a Refresh Token to Coalesce. Coalesce is then able to exchange this refresh token for an Access Token which can then be used to open a Snowflake connection and execute queries in Coalesce on behalf of users.
Disabling Snowflake OAuth
To disable Snowflake OAuth, set the ENABLED parameter to FALSE. More details in Snowflake's ALTER SECURITY INTEGRATION.
Disabling OAuth using the Enable OAuth toggle will only prevent new OAuth connections from being created; existing connections will not be affected.
alter integration COALESCE_OAUTH set enabled = false
Removing Snowflake OAuth
To remove the integration you can drop it using the following command, review Snowflake's, Drop Integration. Then you need to delete the configuration settings in Coalesce.
drop integration if exists COALESCE_OAUTH;
MFA Accounts
If you have MFA enabled on your Snowflake account, you should use OAuth authentication.
Troubleshooting
Invalid consent request: When authenticating with Snowflake, OAuth successfully redirects you to the Snowflake login page, but you receive an Invalid consent request error, your Snowflake user may not have access to the Snowflake role configured when authorizing OAuth. Double-check that you have access to that role and if the role name has been correctly entered in as Snowflake is case-sensitive.